
|
|
|
|||||||
 |
| Thread Tools |
 09/01/2007, 04:17 PM
|
#1 |
|
Registered Member
Join Date: Aug 2006
Location: SLO County, CA
Posts: 758
|
Go Ahead for Gravity-Fed Auto-Top-Off Construction NEED RESPONSES NOW!!!
Alright, I have all of my supplies, now I'm ready for construction. My materials are:
2 5g water dispensers(similar design to one in image below) tubing a T-valve superglue Unfortunately, I couldn't find a valve to shut off the water flow during water changes, so I think I'll use a clamp when changing water. My other problem is holding the tubing in place. Should I superglue the tubing to the side of the sump? BTW, I'm removing the nozzles on the dispensers and inserting the tubing into water sealers. Is there anything I need to do that someone needs to point out? 
__________________
I need treefitty. - Loch Ness Monster Current Tank Info: 86g rubble zone w/ seagrass bed biotope |

|

|
|
09/01/2007, 04:36 PM
|
#2 |
|
Registered Member
Join Date: Nov 2006
Location: Maryland
Posts: 2,004
|
run the tubing from the cooler and hook it up to a float valve like this one, http://airwaterice.com/product/FV-14MA252 installed in the sump.
|
|
|
|
|
09/01/2007, 04:37 PM
|
#3 |
|
Registered Member
Join Date: Nov 2006
Location: Maryland
Posts: 2,004
|
run the tubing from the cooler and hook it up to a float valve like this one, http://airwaterice.com/product/FV-14MA252 installed in the sump. I would either drill a hole in the lid and run the hose from there to the float valve or remove the petcock and replace it with a fitting (if the cooler is threaded). Try to avoid drilling holes, just easier for it to leak then.
|
|
|
|
|
09/01/2007, 04:39 PM
|
#4 |
|
Registered Member
Join Date: Nov 2006
Location: Maryland
Posts: 2,004
|
This forum is retarded. If you want the link to the float valve that I tried to post send me a PM.
|
|
|
|
|
09/01/2007, 06:55 PM
|
#5 |
|
Registered Member
Join Date: Aug 2006
Location: SLO County, CA
Posts: 758
|
Wrench, you don't understand what a gravity fed design is.
Anyone else?
__________________
I need treefitty. - Loch Ness Monster Current Tank Info: 86g rubble zone w/ seagrass bed biotope |
|
|
|
|
09/01/2007, 07:16 PM
|
#6 |
|
Registered Member
Join Date: Nov 2006
Location: Maryland
Posts: 2,004
|
I thought it was when the reservoir was higher than the sump, eliminating the need for a pump. Guess I stand corrected. Enlighten me....
|
|
|
|
|
09/01/2007, 07:21 PM
|
#7 |
|
Registered Member
Join Date: Oct 2005
Posts: 198
|
Wrench no need to be enlightened, that is exaclty what it is (I know, you knew that though). I also would think gravity fed is pretty um, well straight forward.
__________________
Dan 90 gallon brace-less trim-less external over flow |
|
|
|
|
09/01/2007, 07:27 PM
|
#8 | |
|
Hermit
Join Date: Jul 2005
Location: Mountains of Boulder County.
Posts: 2,289
|
Quote:

__________________
Stay fishy my friends. Current Tank Info: 300 gallon built in plumbed to the basement. 30 gallon surge for flow, GEO protein skimmer, litermeter 3's for continuous water change (1 gallon per day), calc reactors, kalk reactors, 600w MHx2, 6" DSB, 1000 lbs of live rock (300 display, 700 sump) |
|
|
|
|
|
09/01/2007, 07:56 PM
|
#9 | |
|
Registered Member
Join Date: Nov 2006
Location: Maryland
Posts: 2,004
|
Quote:
|
|
|
|
|
|
09/01/2007, 09:38 PM
|
#10 |
|
Registered Member
Join Date: Aug 2006
Location: SLO County, CA
Posts: 758
|
Sorry. I was in a rush when I typed that. You're right, for the most part, Wrench, except that you don't need a ball valve.
I've seen sites that say you need a ball valve, but it's actually completely unnecessary. When the water level gets up to the tubing, the water can't flow in. It needs more pressure. But really, how should I attach the tubing to the sump? Would putting a zip tie around it and then glueing the zip tie to the sump work?
__________________
I need treefitty. - Loch Ness Monster Current Tank Info: 86g rubble zone w/ seagrass bed biotope |
|
|
|
|
09/01/2007, 09:42 PM
|
#11 |
|
Registered Member
Join Date: Nov 2006
Location: Maryland
Posts: 2,004
|
float valve, not ball valve. To only allow water to enter the sump when the level is low.
|
|
|
|
|
09/01/2007, 09:45 PM
|
#12 |
|
Registered Member
Join Date: Aug 2006
Location: SLO County, CA
Posts: 758
|
Either way, you don't need a valve to keep the water level stable.
__________________
I need treefitty. - Loch Ness Monster Current Tank Info: 86g rubble zone w/ seagrass bed biotope |
|
|
|
|
09/01/2007, 10:14 PM
|
#13 |
|
crabby hermit
 Join Date: Jul 2004
Location: somewhere at the end of the rainbow
Posts: 1,363
|
If you want to do it without a float valve, I'd copy this design. You might need a second set of tubing/airline to let air in. Are those Gatorade containers airtight? 'Cause if they're not, it'll still siphon.
Spleen
__________________
Spleen "Put that in your Mag Drive and smoke it." - jnarowe "Beware of the banter" - mpoletti "Now I know that some things are just out of our control and we should enjoy the good parts as much as we can." - pookstreet |
|
|
|
|
09/02/2007, 05:37 AM
|
#14 |
|
Registered Member

Join Date: Jun 2007
Location: Melbourne Australia
Posts: 384
|
Why not just setup the gravity fed top-off with air-line tubing and a valve? I use a 25 litre container that is filled with ro and situated higher than my sump, and I have air-line tubing running to my sump where it passes through my kalk reactor. At a point on the airline tubing, just before the kalk reactor, I have a hospital type drip wheel valve that I can accurately control the dripping of the ro to the sump. This works really well and cost me about $5 for the tubing. I got the valve from my workplace (after being used and discarded).
|
|
|
|
|
09/02/2007, 07:48 AM
|
#15 |
|
RC Mod
|
Hey RA, This is mine. The drip is controled be a dpipper from an IV bottle. Mine is siphon but should work from gravity also. PM me if you need any info.

__________________
Jesse I'm not saying I'm Batman. I'm just saying nobody has ever seen me and Batman in a room together. |
|
|
|
|
09/02/2007, 08:17 AM
|
#16 |
|
Registered Member
Join Date: Feb 2004
Location: Pensacola, FL
Posts: 360
|
Random Aquarist, I am not sure that anyone but spleen knew whatyou were talking about. I am assuming that much by your responses.
The system you are wanting to use has two lines. The first is a siphon from the bottom of the supply tank to the sump. The second (control line) is a line from the top of the supply container (ie above high water) that extends to the elevation in the sump at which you want to keep the water. If the sump is below the end of the control line, the siphon is allowed to flow since air can enter the supply tank. When the sump level reaches the end of the control line the siphon is suspended since no air can enter the supply tank. As spleen indicated the tank has to be absolutely air tight. As far as mounting the control line, I would glue a bracket to the inside of the sump and use an hard section of tubing held in place on the bracket by tubing sleeves above and below. This will allow you to slide it up and down easily but will hold it in place. Attach the flexible tubing from the tank to the top of the hard tube. |
|
|
|
|
09/02/2007, 09:50 AM
|
#17 |
|
Registered Member
Join Date: Aug 2006
Location: SLO County, CA
Posts: 758
|
Okay. There was a bit of misunderstanding on my part. I thought I heard somewhere that you don't need a float valve because once the water level reaches the end of the tubing, the water can't flow in anymore.
I'll go buy a float valve today. Where can I buy a float valve for 1/2" tubing? When I went to Home Depot, all I could find were PVC valves. spleen, I don't know if the Gatorade containers are airtight. I don't have Gatorade containers, I just used that picture so you could have an idea of what my containers looked like. Wrench, I'm very sorry. I typed that post in literally 5 seconds because I was in such a hurry. If I had had the time, I would've worded it a lot differently. You were completely right about the float valve thing too.
__________________
I need treefitty. - Loch Ness Monster Current Tank Info: 86g rubble zone w/ seagrass bed biotope Last edited by Random Aquarist; 09/02/2007 at 09:58 AM. |
|
|
|
|
09/02/2007, 11:10 AM
|
#18 |
|
Occupy Reef Central
Join Date: Jun 2004
Location: Orbiting
Posts: 4,141
|
You don't need a float valve, but you do need a ball valve. That's how I have mine set up anyway. The jug is above the water line in the sump, and a 3/4" pvc pipe with a ball valve on the end runs into the sump (the ball valve is needed when you fill the jug). That's it. Just be sure everything is water tight and rigid. You can't have any flex, as the system is under negative pressure and will collapse.
Edit: You can use flexible tubing if you do the dual line method (one line for feeding water, the other to equalize pressure in the jug), but I had problems with the tubing pinching that way.
__________________
Time flies like an arrow. Fruit flies like bananas. Current Tank Info: 78"x36"x27" acrylic, 6 Orphek Atlantik V3+ Compacts, MRC Orca Pro II w/washdown, CalcFeeder Pro AC3, Emperor Aquatics 80w UV, 80/20 aluminum stand, Vortech MP60's, Theiling Rollermat, GHL Profilux 3.1T EX, Kessil H380 |
|
|
|
|
09/02/2007, 09:00 PM
|
#19 |
|
Registered Member
Join Date: May 2007
Location: Sandusky, OH
Posts: 251
|
Everyone is over-thinking this IMO! I have a gravity-fed ATO that runs flawlessly, and all I used was some airline tubing, silicone sealer, a rubber stopper, and some velcro ties.
As mentioned previously, the container must be 100% airtight (and this includes while under vacuum pressure, because it'll be under negative pressure at all times). Silicone seal the airline tubing onto the spigot of the container, and then silicone another airline tube to a hole in the lid. I'm assuming you have other things in your sump, ie: skimmer, return pump, baffles, etc. Just velcro tie the intake tube to something that's currently in your sump (trial and error to find the right height), and hang the outlet tube over the edge of the sump (make sure it's not below the water level). That project shouldn't take more than an hour, provided it's airtight. |
|
|
|
|
09/02/2007, 11:49 PM
|
#20 |
|
Registered Member
Join Date: Jun 2007
Posts: 117
|
so why the rubber stopper?
__________________
It takes 42 muscles to frown.-- But only 18 to reach out and slap whoever it was that made you mad |
|
|
|
|
09/03/2007, 01:37 AM
|
#21 | |
|
Premium Member
Join Date: Aug 2007
Location: Fishers, IN, USA
Posts: 1,169
|
Quote:
Just my two cented flamebait.
__________________
-Chris Current Tank Info: 70G Reef (Aug 2007), 45G Reef (Dec 2007) |
|
|
|
|
|
09/03/2007, 08:15 AM
|
#22 |
|
Registered Member
Join Date: May 2007
Location: Sandusky, OH
Posts: 251
|
so why the rubber stopper?
Sorry, I forgot that part. I also silicone sealed the lid to the container to make it airtight, so I had a drill a hole in the lid for refilling. The large rubber stopper was for the refilling hole. |
|
|
|
|
09/03/2007, 09:53 AM
|
#23 |
|
Occupy Reef Central
Join Date: Jun 2004
Location: Orbiting
Posts: 4,141
|
Here are some photos. Float valves are nice too, but I like that this thing is fool proof.
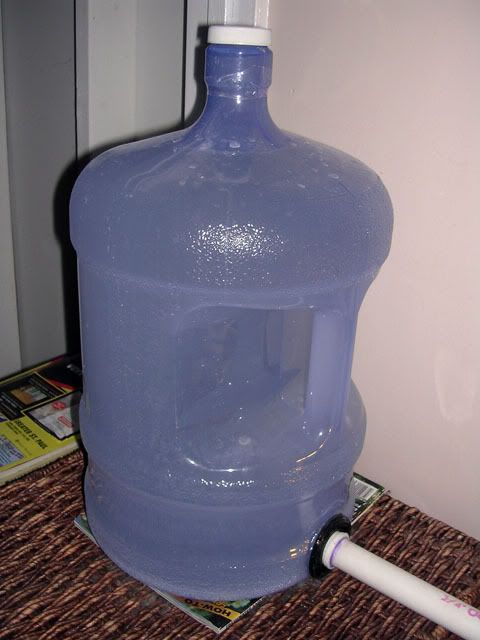 The black ring is a uniseal. 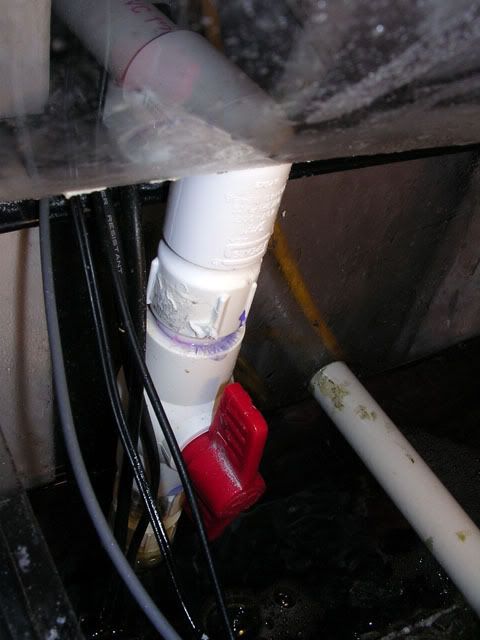 This photo shows how the end goes into the sump.
__________________
Time flies like an arrow. Fruit flies like bananas. Current Tank Info: 78"x36"x27" acrylic, 6 Orphek Atlantik V3+ Compacts, MRC Orca Pro II w/washdown, CalcFeeder Pro AC3, Emperor Aquatics 80w UV, 80/20 aluminum stand, Vortech MP60's, Theiling Rollermat, GHL Profilux 3.1T EX, Kessil H380 |
|
|
|
|
|
|


