
|
|
 04/02/2009, 06:29 PM
|
#1 |
|
Registered Member
Join Date: Feb 2008
Location: Toronto Canada
Posts: 91
|
my first reef
well its been a year of research and 8 months of gathering parts and finaly i can say my plumbing is done heres some pics
any comments would be great 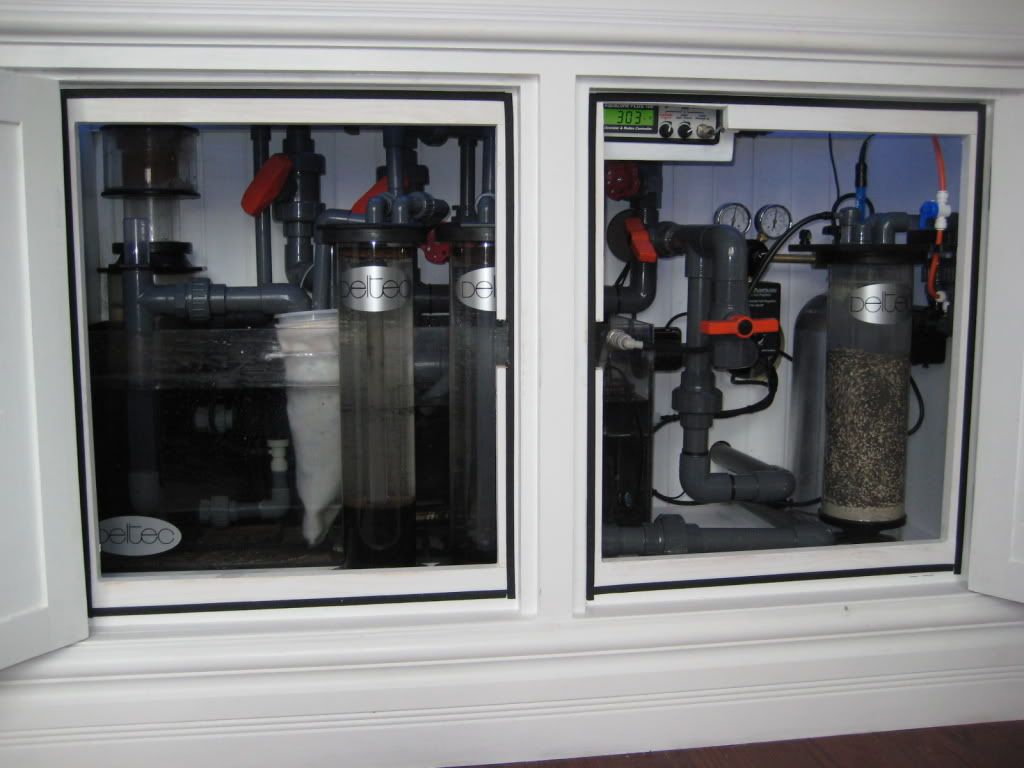 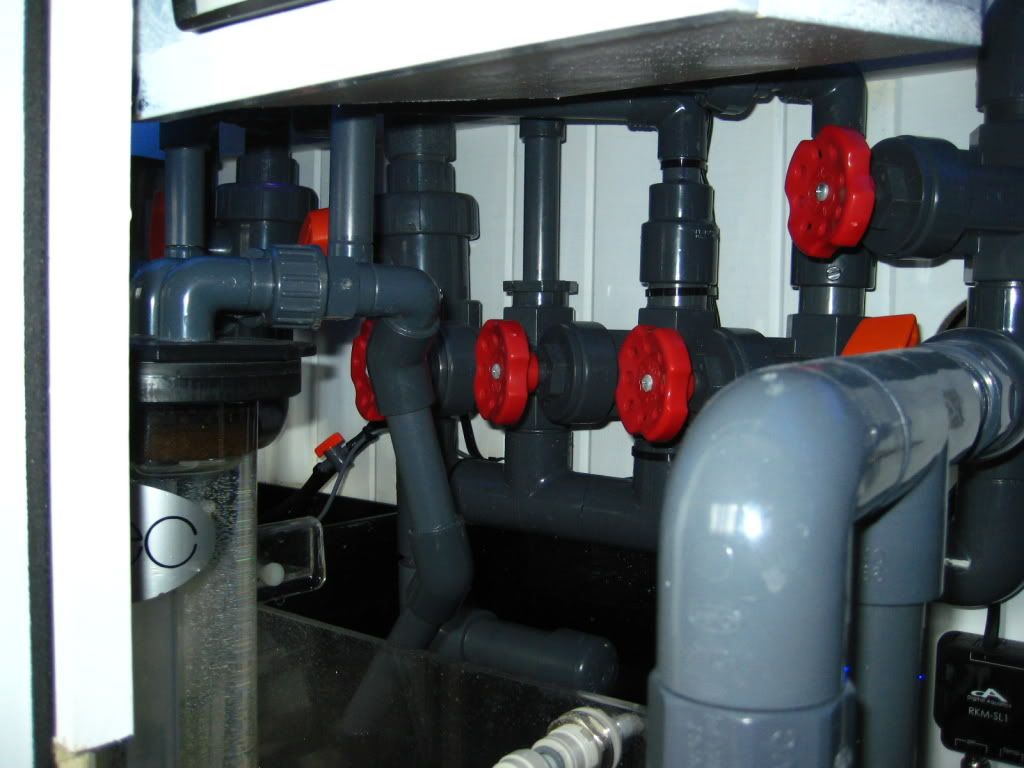 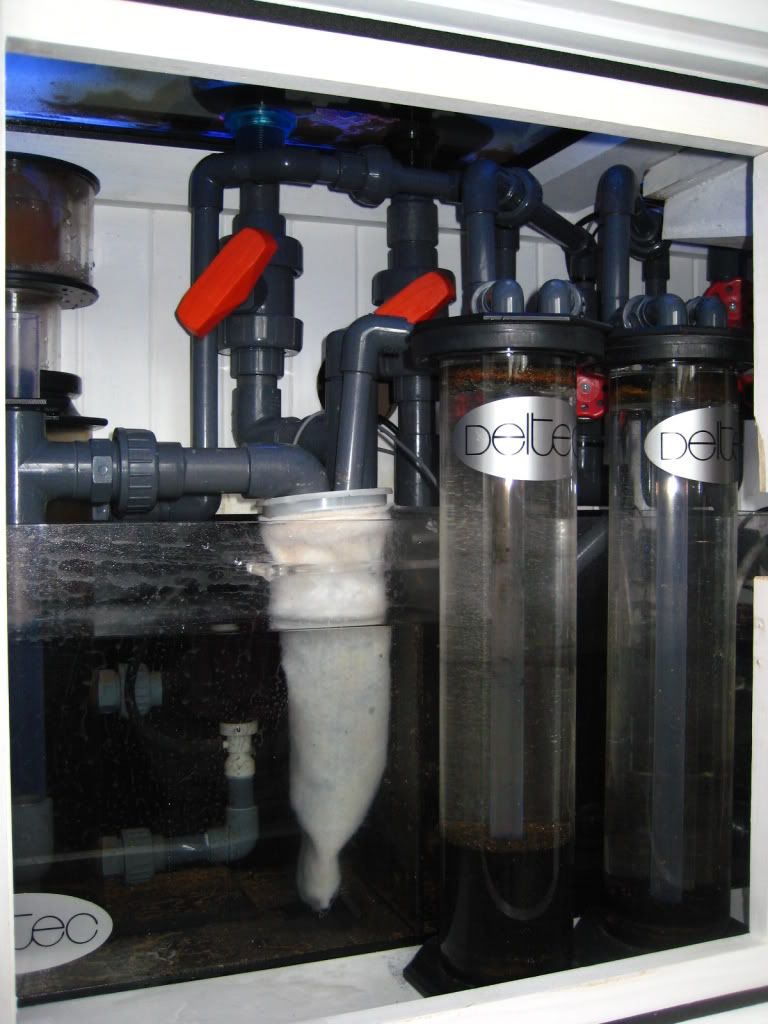 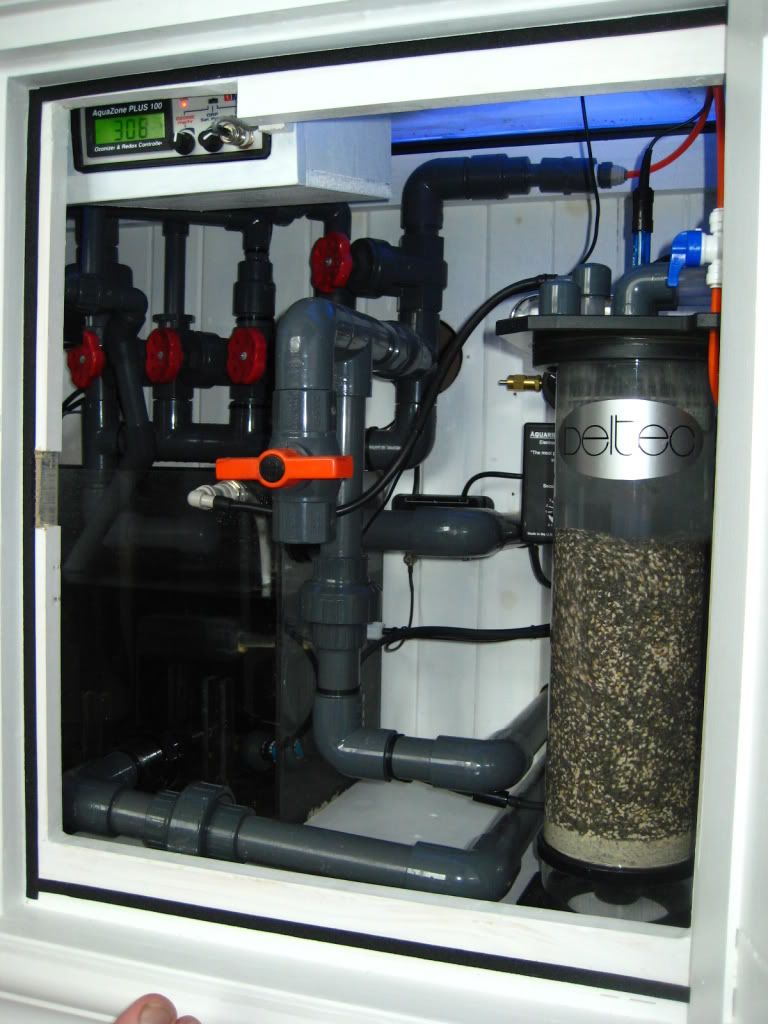 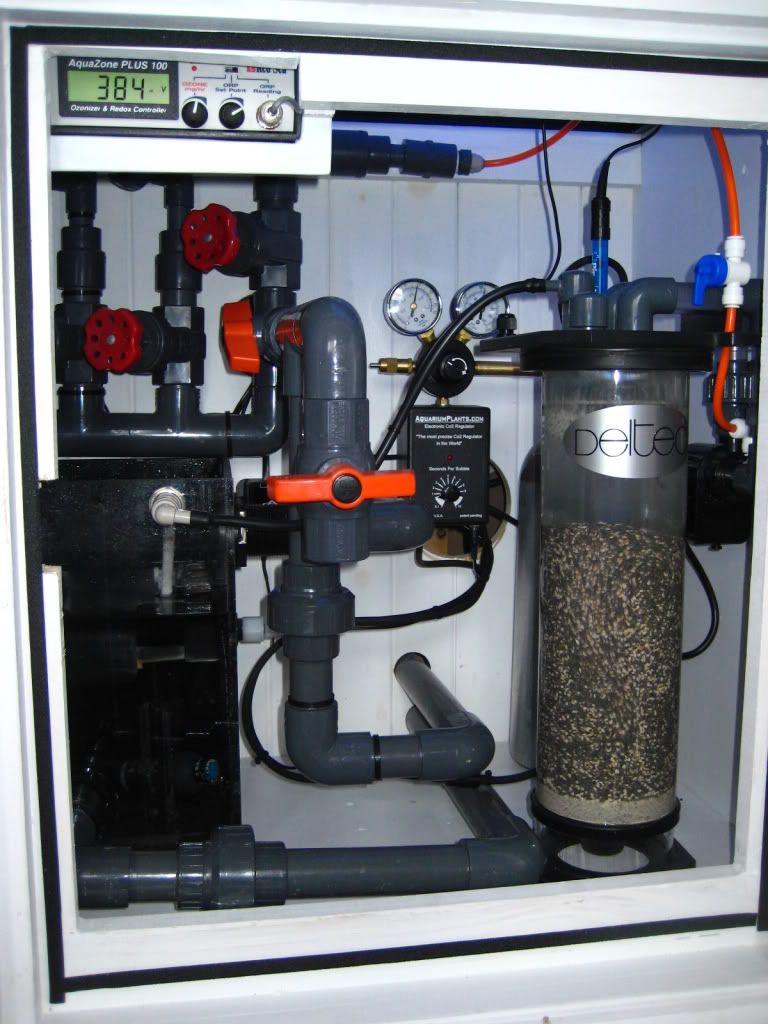 and my unfinshed stand 
|

|

|
|
04/02/2009, 06:34 PM
|
#2 |
|
Registered Member
Join Date: Aug 2008
Location: Delaware
Posts: 1,028
|
Wow!
 Great job on the plumbing. Looks very neat and tidy. The cabinetry is fab from what I can see. I'd like to see more pictures of the display. Great job on the plumbing. Looks very neat and tidy. The cabinetry is fab from what I can see. I'd like to see more pictures of the display.Great job! Your work? |
|
|
|
|
04/02/2009, 06:40 PM
|
#3 |
|
Registered Member
Join Date: Apr 2006
Location: Brandywine, MD
Posts: 230
|
Looking really good! Everything looks nice and clean.
__________________
Mike Current Tank Info: 210 gal, 75 gal Sump/Refugium, MSX300a Skimmer, 4 AI SOL Blues |
|
|
|
|
04/02/2009, 06:44 PM
|
#4 |
|
Registered Member
Join Date: Jun 2006
Location: St Louis MO
Posts: 4,222
|
I hate you.
JK. If that is your first atempt. It is amazing!
__________________
$35-50 for a <1" frag of some stupid named thing that came from a colony you bought for $40-60 wholesale and chopped into 20-40 pieces? No thanks. "JasonH" Current Tank Info: 125 aggressive reef, DIY led lighting, swc cone skimmer, 33 gallon sump, posiden Ps3 return. |
|
|
|
|
04/02/2009, 07:03 PM
|
#5 |
|
Registered Member
Join Date: Nov 2006
Location: Seattle
Posts: 231
|
I like the tank but I like the workmanship you put into the plumbing more good job!

|
|
|
|
|
04/02/2009, 07:22 PM
|
#6 |
|
Registered Member
Join Date: Sep 2008
Location: Ruidoso, NM
Posts: 263
|
I would add a few more shutoff valves if I where you! Just kidding, looks great.
|
|
|
|
|
04/02/2009, 07:27 PM
|
#7 |
|
Registered Member
Join Date: Feb 2008
Location: Toronto Canada
Posts: 91
|
thanks everyone ya i realy took my time wiht my plumbing i hate messy workmanship i wanted to make sure everthing was easy to reach and service
|
|
|
|
|
04/02/2009, 08:31 PM
|
#8 |
|
Registered Member

Join Date: Nov 2006
Location: richboro
Posts: 313
|
I love the small side window, plumbing looks like a nuclear submarine or something. I like it.
|
|
|
|
|
04/02/2009, 08:42 PM
|
#9 |
|
Premium Member
 Join Date: May 2003
Location: Granville, Ohio
Posts: 5,006
|
Very nice, and I like the fact that you used all grey PVC.
__________________
~~~Having a high post count doesn't automatically give you a high reefing IQ.~~~ |
|
|
|
|
04/02/2009, 08:54 PM
|
#10 |
|
Team RC Member
Join Date: Jul 2006
Location: STL
Posts: 14,754
|
Nice work on the plumbing.
 Can you hook me up with your supplier that got you those gate valves. Can you hook me up with your supplier that got you those gate valves.  Looks amazing. Loving the trim detail on the display too. Looks amazing. Loving the trim detail on the display too.
__________________
-Brett 180g Marineland Starfire In-Wall 278 gallon system |
|
|
|
|
04/02/2009, 10:11 PM
|
#11 |
|
Registered Member
Join Date: Jul 2006
Location: Charlotte, NC
Posts: 782
|
i usually skip threads with similar titles... the results typically reinforce the title... this is one thread im glad i clicked on... the equipment and attention to detail in setting the system up is very impressive! great job
|
|
|
|
|
04/02/2009, 10:21 PM
|
#12 |
|
Registered Member
Join Date: Feb 2008
Location: Ballarat, Australia
Posts: 50
|
Well you're definately headed in the right direction. Very clean under the tank.
__________________
"Here's to Swimmin' with Bow-Leged Women" Current Tank Info: 180 gallon in progress |
|
|
|
|
04/02/2009, 10:58 PM
|
#13 |
|
Registered Member
Join Date: Sep 2007
Location: Flagstaff, AZ
Posts: 2,409
|
The plumbing looks really clean and well thought out -- the only thing I see is your ball valve pointing straight down with nothing under it:
I assume the intent is to make water changes easier, but IMO that is a recipe for disaster when that ball valve gives way, or you/someone taking care of the tank leaves it open even a little bit. I do think that rock pile is going to look sweet once things really start growing on it, and the cabinetry is really nice looking too
__________________
Owen Professional Bacteria Geek "Ree... cy... cling?" "One day it's a bowl full of cherries, one night I'm suckin' on lemons and spittin' out the seeds" Current Tank Info: 90 gallon tall reef |
|
|
|
|
04/02/2009, 11:15 PM
|
#14 |
|
Registered Member
Join Date: May 2007
Location: California
Posts: 3,031
|
What would you recommend he do differently OwenInAZ? I can't imagine a ball valve giving out unless it's not glued in.
__________________
-Eric Sutter Current Tank Info: 14g Biocube |
|
|
|
|
04/02/2009, 11:22 PM
|
#15 |
|
Registered Member
Join Date: Nov 2006
Location: Seattle
Posts: 231
|
PVC Schedule 80 ball valve = No Problems
|
|
|
|
|
04/03/2009, 06:59 AM
|
#16 |
|
Registered Member
Join Date: Sep 2007
Location: Collierville, Tennessee
Posts: 302
|
First reef? Hella nice job!
__________________
Thank you. Drive Thru! Current Tank Info: 180G - See my Gallery |
|
|
|
|
04/03/2009, 07:15 AM
|
#17 |
|
Registered Member
Join Date: Feb 2008
Location: Toronto Canada
Posts: 91
|
that valve is a extra for who knows i also use it for water changes to drain my sump i may just end up looping it back in the the first section of my sump to keep debris floating
thanks for all the great comments i wouldnt have done this good with out RC it has realy helped me do things right the first time!!! and im still learning little tricks all the time the gate valves came from just a online hardware store dam i forget now but i beleve marinedepot sells the same brand |
|
|
|
|
04/03/2009, 07:23 AM
|
#18 |
|
Registered Member

Join Date: Mar 2008
Location: michigan
Posts: 1,015
|
awesome job on the plumbing and woodwork. love the look of the sch 80 fittings and pipe. i don't even want to look at my plumbing and sump area after seeing such an organized system!
how do you like your ati power module? i am so itching to switch to t-5's.
__________________
mac Current Tank Info: 70gal sps reef (36x24x20), 50g sump, 25g refugium, vertex alpha cone 170, 2 x 250w 14k phoenix w/ lumenmax 3's, 2 vortech mp40w's, eheim 1262 return pump |
|
|
|
|
04/03/2009, 08:39 AM
|
#19 |
|
Registered Member
Join Date: Jun 2008
Location: Sacramento, CA
Posts: 1,136
|
I wish my first reef was that well thought out, nice work!
__________________
Justin |
|
|
|
|
04/03/2009, 08:47 AM
|
#20 |
|
Reef Custodian
Join Date: Jan 2004
Location: FL.
Posts: 954
|
I can see the pic's i dont know why any ideas?
__________________
Stromalitic cyanobacteria!... Gather. An entire ecosystem contained in one infinitesimal speck. |
|
|
|
|
04/03/2009, 09:29 AM
|
#21 |
|
Registered Member
Join Date: Feb 2007
Location: Derby CT
Posts: 2,861
|
Yeah that is a great setup I only can wish under my tank looks half as neat. Good luck with everything
|
|
|
|
|
04/03/2009, 09:33 AM
|
#22 | |
|
Registered Member
Join Date: Sep 2007
Location: Flagstaff, AZ
Posts: 2,409
|
Quote:
My philosophy is just to keep things simple, and to have multiple redundancies built into the system in case something gives out. For example, the sump should be able to hold all the water that backflows out of the tank during a power outage -- to make sure that happens, the return is placed high in the tank with several break holes drilled. In that one example there are three points of redundancy to prevent water on the floor. Just saying "it's schedule 80, it won't be a problem," to me, is an unacceptably high amount of risk considering the investment we make in the tank and the potential damage to a home. I don't know if that ball valve *will* go out, but to me that's a huge failure point in what appears to be an otherwise strong system, and as we know in this hobby if something can go wrong it generally will at some point
__________________
Owen Professional Bacteria Geek "Ree... cy... cling?" "One day it's a bowl full of cherries, one night I'm suckin' on lemons and spittin' out the seeds" Current Tank Info: 90 gallon tall reef |
|
|
|
|
|
04/03/2009, 09:35 AM
|
#23 |
|
Registered Member.
Join Date: Jan 2002
Location: Murfreesboro, TN
Posts: 1,566
|
Looks like you Did your Homework
 Nice job!!! Nice job!!!
__________________
Rick --::-- Baffleless Sump Club Shallow Reef Club Rimless Aquarium Club Current Tank Info: 103 Gallon Starphire Reef Savvy Cube / 250w Galaxy Dimmable - Radium - Lumenbright Mini / 2 x 24" VHO / 2 x 24" T5 / 3x Power Brite Act LEDs /2 x Tunze 6025 / Vortech MP40ES / Neptune APEX Lite / CS200 Cone with Octo BB 2000 |
|
|
|
|
04/03/2009, 09:53 AM
|
#24 |
|
Registered Member
Join Date: Sep 2006
Location: Abbotsford, B.C.
Posts: 578
|
Nice work! That plumbing looks pretty neat and sweet....salt creep should take care of that.
|
|
|
|
|
04/03/2009, 10:17 AM
|
#25 |
|
Registered Member
Join Date: Feb 2008
Location: Toronto Canada
Posts: 91
|
my sump actual has a back up plan in case of a weird emergency my sump will never over flow cause i have a 3/4 bulk conected to a pipe that drains in to my sump pump in the basemet which mena no water ever on my hardwood!!!! puttinga cap on that ball valve is probaly a relay good idea i will take your advice saftey first disaster avoided
and yes slat creep sucks im wipe my equipment every week to keep it spiffy |
|
|
|
 |
|
|


