

|
 |
|
|
#1 |
|
Registered Member
Join Date: Dec 2010
Location: Akron Ohio
Posts: 310
|
Through wall/floor fittings for basement sump?
Right now my 20g sump is under my 65g Display tank, all is well but maintenance, top offs, water changes etc is just a huge pain. The display tank is basically RIGHT over where I have all my equipment in the basement so it's a prime candidate for a basement sump. I'm thinking about picking up a 40g breeder to use as a sump/fuge which I'll locate almost directly under the tank.
So I have a few questions. What kind of fittings are you guys using to go through your wall or your floor boards to feed or drain your tank? My tank has a 1" drain and a 3/4" return line, it's a reef ready tank. I'll be remodeling the bathroom in the next couple weeks and will have it stripped down to bare studs so I'll have access to inside the wall right behind the display tank as well as the floor above the equipment. The area where plumbing could go through the wall to feed and drain the display tank is right where our bathroom vanity is so that works out perfectly. I can just make a simple access panel to get to whatever fittings or plumbing I install. So what kind of fittings would you recommend? I'll need to run the drain line and return line to the basement, I also use a Reef Keeper Lite to control everything so will be running some electrical to the basement as well to control fuge lighting, return pump, skimmer pump and heaters so any input on that would be greatly appreciated too. I'll try and get a CAD drawing of the layout done soon to give a better layout.
__________________
65g Mixed Reef: 20g Sump, Fuge with Chaeto, (2) Koralia 750s, NWB-110, 6 x 39w TH50 |
|
|

|
|
|
#2 |
|
RC Sponsor
  Join Date: Sep 2009
Posts: 14,173
|
I would keep it simple and use a PVC toiler seal ring. Run the pipes through one ring and seal it with some foam insulation spray that you get in a can from places like Home Depot. That or just drill a hole through the floor and run the PVC pipe through it.
The alternative would be to use bulkheads but that just adds more glue joints and seams which is kind of a waste in my opinion as those seams will add to your head pressure.
__________________
Director Customer Support Royal Exclusiv USA For All Royal Exclusiv & Bubble King questions please refer to our Sponsor forum: http://www.reefcentral.com/forums/fo...play.php?f=745 Current Tank Info: 480G display mixed reef, 90G sump, 90G refugium, 60G display refugium. Check out my build thread: http://www.reefcentral.com/forums/showthread.php?t=1783476 |
|
|

|
|
|
#3 |
|
Registered Member
Join Date: Dec 2010
Location: Akron Ohio
Posts: 310
|
I'd like to leave the finished side of the wall (where the display tank is) as finished looking as possible. I don't want to go through the floor there so it'll have to go through the wall. On the backside of the wall is the vanity so I can keep that as bare bones as needed since it's all covered. This is taking a pretty well thought out sales pitch to my wife so I need to keep the living room side nice and tidy if the fish tank were to ever move.
Happy Wife is a happy life 
__________________
65g Mixed Reef: 20g Sump, Fuge with Chaeto, (2) Koralia 750s, NWB-110, 6 x 39w TH50 |
|
|

|
|
|
#4 |
|
RC Sponsor
  Join Date: Sep 2009
Posts: 14,173
|
Another thought would be to use plastic fittings or grommets like these used on desks to run wire through. They make them in different sizes and colors and you could use the ring to run the pipe though and hide the cut line on the wall or floor. They sell them at Lowes and Home depot. With your elevated head level, the less glue joints and elbows you have the better as each one will create additional friction resulting in additional head pressure.
__________________
Director Customer Support Royal Exclusiv USA For All Royal Exclusiv & Bubble King questions please refer to our Sponsor forum: http://www.reefcentral.com/forums/fo...play.php?f=745 Current Tank Info: 480G display mixed reef, 90G sump, 90G refugium, 60G display refugium. Check out my build thread: http://www.reefcentral.com/forums/showthread.php?t=1783476 |
|
|

|
|
|
#5 |
|
Registered Member
Join Date: Dec 2010
Location: Akron Ohio
Posts: 310
|
I think what I'd like to do is mount (2) bulkheads in the wall. 1" for drain and 3/4" for return. Then on each side of the bulkheads I'll plumb in barb fittings. That way I can use flexible tubing to make my 90 degree bend to the bottom of the display tank (on the tank side of the wall) and down to the floor (on the bathroom side of the wall)
This should help keep the friction down since there won't be any real 90 degree bends. It'll be a smoother transition right? How much water can you flow through an overflow that has a long drain line?
__________________
65g Mixed Reef: 20g Sump, Fuge with Chaeto, (2) Koralia 750s, NWB-110, 6 x 39w TH50 |
|
|

|
|
|
#6 |
|
Registered Member
Join Date: Dec 2010
Location: Akron Ohio
Posts: 310
|
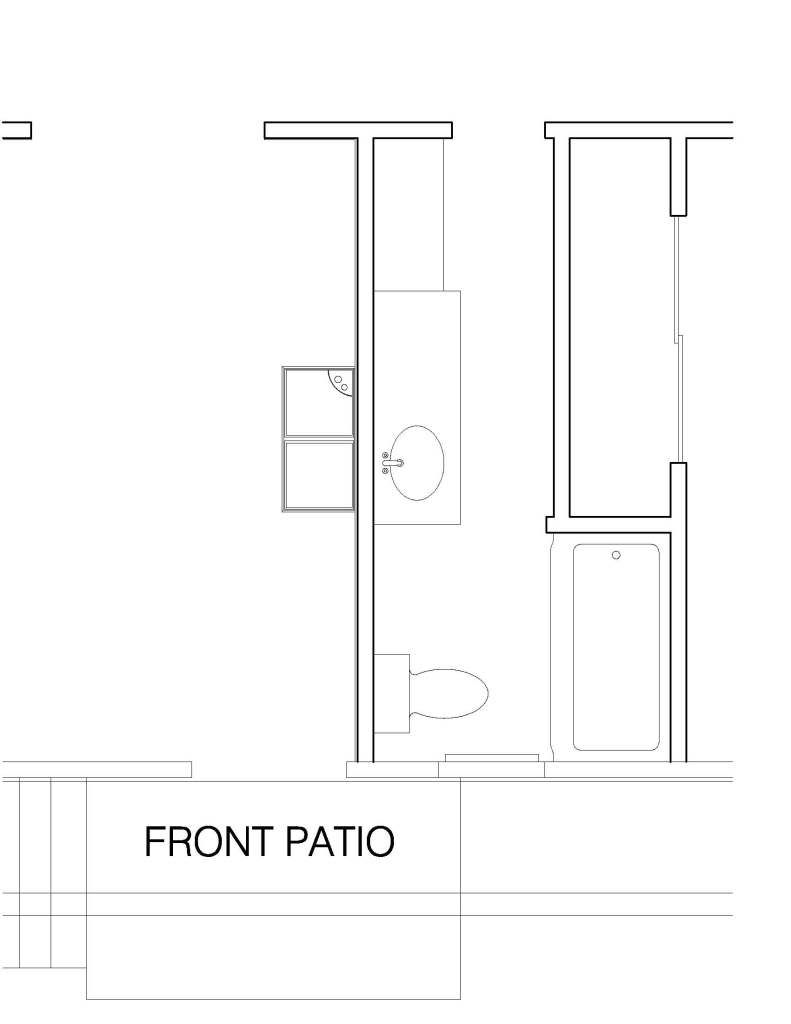
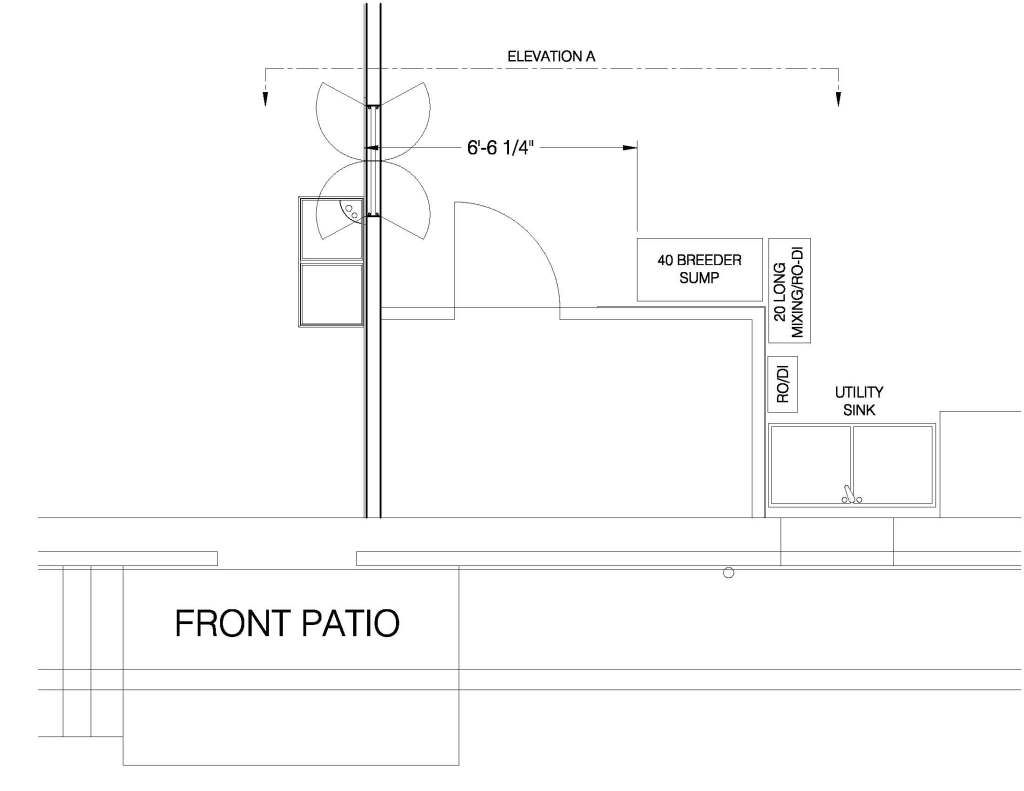
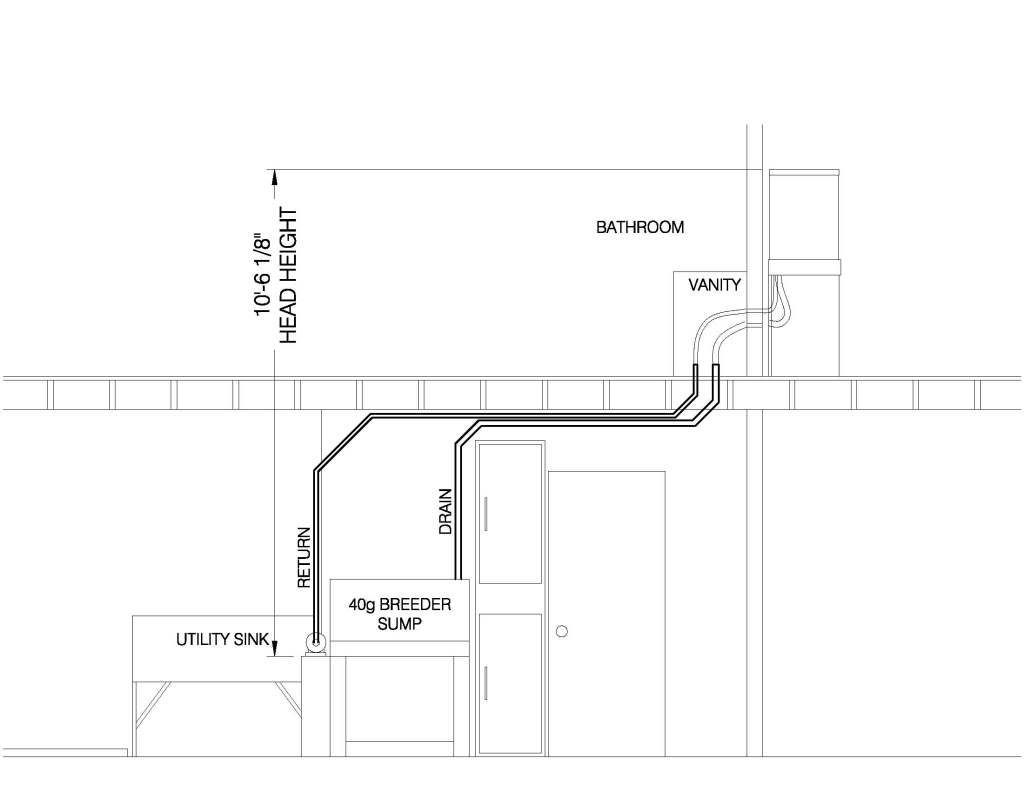
Ok here are some drawings of my layout to give some ideas of what I'll need.
This is a view of the 1st floor where the tank is. The bathroom is behind the wall where the tank is.  Here's the basement view directly below the tank. I left the tank in the drawing to show placement on the floor above. This is how I want to setup the sump.  Here's what I'm thinking for a layout. Does this seem reasonable? Is it best to try and run pipes at 45 degrees instead of a 90? Also, should I run a 1.5" PVC drain line? It's a 1" bulk head but it ran MUCH better when I had 1.5" ID flex tubing on the bottom of bulk head (compared to the 1" rigid line going to the sump now). For the return line the tank has a 3/4" bulk head, Should I run 1" PVC for the return line and then it'll get reduced to 3/4" at the bulk?  If I can make this layout work it'll make maintenance sooooo much easier. I can drain water from the sump right into the utility sink for my water changes and I can have the RO/DI reservoir (20L) for my auto top off right next to the sump. Shouldn't have to leave the basement to do any work I'm hoping?
__________________
65g Mixed Reef: 20g Sump, Fuge with Chaeto, (2) Koralia 750s, NWB-110, 6 x 39w TH50 |
|
|

|
|
|
#7 |
|
Premium Member
 Join Date: Jul 2001
Location: Baltimore, MD
Posts: 29
|
Nick,
I am doing something very similar with a new tank - display tank in the kitchen and a large sump in the basement. Thought I would share some of the tips and insight I have received from here over the last year or two... 1. You would be very smart to have a second drain line in case of emergency. If possible you could drill another 1" drain in the tank. Of course, if that is impossible to do then maybe you could use the 3/4" as your primary drain at a full siphon and then the 1" could be your emergency. The return could then go up and over the back of the tank. 2. Make sure the return pump you get can handle the head. This was the toughest part for me since I wanted a submersible return pump. Finally went with a Ehiem 1262 which should be able to handle the 10' head. 3. Do not rely on check-valves for anything. I'm actually using one on my return but only as a convienence. Make sure your sump can handle any volume that comes back from the display tank thru the return when the pwer goes off. 4. Put a ball valve on both the drain and the return near the sump. Also put a union (or use a true-union ball valve) so you can disconnect the sump if needed. I'm actually putting both a gate valve and a ball valve on both. Typically the ball valve work best as on-off kind of valve since they are hard to adjust in small amounts. The is why I'm doing the gate too so it can be set if needed by small amounts and not changed. It is probably overkill to have them on both drain and return but I figured it is good to have in case I ever need it. 5. If you do autotop-off, run it from fixed a reservoir of RO water and put your RO on a timer to run every other day to refill the reservoir. This is so if your autotop-off gets stuck, you will only dump a fixed amount of fresh water into you sump and not run directly from the RO supply. I'm sure some of these tips you already know but I hope there is some small bit of advice here you find helpful. Thanks, Larry |
|
|

|
|
|
#8 |
|
Registered Member
Join Date: Dec 2010
Location: Akron Ohio
Posts: 310
|
Thank you for the tips! There's no way to drill the tank. It's a RR tank so I could technically use the return line as a secondary drain and run the 1" as a main siphon. I've read about that setup before. I'm not really concerned with pushing 600gph through the tank though. I'm fine with 200-300gph which should be fine with my standard setup?
I like the idea of ball valves near the sump. That could be helpful in many ways. I'm actually thinking about using a 75g for a sump now. Better to have something larger with more capacity for upgrades in the future.
__________________
65g Mixed Reef: 20g Sump, Fuge with Chaeto, (2) Koralia 750s, NWB-110, 6 x 39w TH50 |
|
|

|
|
|
#9 |
|
Registered Member
Join Date: Apr 2008
Location: B.C. Canada
Posts: 1,555
|
Nice drawings. Your return however is a longer run than your drain. If possible, I'd think about modifying that situation. May not seem like a lot, but over the long term, running the return pump 24/7/365, keeping the return line as short as possible will save you money. So, move the return pump to the right side of the 40g breeder sump to shorten up the return line. Raising the breeder sump as high as practicable on a taller stand will also go a long way to saving power by allowing you to go with a smaller return pump.
__________________
Mike Current Tank Info: 77g sumpless sw with rock, sand, a few critters, fishes & polyps. Lights, pumps..... |
|
|

|
|
|
#10 |
|
Registered Member
Join Date: Jun 2010
Posts: 305
|
Would it be possible to run flex pvc "spa flex" without any connector pieces?
|
|
|

|
|
|
#11 |
|
Registered Member
Join Date: Nov 2008
Location: Parkville, MO
Posts: 832
|
I ran spa flex continuous with no fitting until I got to the basement. I just used a standard electrical box like they use when there is an outlet on both sides of the wall. I was able to get a 1 1/2" and 1" spa flex through one box. If I ever move the tank, just put a blank outlet cover over the box. Once I got to the basement, I transitioned to rigid PVC.
|
|
|

|
 |
|
|
 Similar Threads
|
||||
| Thread | Thread Starter | Forum | Replies | Last Post |
| Help sump doesn't fit in stand!!!!! | lacosta28 | New to the Hobby | 44 | 02/06/2011 05:13 PM |
| Newbie basement sump question | lurchix | Do It Yourself |
0 | 01/12/2010 03:19 PM |
| tank on 2nd floor fuge in basement. how can i do this. | brad7373 | Do It Yourself |
56 | 10/13/2008 12:15 PM |
| Drilling through first floor for basement sump | BRISK495 | Do It Yourself |
7 | 08/14/2007 07:35 AM |
| Who has a 180 or 210 on the first floor above a basement? | anjhof | Large Reef Tanks | 16 | 05/26/2006 01:21 AM |