
|
|
 08/26/2007, 11:19 PM
|
#1 |
|
Registered Member
Join Date: Apr 2007
Location: Uranus
Posts: 3,094
|
coil denitrator
hey guys i found this, what do you think????
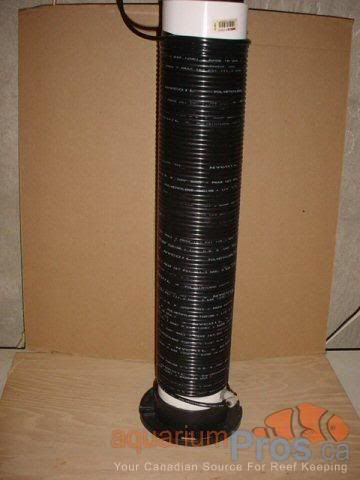
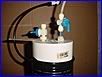
A DIY coil denitrator can be built for approx. $40 and an hour's worth of time. Parts needed: 30" length of 4" PVC pipe 2 x 4" PVC end caps 4" closet flange 1 gallon of bioballs 2 JohnGuest valves 1 JohnGuest 90 elbow fitting 1 JohnGuest coupling 100' Polyethylene 1/4" tubing Glue one end cap onto the length of PVC pipe. Fill pipe with bioballs Glue on remaining end cap. Glue finished pipe into closet flange. Drill 2 holes in the top end cap for the JG valves Drill 1 hole in the side near the bottom just above the closet flange Wrap the JG valves with Teflon tape and thread into place in the top cap Wrap the JG fitting with Teflon tape and thread into lower side hole Insert one end of 1/4" tubing into lower JG elbow fitting and begin winding tubing around pipe working upwards Leave approx. 12" of tubing unwound at the top for connection to the powerhead and secure to the top with either hot glue or black electrical tape (I wrapped the top couple of inches with BET to secure the tubing) Operation of coil denitrator: One of the JG valves on the top is to bleed out air trapped inside the denitrator The other JG valve is to control the effluent drip rate Connect the feed line to a powerhead (I'm using a MJ1200) Place the powerhead in a pail of hot water and a cup of vinegar to flush out the unit prior to use. Follow up with a pail of RO water to flush out tap water Place the powerhead in your Sump and set the drip rate to almost a steady flow The effluent should be dripped through some carbon before entering the Sump (use half of a small popbottle with holes drilled in the bottom and filled with carbon) The unit takes approx. 1 month to start operating effectively. Measure your nitrate levels prior to the operation of the coil denitrator and then start monitoring again after the intitial break-in period. Once these units are started they never have to be opened again. It is a self-contained unit. The principal of how these units work is quite simple. As the water travels down through the 100' of tubing, oxygen is slowly depleted until it reaches the bottom of the bioball filled chamber where an anerobic (oxygen-free) area is created. It's in this area that the nitrates are consumed by the bacteria growing on the bioballs. The water exits the top of the unit nitrate free.
__________________
Senior Member of the "Hardly any Water Changes, Temp Swinging, T5ing, No Qtining, Frag Exchanging for Fish Food Current Tank Info: 90RR inwall, Octopuss Skimmer, 2 MP40 wQD, 1 MP10 WQD, 2 Radions G4 Pro, Apex Doser, Apex Controller, 400w heater, 30 Gal Sump, Biopellets, Carbon, Gfo, Macroalgae |

|

|
|
08/26/2007, 11:25 PM
|
#2 |
|
Registered Member
Join Date: Apr 2007
Location: Uranus
Posts: 3,094
|
__________________
Senior Member of the "Hardly any Water Changes, Temp Swinging, T5ing, No Qtining, Frag Exchanging for Fish Food Current Tank Info: 90RR inwall, Octopuss Skimmer, 2 MP40 wQD, 1 MP10 WQD, 2 Radions G4 Pro, Apex Doser, Apex Controller, 400w heater, 30 Gal Sump, Biopellets, Carbon, Gfo, Macroalgae |
|
|
|
|
08/26/2007, 11:25 PM
|
#3 |
|
Registered Member
Join Date: Jun 2007
Posts: 4,670
|
The Advanced Topics section has one or two long threads on the denitrification coil.
|
|
|
|
|
08/27/2007, 06:38 PM
|
#4 |
|
Registered Member
Join Date: Apr 2007
Location: Uranus
Posts: 3,094
|
has anyone triyed this???
__________________
Senior Member of the "Hardly any Water Changes, Temp Swinging, T5ing, No Qtining, Frag Exchanging for Fish Food Current Tank Info: 90RR inwall, Octopuss Skimmer, 2 MP40 wQD, 1 MP10 WQD, 2 Radions G4 Pro, Apex Doser, Apex Controller, 400w heater, 30 Gal Sump, Biopellets, Carbon, Gfo, Macroalgae |
|
|
|
|
08/27/2007, 06:41 PM
|
#5 |
|
RC Mod
Join Date: Mar 2002
Location: Mountain View, CA, USA
Posts: 88,616
|
Yes, lots of people have tried them. They can work, but they sometimes cause trouble. Keeping the flow rate adjusted, and everything else working, apparently isn't always trivial.
__________________
Jonathan Bertoni |
|
|
|
|
08/27/2007, 07:42 PM
|
#6 |
|
Registered Member
Join Date: Jul 2007
Location: mayfield ohio
Posts: 514
|
for sure have to watch drip rate, too slow and you can get hydrogen sulfide, too fast it wont do the job.
I do not use one but know a few people that do and have had great results. The ones i have seen the coil are inside the unit, I have thought about using one, but i gues a bit timid about it. Let me know how it works if you do go ahead with it.
__________________
kevin Current Tank Info: 75 gallon FOWLR |
|
|
|
|
08/27/2007, 09:53 PM
|
#7 | |
|
Registered Member
Join Date: Jun 2007
Posts: 4,670
|
Quote:
|
|
|
|
|
|
09/04/2007, 09:06 PM
|
#8 |
|
Premium Member
 Join Date: Apr 2007
Location: North Carolina, USA
Posts: 117
|
I made one a few months back, and once it was broken in, my nitrates went from 40 to zero. The one described above looks a little more robust than mine. Mine only used 20 feet of tubing. With 100 feet of tubing you can increase the flow rate because the goal is to have the water devoid of oxygen by the time it reaches the end of the tubing. With 20 feet it has to flow slowly (1 drip per sec). With 100 feet of tubing, I assume you could run 5 drips per sec and still have it work.
I had trouble keeping the flow rate correct. As the tubing got saturated with aerobic bacteria, it clogged up and I had to adjust the flow rate every few days. |
|
|
|
 |
| Thread Tools | |
|
|


