


|
 |
|
|
#1 |
|
Registered Member
Join Date: Oct 2008
Location: NoVA
Posts: 344
|
My 90g build - please comment
I have finally gotten over the hump and now its just bring the rest of it together, so I thought it was time to make a post about my progress.
I have had a 55 gallon with everything hang-on-the-back style, since early October of '08 and I am fortunate enough to be moving to a new place where I can have a sump setup and not worry too much about a potential flood (go tile). After the initial furniture move the following day will start early in the breaking down of the 55 gallon and transferring it 20 minutes away into the 90 gallon. The new system is a used 90 gallon reef ready tank with a 30 gallon sump, I am going to be using 1" PVC for the drain, 3/4" PVC for the return, I am going to use a mag 7 on the return, an octopus 150 recirculating skimmer, at least a koralia 2 and 3, probably a 300 watt heater, 6x54 watt T5 setup, something like 110Lbs of live rock, 90 Lbs of dry sand, and I will be running a refugium in the sump. In the overflow I plan on having a regular standpipe with a loc-line hose for the return, and a durso standpipe at 24" for the drain. I apologize for the quality of pictures, right now I have only had my cell phone handy and I wanted to record a bit of my progress. Also a lot of this handy work is a first time for me so don't expect professional quality =) The canopy was sanded and revarnished. The front is on hinges for easy accessibility, there are also two drilled holes on the sides to attach fans for ventilation. 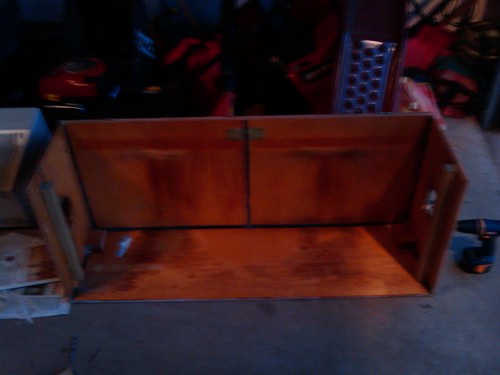  The tank was literally broken down right before I got to the guys house, his pipes were frozen at the time so he couldn't get everything out. It also looks like toward the end of owning it he did bare minimum cleaning, I had a lot of ground to make up to make this tank look newer. 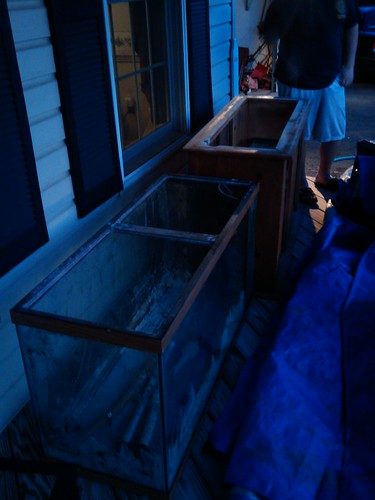 Thanks to Jamesbuf I got a great deal on this skimmer. I was a bit weary at first because I had no clue where to go as far as skimmers went, but he talked me through it and convinced me why I should buy this skimmer and I am definitely impressed. Probably my favorite piece of equipment right now. (Please excuse the junk, I have this setup in the storage room for now) 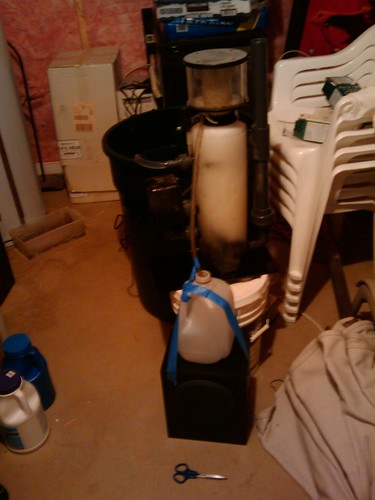  This was after running it for about an hour, in the brute is just new saltwater, about 40 lbs of old live rock I had just picked up that wasn't in the greatest shape. It foamed up nicely and I am still impressed.  I was pretty proud of this (again the tank is 100% clean yet) I picked up some egg crate, got a knife blade and put it on a jiggsaw and cut these out. The top was kind of tricky, I ended up sanding down the edges. This worked out great because I have a snug fit and the edges aren't sharp.  I am still irritated by this. This is the original stand the tank came with. The previous owner was using the tank as a headboard on his bed so he had the tank backwards on the stand, as you can see he had to cut the lower right corner in order for the pipes to fit. I figured ok, it was on backwards so he had to cut the stand... well I turned the tank around and low and behold, I had to cut also. Only problem is the supporting joist is moved further up compared to the other side (if that makes sense). Basically I had a smaller cut available so the tank is sitting almost flush in the front with a big lip on the back =/  Here is where the tank will sit. I put the stand on plywood just to help distribute the weight, even though I doubt it would crack the tiles. I like the location because to the left of the tank is where my new room will be, to the right is the storage room and a door to go outside where I can pump water out of. The sump is not finished and the plumbing isn't glued, I was doing a dry fit, still trying to figure out what exactly I want to do with the plumbing.  Another shot of the drain line, the return is a pipe that goes straight up, simple as that just waiting on the pump to come in. Please if anyone sees anything on the drain line, let me know. Anything I should do differently? I'm thinking I should cut out a section in the middle and add a union. The part that attaches to the bulkhead is a threaded w/ slip, kind of like half a union. The piece threads onto the bulkhead and the PVC glues into it. Also the PVC sags a little bit during a dry fit, should I get a metal fastener or something and support the PVC?  I am also planning to do an ATO, but just haven't gotten that far yet. I want to keep my 2 true percs, 3 chromis, diamond goby, plus at least one tang, a wrasse, maybe some firefish, but not a ton of fish. Please any comments or suggestions are welcomed, setting up a sump is all very new to me. I plan on gluing the baffles in on Friday, I hope scoring it will work out. I also plan on using lexan baffles on glass with AGA silicone, John at BRK said it would work fine since that what he uses in his huge sump at the store. I also plan on finalizing my plumbing hopefully Friday to be ready to do a leak test on Sunday. After that the tank will soak in a vinegar mixture with the return pump running probably over 24 hours so I can scrape everything off. One more thing, does everyone hand tighten the bulkheads or do you wrench those on? I know I'll find out when I leak test but I just thought I would ask, I don't want to risk cracking the glass or ruining the seals. Thanks for looking and more is to come in the near future! |
|
|

|
|
|
#2 |
|
Registered Member
Join Date: Mar 2009
Location: Texas
Posts: 150
|
WOW! Thats a LOT of work. I'm impressed

|
|
|

|
|
|
#3 |
|
Registered Member
Join Date: Oct 2008
Location: NoVA
Posts: 344
|
Hey thanks, its been tough and expensive but she is finally coming together =)
|
|
|

|
|
|
#5 |
|
Registered Member
Join Date: Jul 2008
Location: Edmonton Alberta
Posts: 4,717
|
looks good, eggcrate will NOT keep smaller fish in though ( firefish, wrasses, ect.)
__________________
----------------- Current Tanks: New 210 custom 84 x 24 x 24, 60g sump, SWC 250 extreme with bubble blaster 5000, 2 vortech mp40, 2 vortech mp10, 12 T5, Water blaster 5000, warner marine bio pellets, 60g clownfish cube, red carpet anemone with a 25g sump,SRO octopus 1000sss, 250w radium, lumenarc large. |
|
|

|
|
|
#6 |
|
Registered Member
Join Date: Oct 2008
Location: NoVA
Posts: 344
|
That's what I was afraid of. I was thinking of doing a screen on top of the egg crate but I'm worried about light reduction.
|
|
|

|
|
|
#7 |
|
Day Dreamer
Join Date: Oct 2005
Location: SINY
Posts: 625
|
Nice start vyerous, great way to start by saving a few bucks and buying used. I dont think Ill ever buy a new tank again.
Lol, a headboard eh? What a hard place to access for maintenance, maybe he moved his bed back every time? I like the spot you picked for it much better, its framed nicely by those 2 doors. Just watch how far forward you pushed the tank on the stand, make sure its not putting too much pressure on something not designed to take the weight. How far does that lip go over the front pieces? If your going to mix acrylic/lexan and glass I would suggest using as thick a sheet of lexan as you can. This way its less likely to bow and it wont put as much flexing pressure on the silicone. I would def support that drain pipe, you dont want to put stress on the bulkhead and glass if you dont have to, also when there is water in it its noticeably heavier. The bulkhead fitting I like to get as tight as I can with my hand then gently torque it down with a channel locks.
__________________
- Pete Current Tank Info: 60 gal Deep Blue cube, AquaC EV180, Kessil H80 fuge, A360WE TB |
|
|

|
|
|
#8 |
|
Registered Member
Join Date: Feb 2008
Location: Birdsboro,Pa
Posts: 52
|
keep it coming.
|
|
|

|
|
|
#9 |
|
Registered Member
Join Date: Aug 2008
Location: Novi, MI
Posts: 1,550
|
I would add a ball valve onto the drain line. It never hurts when you need to get in the sump and work to be able to kill the flow.
Plus, my standpipe gurgled a little bit initially but by playing with the ball valve on my drain line I silenced the standpipe. As for the top, go to home depot, buy screen frame, spline, and corners. For the actual "screen" part, buy bird's netting from the garden department or order some stuff called pond netting. I wish I had the link handy. This is small enough to prevent almost all fish from jumping but as a plus won't reduce light. |
|
|

|
|
|
#10 |
|
Registered Member
Join Date: Aug 2008
Location: Novi, MI
Posts: 1,550
|
|
|
|

|
|
|
#11 |
|
Registered Member
Join Date: Feb 2009
Location: North Dakota
Posts: 30
|
Great Job on getting things started.
Will Subscribe to see the marvelous transformation!!
__________________
Cinthia 2 GSMC, LMB, Bi-Color Blenny,Green Clown Goby, Mandarin, Royal Gramma Current Tank Info: 75gal SW |
|
|

|
|
|
#12 |
|
Registered Member
Join Date: Jan 2009
Location: Bloomington, Indiana
Posts: 254
|
seems like its going to be a good build. keep us updated!
__________________
"All the yellow tangs and clownfish in the world can't save you now!"-peter from family guy Current Tank Info: 6 Gallon Nano..In progress |
|
|

|
|
|
#13 |
|
Registered Member
Join Date: Feb 2009
Posts: 81
|
Wow! Ha I can only wish to have a 90 gallon. I guess my 10 gallon will have to do haha.
|
|
|

|
|
|
#14 |
|
Registered Member
 Join Date: Dec 2003
Location: Denver, Colorado
Posts: 9,579
|
Looks like a good start!!
__________________
Make it a Great Day!!!! Current Tank Info: 60 gal SPS cube, with 25 gal refugium, 400W MH, DIY Lumenarc III, DIY skimmer, DIY stand and canopy. 40 breeder LPS with 40 gallon sump, DIY stand, 250W MH |
|
|

|
|
|
#15 |
|
Registered Member
Join Date: Sep 2007
Location: PA
Posts: 14,022
|
Haha... this is too funny... I literally had an almost identical setup a year ago. Here's the initial thread, you may find some pointers/learn from my mistakes.
http://www.reefcentral.com/forums/sh...readid=1310919 Nice start... and good luck. 
__________________
"Enough light? Heck I could go barebottom and grow SPS in the stand!" - DiscoReefRover |
|
|

|
|
|
#16 |
|
Registered Member
Join Date: Oct 2008
Location: NoVA
Posts: 344
|
Wow you guys are awesome and thanks for the compliments.
I'm definitely going to find some bracket I can hold the PVC up with because I don't like how much it sags when its dry. I have heard bad things and good things about the lexan in a glass sump. It will definitely bow a little bit but I don't think it should be too, the height of the baffles will be something like 8 inches and 12 inches wide, if it bows a little I think I can live with that. The biggest concern is getting it to stay in place, my LFS uses them in their huge 150g sump and have since they opened. Yea the headboard idea is cool and all but he had a regular pipe for a return, he said the gurgling sound made him go to sleep... must be nice to be able to sleep with that, otherwise I wouldn't be able to go to sleep from the constant gaze into my fish tank =D Thanks about the placement as well, I thought long and hard about it and the location not only looks well but it is also practical for water changes and storage. The majority of the weight is still on the frame itself, the lip on the stand is about an inch away from the stand so I'm still in good shape. It also works out better in the back because the lip back there for some reason is like 4 inches, so the tank is pretty well balanced on top of the frame itself. I have heard of people using ball or gate valves on the return to help with silencing and controlling flow issues, I plan on using a durso standpipe so I'm hoping it will alleviate most the sound right off the bat. Thanks for the links also, I originally wanted to do a DIY screen for the top of the tank (like you would in a window frame) but I didn't want to use regular screening because it was so small I didn't want to take away from the light. I'm definitely going to go to home depot and get some of that after the tank is settled and the wallet gets a little thicker =D Tswift awesome thread and thanks for sharing. Definitely giving me an idea of what to prepare for and where I want to go with my tank, its inspiring. I wish I had more pictures to share but the progress is on hold while my pump is in the mail, durso in the mail, still need to order a few other things. Friday I plan on finalizing my PVC design and gluing it along with gluing the baffles. Like I said if all goes well I should have a leak test on Sunday... if all goes well... Thanks again for the support! |
|
|

|
|
|
#17 |
|
Registered Member
Join Date: Mar 2008
Location: Palmyra PA
Posts: 410
|
before you fill it with sand/rock i would change the white eggcrate for black eggcrate. Some people have had problems with some nasty algae growing on the white. Bulk Reef Supply sells 2x2 sheets of the black.
|
|
|

|
|
|
#18 |
|
Registered Member
Join Date: Oct 2008
Location: NoVA
Posts: 344
|
You know now that you mention it every time I have seen white egg crate it has pretty much been covered in GHA... how odd. Do you think it will still accumulate algae in a light and oxygen deficient atmosphere? (Under the sand)
|
|
|

|
|
|
#19 | |
|
Registered Member
Join Date: Mar 2008
Location: Palmyra PA
Posts: 410
|
Quote:
edit: i think i read that the white from hd/lowes can leach phosphates so it will probably still leach them under the sand. |
|
|
|

|
|
|
#20 |
|
Registered Member
Join Date: Oct 2008
Location: NoVA
Posts: 344
|
No kidding, who would have thought. Thanks for the info I think I'll probably get on that.
|
|
|

|
|
|
#21 |
|
Registered Member
Join Date: Oct 2008
Location: NoVA
Posts: 344
|
Ok I've got some more questions.
First off is union placement and how many. On my drain where should I put the union and how many? I know what a union does, how exactly it works I'm not sure, it looks like in some people's setups they wouldn't work because one end of the pipe is glued and the other end of the pipe is glued with a union in the middle... how could that work? If you could please show me some pictures of your union placement I would appreciate it. Also where should I put the gate/ball valve on the drain line. Does it matter where (on the vertical portion or the horizontal portion?) Is it worth putting a gate/ball valve on the return line? When I install the pump on the return line, do I want the pump resting on the glass or should I have it raised off of the glass? How big should I make the return and drain zones? I want my fuge do be the largest size, I just don't want to make them too small. Any flaws with this design? (also where should the stuff I asked go?) 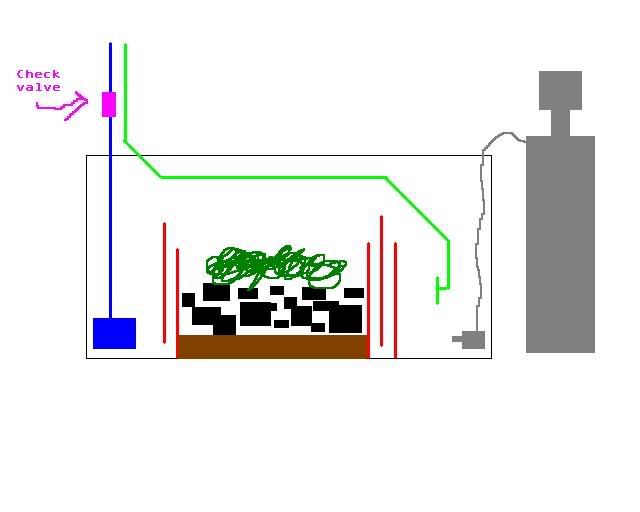 I know I know, don't use a check valve but I got talked into it. I'm thinking of putting a union above and below so I can clean it once a month, give it a good soak in the vinegar and have my return off for like an hour. Please any help is greatly appreciated! |
|
|

|
|
|
#22 |
|
Registered Member
Join Date: Oct 2008
Location: NoVA
Posts: 344
|
up, still looking for help
|
|
|

|
|
|
#23 |
|
Day Dreamer
Join Date: Oct 2005
Location: SINY
Posts: 625
|
Hey, I have a few ideas.
I dont really know what you mean by union but Im thinking you mean the screw fitting so you can disconnect something from the system. If so I would only have one on my pump so it can be removed for cleaning. Or I would use something like that if I had my pipes going through walls or through a stand so they can be removed later on. If your doing an ATO its not as big a deal, but if your not then you might want to consider making the return pump area a little bigger. Otherwise you will be manually refilling the sump pretty often. 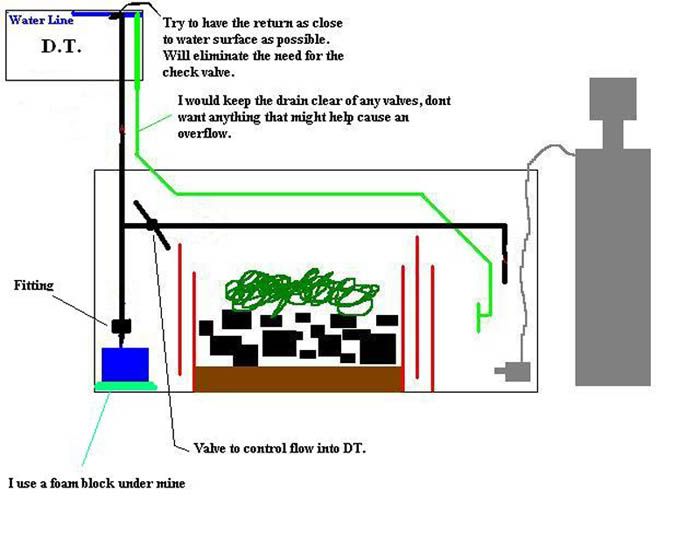 ^ Here is my suggestion. At the top of the return line at the water surface, if the elbow is inside the tank you can just drill a small hole on the top to break the siphon right away. 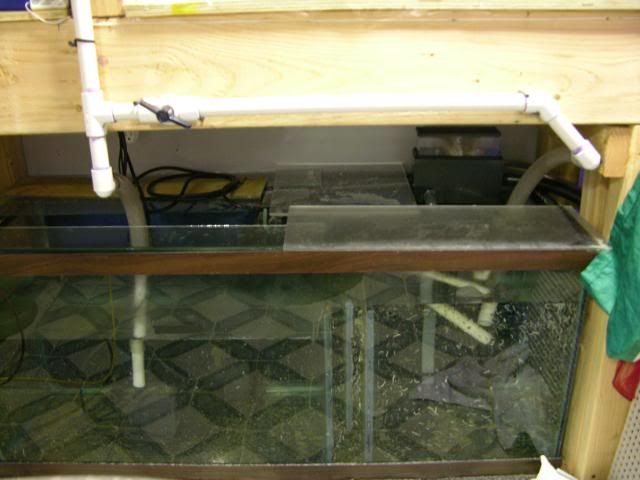 ^ I use a hose and clamp for my union between the pump and the PVC, underwater the pump has a piece of PVC on its outlet. The hose is tight enough that I dont need a clamp down there.
__________________
- Pete Current Tank Info: 60 gal Deep Blue cube, AquaC EV180, Kessil H80 fuge, A360WE TB |
|
|

|
|
|
#24 |
|
Registered Member
Join Date: Oct 2008
Location: NoVA
Posts: 344
|
Thanks for your reply. It helps with some of my questions.
I have been debating whether or not I should put another line off of the return line with a valve to help regulate flow in the tank. However with the head pressure and what not I think I'm only going to get 450 gph from the Mag 7 and since I have a 1" drain line with a maximum of 600 gph, I don't know that I would need the extra drain lain. However, I may plumb it to the fuge to help with flow issues in there if needed. The nice thing about the mag 7 is the connection is threaded onto the pump itself. That's why I plan on keeping the pump about an inch or two off the sump floor, my dilemma is whether or not the vibrations will be loud from the return line vibrating or if I should dampen the sound by placing the pump on a sponge or something. What foam block did you use? I definitely plan on using an ATO. I didn't think the return area should be too big since it won't be starving for water unless the (rare) drain line gets clogged. Does it matter where you place the ATO drain or just anywhere in the sump? Still looking for answers on the unions. |
|
|

|
|
|
#25 |
|
Registered Member
Join Date: Oct 2008
Location: NoVA
Posts: 344
|
Also can anyone recommend the best way to cut lexan? I don't have a table saw so whats the next best thing? Is scoring it and breaking it really that hard?
|
|
|

|
 |
| Thread Tools | |
|
|