


|
 |
|
|
#1 |
|
Registered Member
Join Date: Nov 2013
Location: Memphis, TN
Posts: 116
|
Dane's 175 Gal in-Wall Tank Build
Hello everyone. I'm new to the hobby. Bought a home about 2 months ago that has a 175 gallon in-wall setup (57"L x 29"H x 24"D). Been reading many books and browsing the web learning everything I can about reef tanks (including many posts here, thank you!). I've stopped by local stores and had a few in-town experts stop by, take a look at the setup, and provide their thoughts. So naturally, the best next step was for me to join an online community to learn even more and then hopefully later on contribute to the cause. Thus here I am.
I've included a few pictures below of where I am today. Wish I had taken some pictures at the start though, as the home was a foreclosure and had sat empty for 3 years. It appears they simply walked away from the home, dropping everything...even a full freshwater tank (moment of silence for those left behind). It was a mess: skeletons, calcium deposits along the entire tank from the water line slowly evaporating down, dried organic matter, and on and on. Can't tell you how many hours of sweat equity, elbow grease, quarts of white vinegar & lime juice, number of flat razor blades, etc. have already gone into just clean-up.  Anywho, I digress...onto the next steps. Anywho, I digress...onto the next steps.Where I've come to now is purchasing the needed equipment to convert this previous freshwater tank into a saltwater tank. I'm beginning with the plumbing, and have come to a couple questions that seem to have stumped me and those who have taken a look thus far: - What kind of overflow plumbing is this? An interesting design that seems to be unique and wondering if it has any value or if I should just toss it? - Why would they have had a weir box encasing the return plumbing? To me it looks like the tank was originally designed to have two overflows, however they changed the second to a return. Seems to me like the water in this return weir box would get awfully stale? Need a better picture here, but in the close-up view at the top left you can see the return. Much more to come as the build continues, and look forward to becoming part of the Reef Central community.  - Dane |
|
|

|
|
|
#2 |
|
Registered Member
Join Date: Nov 2013
Location: Memphis, TN
Posts: 116
|
|
|
|

|
|
|
#3 |
|
Registered Member
 Join Date: Dec 2008
Location: Garden Grove, Ca
Posts: 17,023
|
Welcome to Reef Central Dane! Well that certainly is a unique plumbing set up. I suspect it was modified from it's original design, but who knows? It looks like it would be hard to clean, I would start over with a simpler design. The three most common drain set ups are Herbie, Durso and Gurgle Buster. If you run a search you will find diagrams of all three here on RC. Best of luck!
-Mike |
|
|

|
|
|
#4 |
|
Registered Member
Join Date: Sep 2013
Posts: 50
|
Good job cleaning it up! I'm sure it will look awesome when done.
|
|
|

|
|
|
#5 |
|
Registered Member
Join Date: Nov 2013
Location: Memphis, TN
Posts: 116
|
Thanks for the feedback guys.
Think I'll start over on the drain plumbing. Can't wrap my mind around the benefits of that unique setup. As suggested, did a lot of research on the Herbie, Durso, and Gurgle Buster. Found out I'd need a bit more info on my own capabilities. Turns out the prior drain was a 1" pipe, while the return was 3/4". Was able to remove the old drain bulkhead and standpipe, though the return pipe bulkhead is giving me lip. Will tackle it tomorrow. Prior drain side is drilled with a 1.75" hole. Assuming the other is as well for now, still leaves me scratching my head on options. A Herbie (my preferred option) would require me to drill a third hole for the emergency drain (tons of questions there but need to do more research first  ), or run my return along the outside of the tank. With it being in the wall, this would hurt the aesthetics in my mind. Might be able to drill & find space along the sides...we'll see. ), or run my return along the outside of the tank. With it being in the wall, this would hurt the aesthetics in my mind. Might be able to drill & find space along the sides...we'll see.A Durso or Gurgle Buster would be an easier fix, but still leaves me with a weir box covering my return pipe in the tank. In my research this double weir box with single drill holes seems to be a unique concept. Am I missing something, is this common? Any ideas on how to keep this area from becoming a dead zone?  Prior return line: 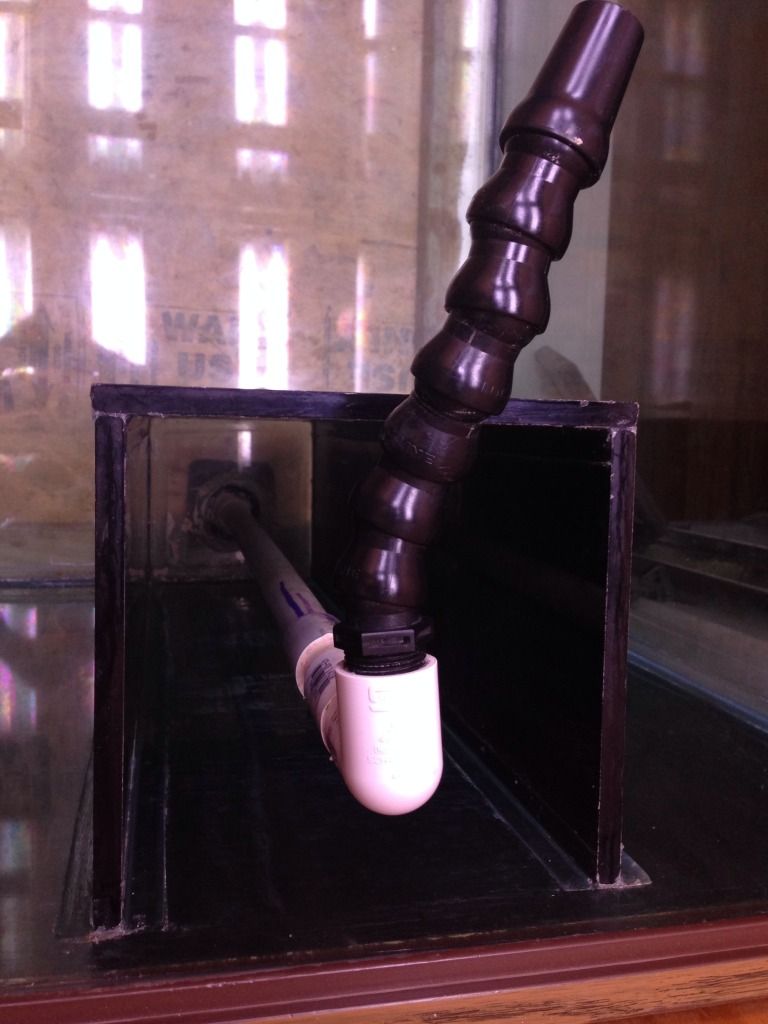 Prior drain line: 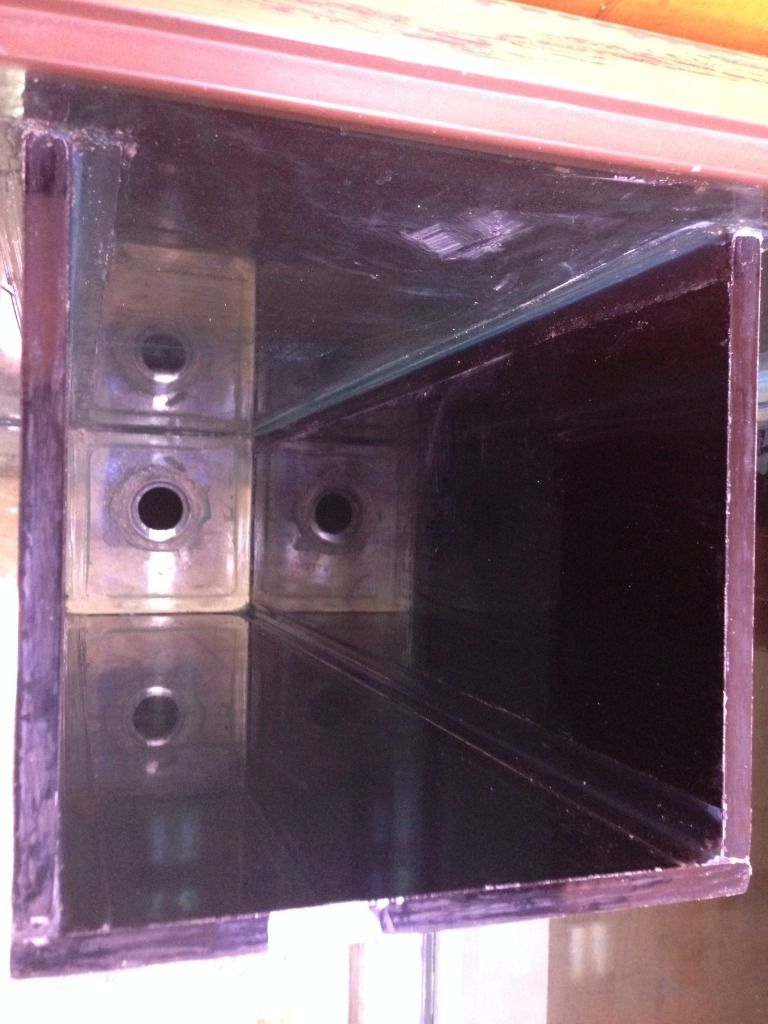
|
|
|

|
|
|
#6 |
|
Registered Member
Join Date: Nov 2013
Location: Memphis, TN
Posts: 116
|
Was able to remove the prior return bulkhead today. Took a little bit of ingenuity to get the thing off as I couldn't come at it from a angle that gave me much torque:
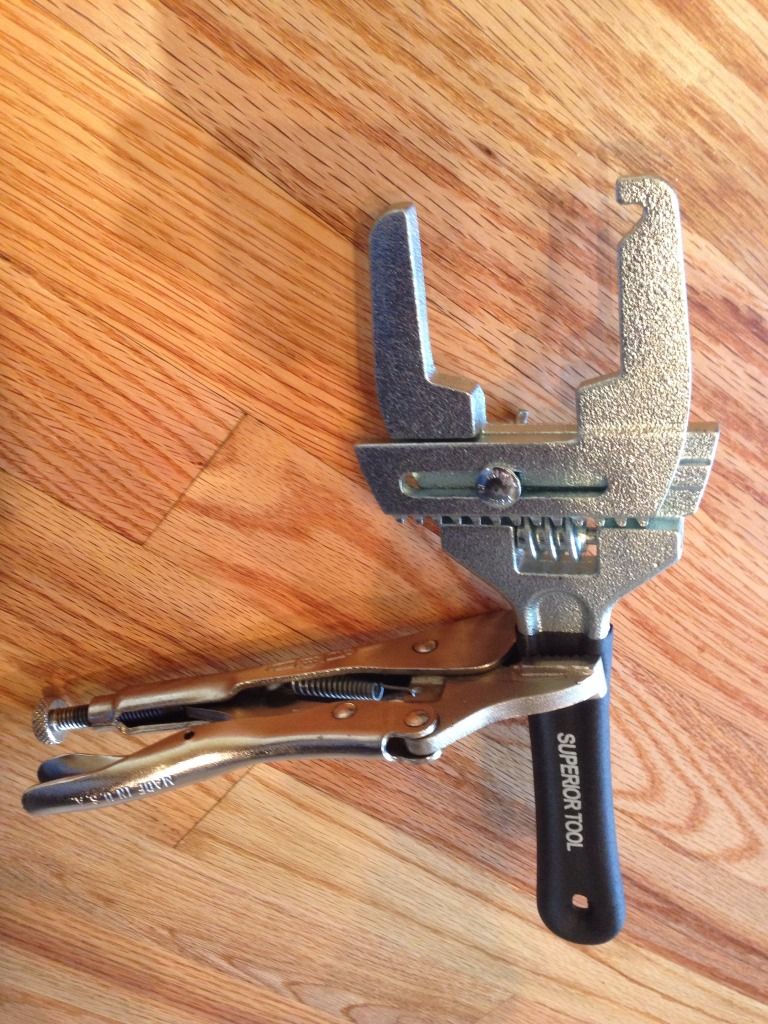 Was able to confirm the other drilled hole was 1.75" diameter as well. However, given both holes are smack center of the weir box, drilling additional holes inside the existing box would now appear to be a more challenging task: 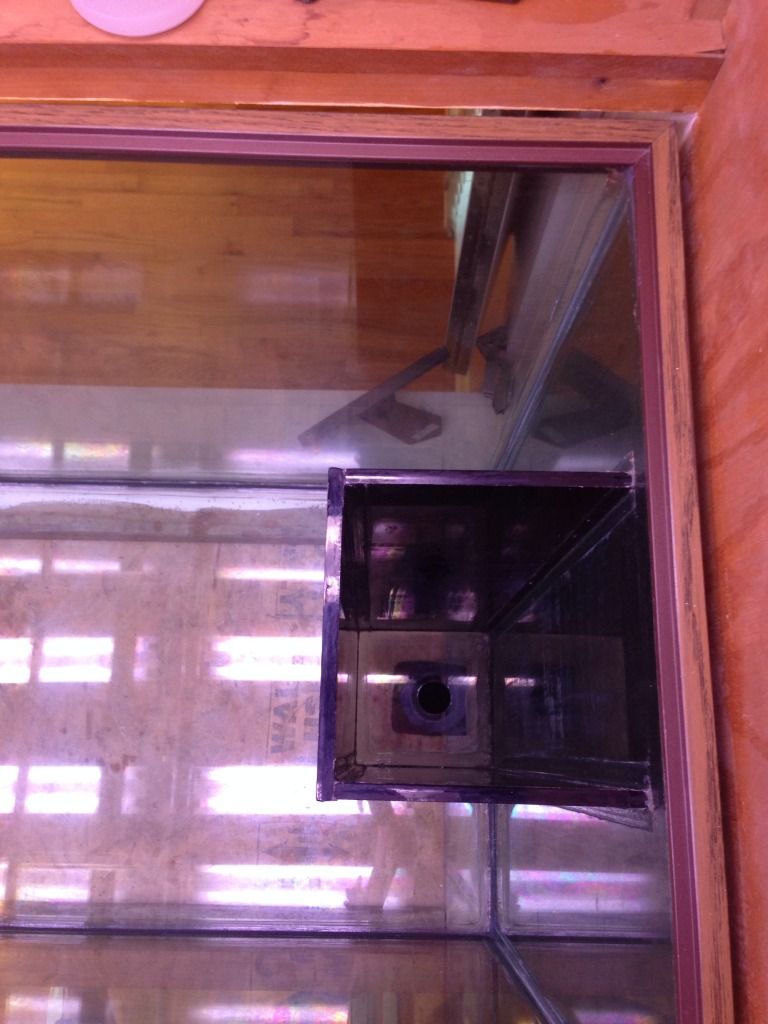 I was also able to confirm a 1.75" hole will not support a 1.25" bulkhead (this one was probably a rookie mistake, but had my hopes up). If anyone has been successful here, please let me know:  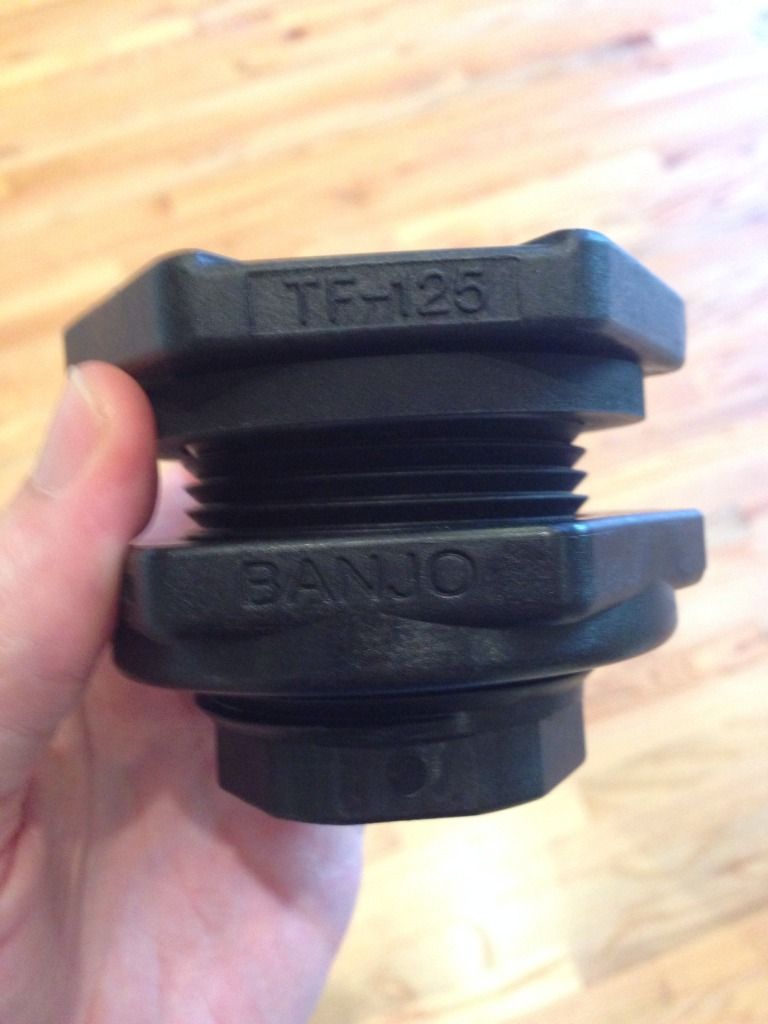 Per the previous recommendations, going to figure out how to make a Herbie work. Where I'm leaning toward is drilling holes in my wood & drywall and run my return around the outside of the tank through the wall to the left or right. Then use these two drilled holes as my primary & emergency drains: 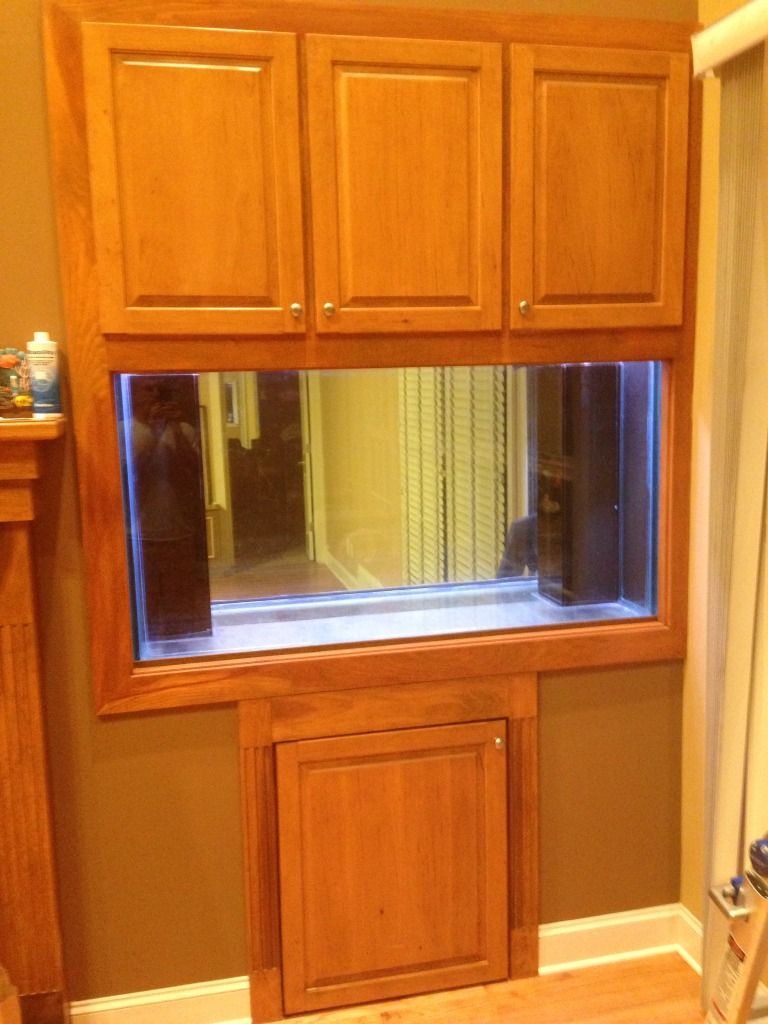 Given the emergency won't pull much water, still concerned about this box getting stale. Thoughts, recommendations, and suggestions are always welcome. Back to the research & books. 
|
|
|

|
|
|
#7 |
|
Registered Member
Join Date: Nov 2013
Location: Memphis, TN
Posts: 116
|
An update on the build. Had to go with 1" ABS bulkheads. Tank is way to heavy to move safely, thus pulling a re-drill & widening of the holes off the table. Schedule 80 1" bulkheads are 0.13" to big (1.88" vs. the 1.75" opening). So we're going to make it work around this limiting factor.
  A schedule 40 1" build it is then. Planned out the Herbie plumbing this week and made the trip to Lowes yesterday for all the needed supplies.  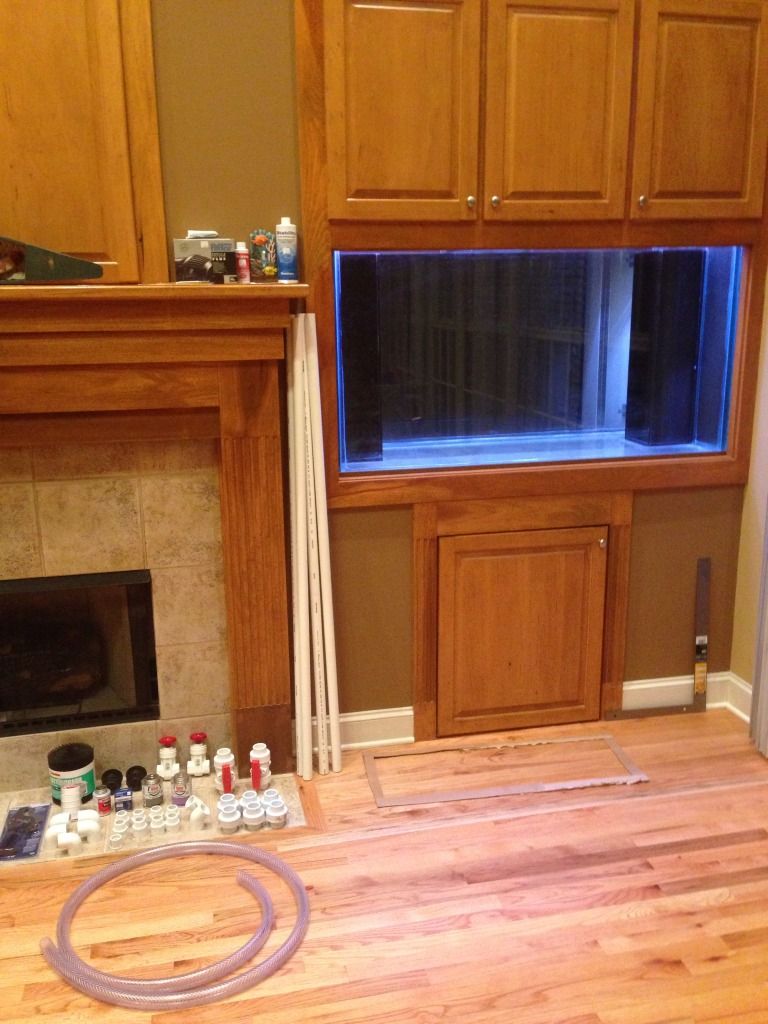 An interesting side note: In the picture above, the cardboard cutout on the floor under the display tank is my mock-up of a sump footprint. While there is ample space under the tank, the door (and depth of the cabinet) is the limiting factor as to how large I can go. Turns out a 36" L x 14" W is about as large as will fit. With the Herbie, my return is going to have to come over the top of the tank, which in my case means through the left wall. Drilled the hole(s) last night. As you can see, with my luck, the first drill found a stud.  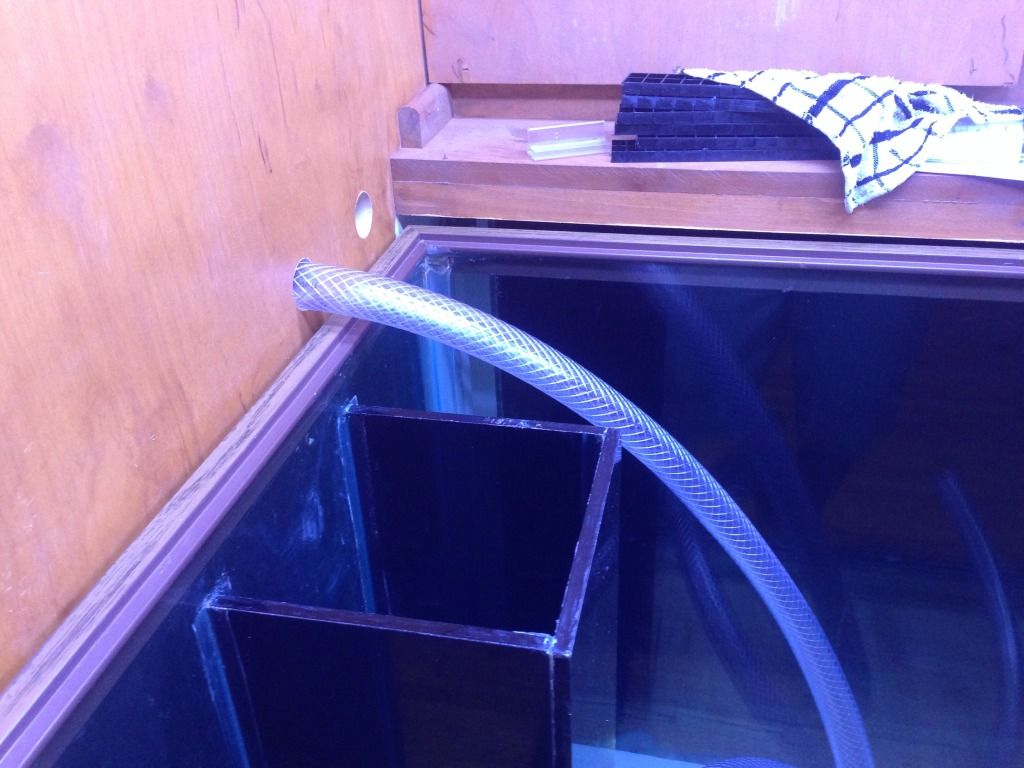 A question as it relates to braided vinyl tubing. In the picture I've selected a 1" internal diameter. However when I look at the hose barb fittings to connect this size tube, they constrict the flow more than I thought: below 3/4". This would definitely be the choke point of my system. With a 1" system, should I be concerned about this? Should I up my flex hose size to 1.25" internal diameter so my barb ID is closer to the 1" internal diameter of the rest of my system? Thanks, Dane |
|
|

|
|
|
#8 |
|
Registered Member
Join Date: Sep 2012
Location: Peoria, Illinois
Posts: 949
|
wow very nice. that's going to look great when finished!
|
|
|

|
|
|
#9 |
|
Moved On
Join Date: Aug 2013
Location: Watervliet, NY
Posts: 111
|
I love in-wall setup's... This is going to be beautiful when its finished... Keep us up to date with pics please!

|
|
|

|
|
|
#10 |
|
Registered Member
Join Date: Oct 2011
Location: Damascus, MD
Posts: 3,340
|
hmm..... I don't like the look of that wall. I suggest you redo the cabinetry above and below the tank as well as that cabinet above the fireplace. It all looks somewhat awkward. I would make the entire wall paneled and not put any knobs at all on any of the cabinets that open. Leave the entire wall one big clean paneled look. It would make a huge difference.
__________________
125RR in-wall, 40B Sump, CS180 BM Skimmer, ATI 4x80 watt, eheim 1262, custom wrap around rock wall, ReefKeeper Elite 120g in-wall, 40B Sump, PC 54wx4, Jabao DC-6000 (full siphon), future seahorse t Current Tank Info: 125g, 120g, 2x40b sumps, ATI 4x80 T5HO |
|
|

|
|
|
#11 |
|
Registered Member
Join Date: Nov 2013
Location: Memphis, TN
Posts: 116
|
Interesting idea, FishGate. Something the Miss has suggested as well.
We are in fact going to remove the cabinet over the fireplace. It's one of those holes in the wall designed for the old CRT TVs (which no one uses anymore). Plan is to just yank that cabinet out and drywall over the hole. We'll then be repainting the room next week and one thought was to paint the remaining cabinetry above and below the tank the same color as the wall. As for making the wall paneled and removing the knobs, could you elaborate a little? Are you saying to install different/new cabinets? I like the idea of no knobs up top, would help blend it in nicely. |
|
|

|
|
|
#12 |
|
Registered Member
Join Date: Apr 2008
Location: Indianapolis
Posts: 2,447
|
I think you will be much happier if you increase the lower access door size. I was able to span a 48" (120g) opening no prob without a center support. This gives me room for sump cleaning and maint.
 
__________________
120g DT 100lbs LR / 200 lbs LS, 45g fuge, VectraM1 Return, Herbie drain, 4x RW-8, 2x AI Hydra 26 w AWM, ASM G2, Apex controller, Apex BoB w floats ATO |
|
|

|
|
|
#13 | |
|
Registered Member
Join Date: Oct 2011
Location: Damascus, MD
Posts: 3,340
|
Quote:
So think the look you have right now over the tank but say 3 panels wide of that across the entire wall. An all wood wall. You can buy cabinet doors which come without knob holes for the panels or you could make your own panels if you are able to.
__________________
125RR in-wall, 40B Sump, CS180 BM Skimmer, ATI 4x80 watt, eheim 1262, custom wrap around rock wall, ReefKeeper Elite 120g in-wall, 40B Sump, PC 54wx4, Jabao DC-6000 (full siphon), future seahorse t Current Tank Info: 125g, 120g, 2x40b sumps, ATI 4x80 T5HO |
|
|
|

|
|
|
#14 |
|
Registered Member
Join Date: Nov 2013
Location: Memphis, TN
Posts: 116
|
Great feedback guys, thank you!
Admittedly, I had to look-up 'paneled walling' to make sure I fully understood your idea, fishgate. To provide some additional perspective, below is a picture of the entire room. 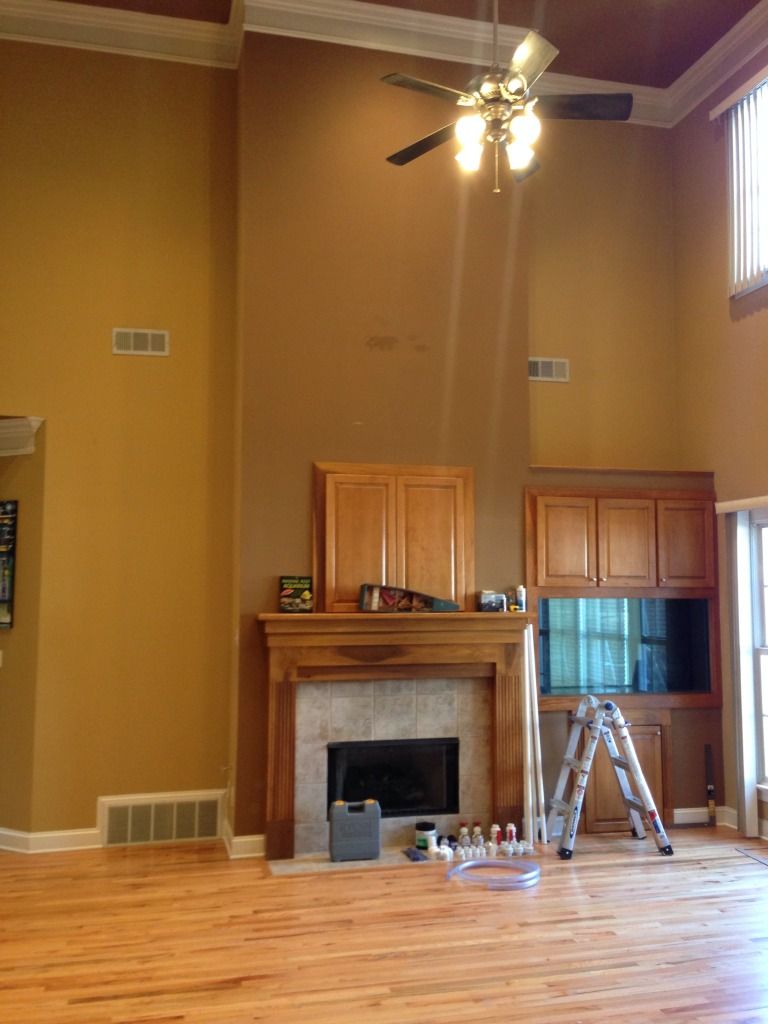 Paneling the entire wall would be a task indeed, as the ceiling is 20' in the room. However, perhaps a hybrid approach to what you suggested as well as Indyman99 (which by the way is an incredible setup!). Indyman, do you or others have any concerns about load bearing with the front center support out? I have two 2x4s on either side of that lower door, supporting the tank..  One option would be to panel everything to the right of the fireplace (again that cabinet over the fireplace will be gone). Or I could increase the size of my lower access door, perhaps making it three smaller doors like above the tank. Even if I kept the two support beams in front, option two would make it a whole lot easier to do maintenance under the tank. Could even widen my access by just enough to get a Trigger Systems sump, which is 36"x15", just a tad too big currently..  the research continues. Thanks again for the input. the research continues. Thanks again for the input.
|
|
|

|
|
|
#15 |
|
Registered Member
Join Date: Nov 2013
Location: Memphis, TN
Posts: 116
|
More progress this weekend. Changed my mind again on the return plumbing. Was too worried the 1" Internal Diameter braided vinyl hose would not be sufficient, especially with the barbed hose fitting taking the ID below 3/4".
So...upgraded to a 1.5" Internal Diameter Spa Flex hose. The hose runs to a 1.5" hose barb, then to a T-unit, which is then plugged at both ends with two bushings (1.5" to 3/4"). The bushings are threaded and fit with two 3/4" Loc-Lines. Used a 2.25" hole saw to drill. This drilled hole fits nicely around the 1.5" hose barb when slid back: 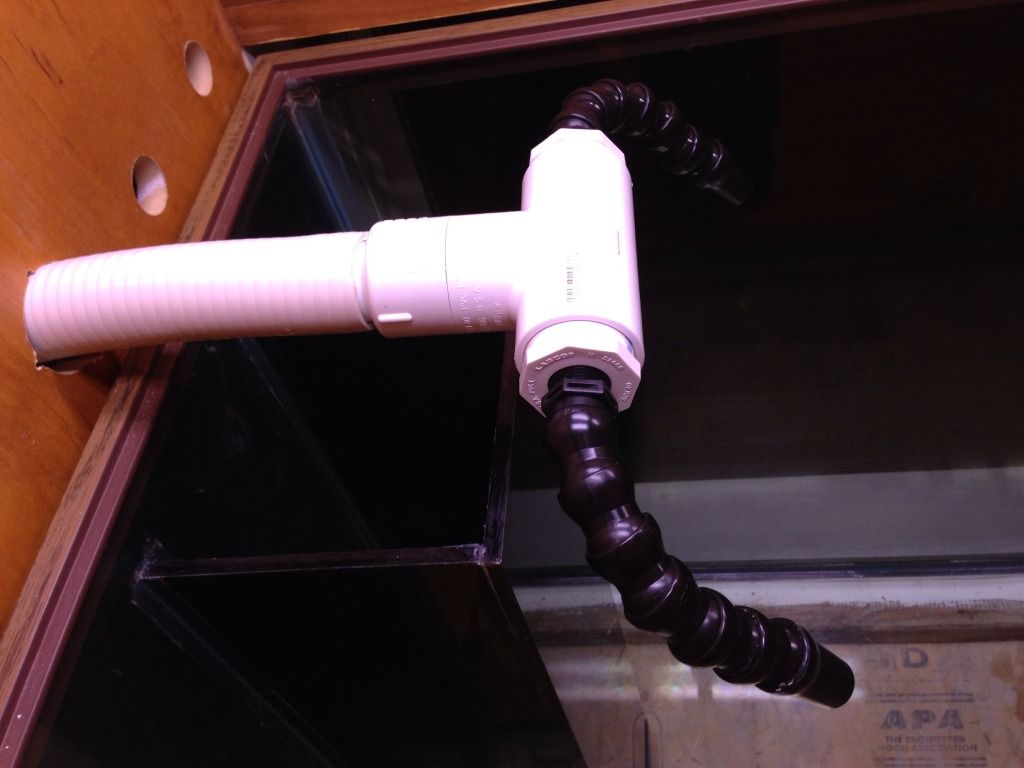 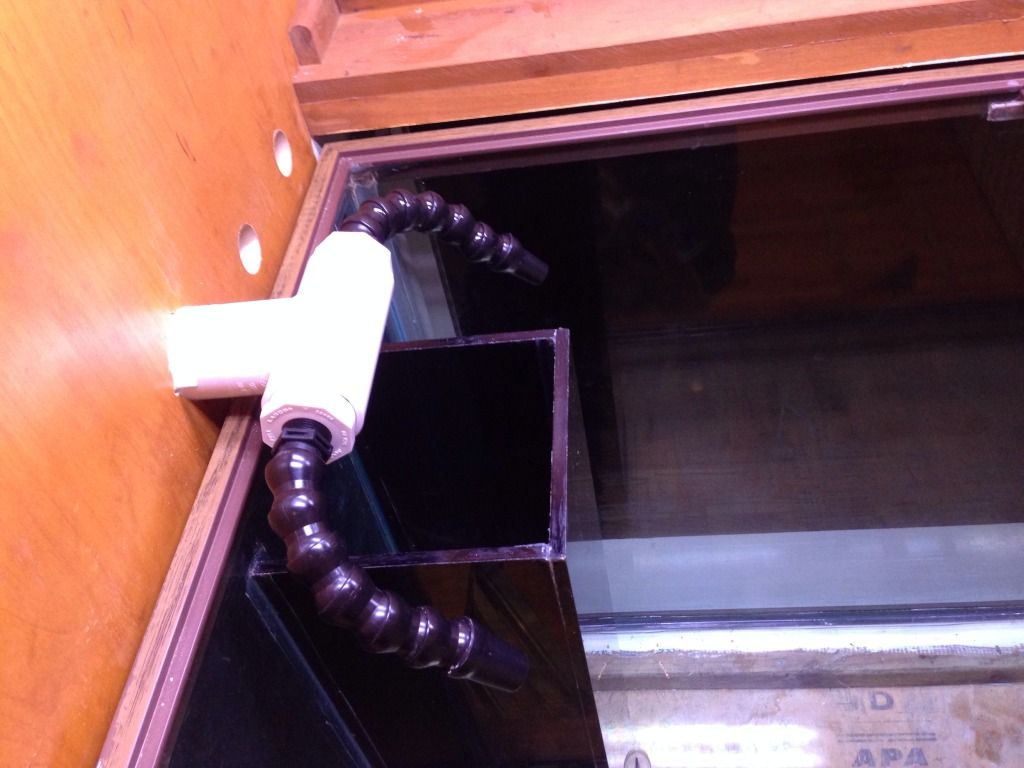 Spa Flex runs inside the wall to the left of the tank and comes out under the tank. The natural curve in the tubing from it being rolled up in storage made pulling the hose through the bottom drilled hole a breeze. It lined-up almost perfectly with my other hole in the bottom. Was quite worried on this one, and turned out quite well. Now onto plumbing the drains... 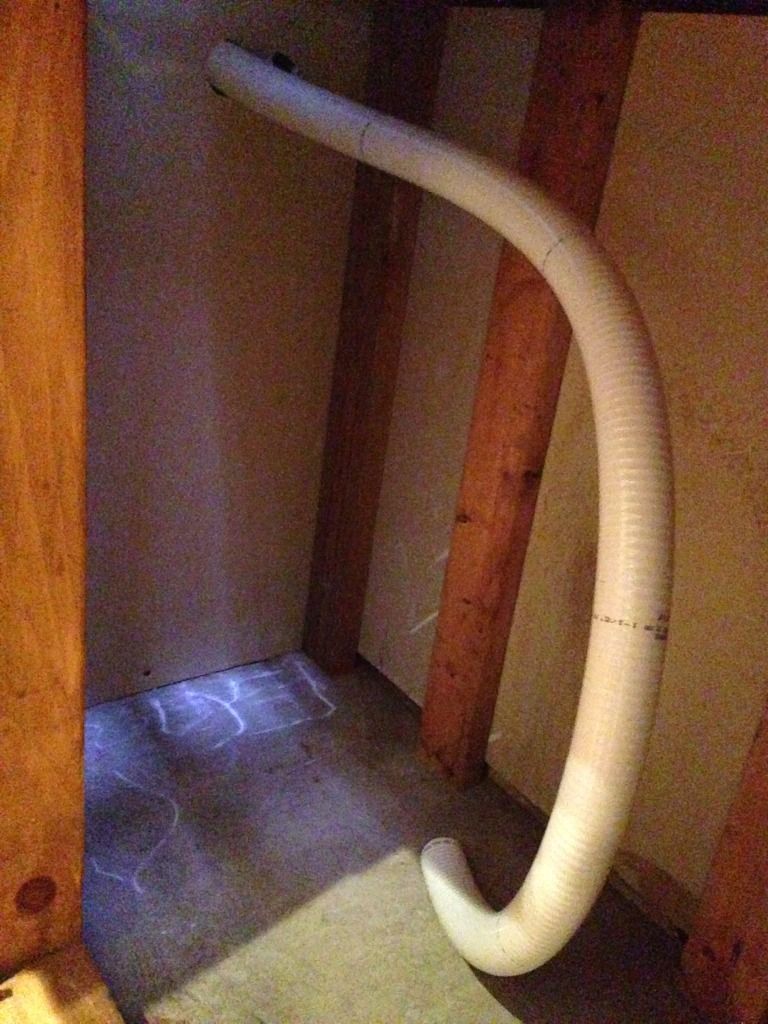
|
|
|

|
|
|
#16 |
|
Registered Member
Join Date: Aug 2013
Location: Atlanta
Posts: 2,497
|
The tank looks stunning.
I am unable to do an in-wall tank, I'm envious. Looking forward to pictures when it has livestock. |
|
|

|
|
|
#17 |
|
Registered Member
Join Date: Nov 2013
Location: Memphis, TN
Posts: 116
|
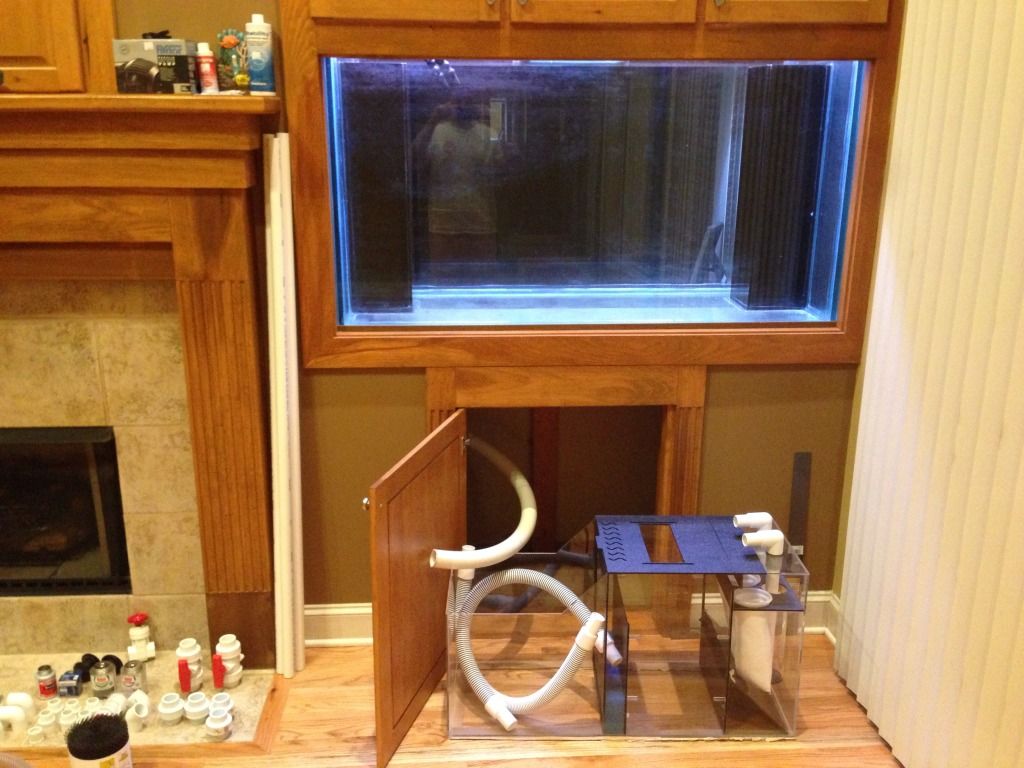
Quick update. Sump arrived this week. Went with an Aqueon Proflex model 4. Thinking about bypassing the provided 90 degree elbows on the drains and just hooking the gate valve directly to the sump for the primary drain. If I'm missing something obvious as to why I should use the elbows, I'm all ears.
 Also had a carpenter come bid on building out the bottom into two french style cabinet doors. Should make it a cleaner overall look and make maintenance much easier. Once those are rebuilt, room & cabinets then get painted, and we should be in business to start making some serious progress. |
|
|

|
|
|
#18 |
|
Registered Member
Join Date: Apr 2008
Location: Indianapolis
Posts: 2,447
|
+1 on widening the lower opening. I would think that you could match the 3xdoor look (like the doors above the tank), even if 2x of the door panels were on a single hinge (ie you would have 2 doors only 1 would be larger and have 2x faux door panels).
__________________
120g DT 100lbs LR / 200 lbs LS, 45g fuge, VectraM1 Return, Herbie drain, 4x RW-8, 2x AI Hydra 26 w AWM, ASM G2, Apex controller, Apex BoB w floats ATO |
|
|

|
|
|
#19 |
|
Registered Member
Join Date: Nov 2013
Location: Memphis, TN
Posts: 116
|
I like it, Indymann99. I've been told the issue is finding proper hinges to support the weight of long doors. Expecting the quote next week.
Legitimate question time. Have the plumbing design setup, but can't decide on the better route for the emergency drain. I've setup both and taken pictures of the two approaches below: 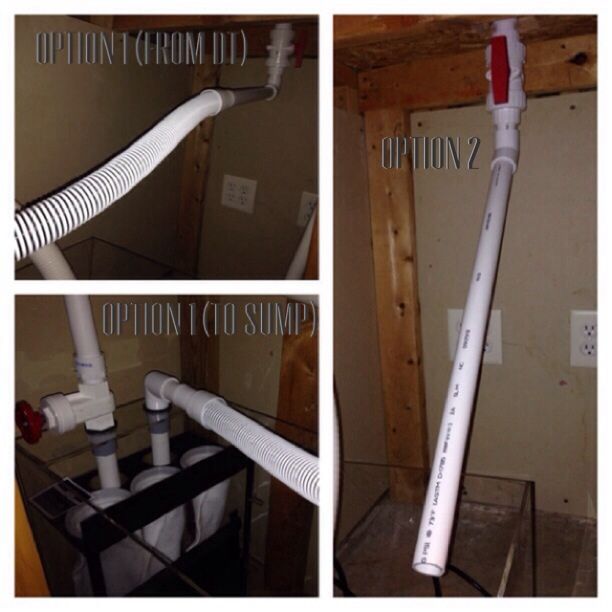 Thoughts anyone? |
|
|

|
|
|
#20 |
|
Registered Member
Join Date: Apr 2008
Location: Indianapolis
Posts: 2,447
|
I say option 2. Fewer joints and straighter fall to the sump. Not wild about Option 1 with the horizontal run and then the transition to the flex tubing.
My 0.02
__________________
120g DT 100lbs LR / 200 lbs LS, 45g fuge, VectraM1 Return, Herbie drain, 4x RW-8, 2x AI Hydra 26 w AWM, ASM G2, Apex controller, Apex BoB w floats ATO |
|
|

|
|
|
#21 |
|
Registered Member
Join Date: Aug 2012
Posts: 59
|
I would go with option to as well, its a straighter shot to the sump.
Not sure if its been mentioned, or thought about, But another thing that I noticed, is the power outlets under the tank appear they are not GFCI, you might want to look into replacing those, it could save your life. |
|
|

|
|
|
#22 |
|
Registered Member
Join Date: Nov 2013
Location: Memphis, TN
Posts: 116
|
Great thoughts. Thank you. Definitely making the change to GFCI outlets both above & below the tank. I'm quite surprised the original owner/builder didn't have them.
 On option 2 for the emergency drain, agree the simpler drain is a plus. Only question I have is the second encapsulated drain pipe in the Aqueon sump...it wouldn't get any direct flow with Option 2. Should I be concerned with this? |
|
|

|
|
|
#23 |
|
Registered Member
Join Date: Apr 2008
Location: Indianapolis
Posts: 2,447
|
Your emergency "should" be 100% dry in proper operation. Also I have my emergency drain terminate ABOVE the sump waterline so that it makes a lot of noise to alert me that the emergency drain is in use.
So I see no problem with not using the 2nd drain "stub" in the sump.
__________________
120g DT 100lbs LR / 200 lbs LS, 45g fuge, VectraM1 Return, Herbie drain, 4x RW-8, 2x AI Hydra 26 w AWM, ASM G2, Apex controller, Apex BoB w floats ATO |
|
|

|
|
|
#24 |
|
Registered Member
Join Date: Apr 2008
Location: Indianapolis
Posts: 2,447
|
@ TulaneDane,
Any progress updates??
__________________
120g DT 100lbs LR / 200 lbs LS, 45g fuge, VectraM1 Return, Herbie drain, 4x RW-8, 2x AI Hydra 26 w AWM, ASM G2, Apex controller, Apex BoB w floats ATO |
|
|

|
|
|
#25 |
|
Registered Member
Join Date: Nov 2011
Location: Lima,Ohio
Posts: 728
|
Nice design, I love the in wall look!
__________________
120RR tank/ 30g sump, mag 9.5, SWC cone 160, Reefbreeders photon 48 |
|
|

|
 |
| Tags |
| build thread, building, buildout, in-wall tank, novice |
| Thread Tools | |
|
|