
|
|
 09/27/2005, 08:05 PM
|
#1 |
|
Premium Member
 Join Date: Sep 2005
Location: St. Louis, Mo
Posts: 1,049
|
Basement Sump
How difficult is it to run a basement sump?
Would I need some expensive, super-powered return pump? Is it possible to limit the number of holes in the wall (or floor) to two -- one for outgoing and one for incoming? I'm looking at a 180 w/two overflows. Could I join the two outgoing pipes with a T (or Y?) PVC piece so just one pipe goes down, and do the same for the incoming to split to return to each overflow? It would be nice to have all that room for hooking up the RO/Di unit w/an auto top-off, storing water right there by where I need it, mixing SW, etc... Plus from what I've read here, it seems like if anything floods it's almost always the sump, and I'd way rather have that happen in the basement than the living room. Also, if anybody has pics of their basement sump I'd love to see them. |

|

|
|
09/27/2005, 08:34 PM
|
#2 |
|
Moved On
Join Date: Aug 2005
Location: Missouri
Posts: 4,297
|
I haven't done it but yes...You can run the overflows together as well as the returns to get them through the floor. The only thing is that you will be increasing the size of the pipe diameter to accomodate more water volume and this will make the hole in the floor A LOT bigger.
There are several pumps that would work and the most reasonable that I have found are the Sequence Reeflow series pumps.......From what I read they are good pumps, perform very well and are cheaper than most externals. |
|
|
|
|
09/28/2005, 08:13 AM
|
#3 |
|
Premium Member
Join Date: Sep 2005
Location: St. Louis, Mo
Posts: 1,049
|
Okay, I'll look into those pumps. Thanks!
I imagine it would be harder to accomplish, but I'd rather run everything through the wall and down rather than the floor. (If it doesn't work out somehow, it's easier to patch up drywall than hardwood.) Actually overall I'm weighing the daunting task of the installation against the benefits. There are a lot of benefits as far as I can see... Upstairs where the tank will be, I do not have anywhere that would work well for water storage and mixing; it would have to be the kitchen, and I could make do, but it would likely be a pain. The water would have to be stored in the pantry. Also, w/the basement sump any flooding would most likely happen in the basement. Also, I could have the RO/DI auto-top-off into the sump, and just run the waste water tube over to a drain... Plus the noise factor is eliminated from the display tank... Plus I can make my sump whatever size/shape I want and can access it from all sides... My husband looked at me like I was crazy when I started talking about running pipes through the living room wall... He said we'd have to hire someone (handyman or plumber) to do it... but surely I can figure it out. 
|
|
|
|
|
09/28/2005, 09:17 AM
|
#4 |
|
Moved On
Join Date: Aug 2005
Location: Missouri
Posts: 4,297
|
Well.....I have all my equipment under my tank and it is a pain to get in there and work....BUT, you don't have to do a lot once it is up and running so its not that bad.
You could actually build the inside of the stand like a bath tub......sink everything down in the stand and leave raised edges about 3" or 4" to hold water incase you have a "flood". You could also add a drain to the bottom of it and run that over to your wall and down to the basement which would eliminate the worry of flooding over the area you built. I would think running your pipes through the wall would be semi easy. It would take some work, but I like projects like that.....Plus you get the "Cool" factor for braggin rights!!  Everything in the basement Would be a lot easier and tons more room, but just plan it out before you start choppin!! |
|
|
|
|
09/28/2005, 09:45 AM
|
#5 |
|
Awaiting Email Confirmation
Join Date: Nov 2003
Location: Nich., Ky.
Posts: 626
|
I have done what your thinking of doing. The drains and returns, closed loop, wiring, etc. are plumbed through the floor (behind the display tank). Floor is easier than the wall. Works great, I essentially have a pump/maintainence room directly below the display. Motors, sump, pump and skimmer noises are all removed from the living room. I'm very happy w/ the way it worked out.
|
|
|
|
|
09/28/2005, 09:59 AM
|
#6 |
|
Premium Member
Join Date: Dec 2002
Location: Hardin, Montana
Posts: 3,142
|
I wouldn't have it anyother way given the choice. Basement sumps are da bomb. One issue I had when I did mine was loss of head pressure going to the tank. But the new thinking is that turnover in the sump isn't that important as long as you keep up with your skimmer. I would spring for a good japanese iwaki if I could. The back pressure on the pump may cause the motor to work harder. A good quality pump would be a plus. I used a little giant 1200 gph pump and it worked fine.
Main tank circulation can be handled with tunze's, closed loops, or other good powerheads. |
|
|
|
|
09/28/2005, 10:00 AM
|
#7 |
|
Premium Member
Join Date: Sep 2005
Location: St. Louis, Mo
Posts: 1,049
|
Reeforbust, it's funny you mention that -- I had actually been contemplating a way to line the inside of the stand with acrylic a few inches high to form a tub that would catch most or all of the water in the event of a flood. If I don't do a basement sump I will definitely try to accomplish something like that.
nepuck, how big are the holes you had to put in your floor? Could I do it with only compromising one or two (3.25") planks of my hardwood floor or would it have to be a much bigger hole to start? I was thinking the wall might not be that hard because I'm pretty sure that in the basement, if you came straight down through the wall, the pipe would emerge over the top rim of the foundation and be visible there, so the other elbow (?) would go there -- so only one bend would have to occur inside the wall. (If that makes sense.) The bad thing is that it's an exterior wall; of course there is insulation in it, but I imagine the pipes might need extra insulation put around them. Also there is probably extra drywall there to cut through; as we discovered when we installed our over-the-range microwave, the exterior walls are pretty thick.
__________________
Everything floats down here. Current Tank Info: Entirely hypothetical |
|
|
|
|
09/28/2005, 10:03 AM
|
#8 | |
|
Premium Member
Join Date: Sep 2005
Location: St. Louis, Mo
Posts: 1,049
|
Quote:
Also, do you guys run dehumidifiers in your basements? |
|
|
|
|
|
09/28/2005, 10:08 AM
|
#9 |
|
Bogus Information Expert
Join Date: Oct 2000
Location: SW Ohio
Posts: 16,147
|
A sump in the basement is always a great idea. It is easier to work on, is less unsightly and far less noisy. The main trick is in plumping it. Every bend and valve adds to the overall head loss and reduces flow. On the other hand you want enough valving and connections so that maintenance is a breeze. It just so happens that RC has this handy-dandy Head Loss Calculator that helps you select the pump that will meet your needs.
__________________
"Leading the information hungry reefer down the road to starvation" Tom Current Tank Info: 130 Now out of service and a 29 |
|
|
|
|
09/28/2005, 12:44 PM
|
#10 |
|
Awaiting Email Confirmation
Join Date: Nov 2003
Location: Nich., Ky.
Posts: 626
|
Size of the floor hole depends on the sum of your plumbing and what not. Mine is 6" x 13" but does not need to be that large. One things for sure, too small would be a hassle. You need some slop to move pipe and wiring around. I could probably get by w/ 4" x 8". My display sits on a tile base, the tile is edged w/ bull-nose tiles so that it forms a lip to catch any flooding. There is a drain in the tile leading to a catch bucket in the basement in case of trouble. Your walls might be different but plumbing through the wall is more complicated (I'm a home builder).
I use an Iwaki MD70RLT (Japanese) for the closed loop. Make sure it's a pressure rated pump. The 70 series works great, very dependable but it is fan cooled and makes some noise (basement-good, living room-bad). Lots of water volume movement in the display tank and much less in the sump (I use an Iwaki MD20RT for sump return). This allows detritus to move from the display and settle in the sump to be skimmed. I have some pics I'll try to post. |
|
|
|
|
09/28/2005, 01:01 PM
|
#11 |
|
Registered Member
Join Date: May 2004
Location: Redondo Beach-SoCal
Posts: 1,498
|
Check out the pics on my site (little red house ^) It is the only way to go...
Nate D
__________________
Nerds with Guns? Fish with Guns! Kimber 1911-Dosen't get any better "If you don't test for it, DON'T ADD IT!!!!" "Always strive for the optimum environment, not the minimum environment" -BrianD- Current Tank Info: 220g bb display about 420g total 100g fuge 90g sump in basement ASM G6 2x400w 14k's, 250w 14k, 2x6100 streams w/MC 1/4hp chiller, BARR CR2200 reactor, Geo Kalk Reactor, SPS and clams |
|
|
|
|
09/28/2005, 02:39 PM
|
#12 |
|
Registered Member
Join Date: Aug 2005
Posts: 59
|
Go for through the wall!
I'm in basically the same state your in. Torn between having unsightly stuff in the LR (not to mention noise) and putting my sump in the basement. My decision maybe easier than your's, I have no place for a sump in the LR and long term I don't think a HOB protein shimmer is the way to go. I've run a lot of video/stereo cable through my walls, just looks so much cleaner and professional. A couple of suggestions: 1) measure where you think the hole should be drilled. measure it again and again. Use things like electrical outlets etc. to get your bearing. Warning: some cables don't go near straight thru; recently I used an old phone cable as a marker - turned out to be 8" off center. 2) Use a small test drill 1/4" or so. It should be long enought to go thru the baseplates of the house. I would recommend at least 6". Run a hanger or wire to verify the hole goes where you think it does. 3) Get a large big drill to use once you've drilled and tested your test hole. At least 7/8" and long 8" or so. Not cheap but it will make the job go easier. 4) Drill muliple pilot holes to guide the big drill. Position the pilot holes so that when you use the big drill the radius will intersect the next big drill hole but be sure to leave enought 'meat' around the next pilot hole to drill the next big one. Sorry if my hints a long and meranding but I tried to be the instructions clear. |
|
|
|
|
09/28/2005, 02:49 PM
|
#13 |
|
Registered Member
Join Date: Jul 2005
Location: Oakland Twp., MI
Posts: 88
|
The basement is an excellent place for the sump/refugium.
I had my 180g hooked to a 120g in my basement for about two years (I have sinced moved, and am building my 180 into the wall of my finished basement). My tank is an All Glass, with dual overflows (1") and returns (3/4"). I simply used T's, and only increased the overflow pipe to 1 1/4" after the T. I used a mag 18 (1800 gph) for the return. Never had any problems; my tank looked great (it was a sad day tearing it down for the move). One thing I did do to combat the head pressure was to build a very tall stand in the basement for the 120. I had about 18" from the top of this tank to the bottom of the floor joists. There was no problem with head loss. Had lots of room under this tank for water change equipment, etc. One other place to save on "head pressure" would be to use curved elbows instead of right angle elbows. I use the conduit elbows (gray, found in the electrical area of Home Depot or Lowes) instead of the white ones where ever I can. |
|
|
|
|
02/01/2006, 11:18 AM
|
#14 |
|
Premium Member
Join Date: Sep 2005
Location: St. Louis, Mo
Posts: 1,049
|
...Revisiting this topic, now that I have made some very slow progress toward getting a tank set up.
I'm definitely going with a basement sump. I'm considering a sump like the one pictured below (one of Melev's). Inside the stand, I would plumb the two drain lines & the two return lines together so there are just two pipes going through one central hole in the floor -- as suggested above. Then, down in the basement, the drain line from the tank would T off to have one drain go to the tower (filled/w rubble) in the skimmer chamber on the left end, and the other draining a restricted flow into the right end, which would be the fuge. The center is the return chamber. I bought a used Iwaki MD100RLT for the return. (I'm actually a bit concerned that this pump is TOO powerful for my system, despite all the head pressure!) It is an external pump, so a hole would be drilled into that center return chamber for it. Something I am considering is a system for making water changes easy. I'm considering drilling an additional hole in the return section that would lead to a drain pipe--normally kept closed with a ball valve--that goes to the floor drain in the basement. Then above/behind the return section of the sump I would keep my SW reservoir with a spigot or pipe that leads to the return chamber. To do a water change, I could shut off the return pump, open the ball valve to drain that center chamber, and then just close the valve again and refill that chamber with new SW. What do you guys think of this idea? I'm looking to make the most of the flexibility & room I'll have by putting the sump in the basement, so if anybody has any additional ideas I would love to hear them. 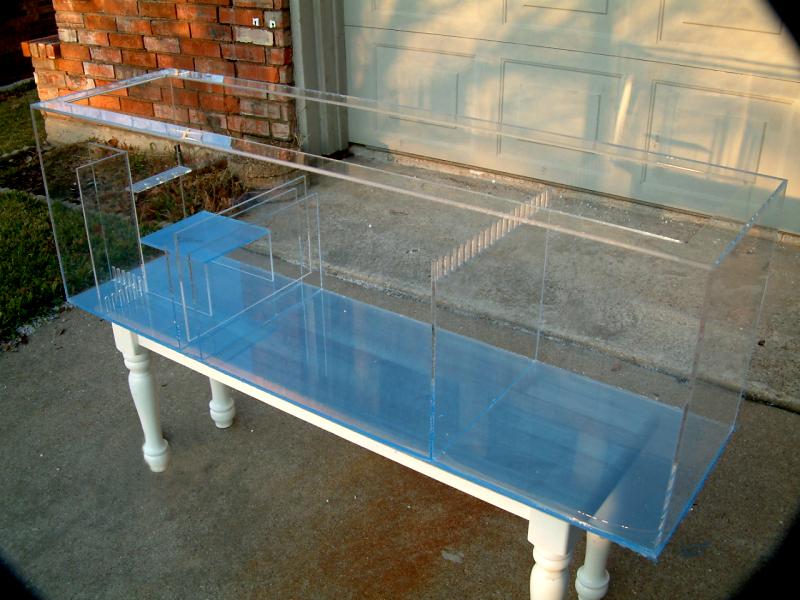
|
|
|
|
|
02/01/2006, 11:39 AM
|
#15 |
|
Premium Member
Join Date: Oct 2003
Location: Detroit, MI
Posts: 102
|
Nice....
Nice sump....
Couple of notes: Your flow plan looks good....the idea of the drain valve is one I highly recommend. I also recommend an overflow outlet be drilled at the top of the sump with a bulkhead and additional line plumbed to the drain. In case of power failure, and when (not if) the sump overflows (beward not just power failure but also the "siphon effect")....the water that doesn't fit into the sump overflows to the drain, not the floor. Regarding holes in your hardwood, I located my tank near a floor register and split the registed into an access hole for the plumbing ad the heat flow. Works great and I can put the room back to "normal" without holes in the floor if/when I move. Don't worry about the Iwaki being too much for the set-up....you'll be surprised at the losses in the plumbing....my GRI520 is a great pump but looses a lot of gas pushing the water over 3 feet and up 6 feet (don't forget to add the height of the standpipes inside the tank if you have standard return plumbing....). Plus you can always throttle it back on the output side. Good luck and keep us in the loop, progress-wise. Grunfeld A Steeler Fan living and working in Detroit |
|
|
|
|
02/01/2006, 02:58 PM
|
#16 | ||
|
Premium Member
Join Date: Sep 2005
Location: St. Louis, Mo
Posts: 1,049
|
Re: Nice....
Quote:
Quote:
 We have extra hardwood planks, although I know it's a real PITA to cut out & replace planks. We have extra hardwood planks, although I know it's a real PITA to cut out & replace planks.Thanks for the help! |
||
|
|
|
|
02/01/2006, 09:10 PM
|
#17 |
|
Premium Member
Join Date: Sep 2005
Location: St. Louis, Mo
Posts: 1,049
|
bump
__________________
Everything floats down here. Current Tank Info: Entirely hypothetical |
|
|
|
|
02/01/2006, 10:06 PM
|
#18 |
|
Premium Member
Join Date: Oct 2003
Location: Detroit, MI
Posts: 102
|
Nice (again)....
Re: Nice....
quote: -------------------------------------------------------------------------------- Originally posted by grunfeld I also recommend an overflow outlet be drilled at the top of the sump with a bulkhead and additional line plumbed to the drain. In case of power failure, and when (not if) the sump overflows (beward not just power failure but also the "siphon effect")....the water that doesn't fit into the sump overflows to the drain, not the floor. -------------------------------------------------------------------------------- That's a great idea for an additional safeguard. So it's not always sufficient to just keep the sump water level low enough to handle back flow if the pump is turned off? Where would the siphoning occur? !Well, the siphon from the return lines will draw water througn the return pump up until the siphon breaks....a lot of water per inch of surface in a 180....some will say to drill a siphon break hole in the line to limit the siphon...great idea, but they clog....some will say to put in back-flow valves (spring/flapper/etc.)...mine didn't create a fully positive seal after a while....point is, no matter what the precautions are, you can't lose betting on the water going wherever you think it can't.....so, learn to direct it as opposed to fighting it... quote: -------------------------------------------------------------------------------- Originally posted by grunfeld Regarding holes in your hardwood, I located my tank near a floor register and split the registed into an access hole for the plumbing ad the heat flow. Works great and I can put the room back to "normal" without holes in the floor if/when I move. -------------------------------------------------------------------------------- That's another great idea... Unfortunately there isn't a floor register along that wall. Although, if we do move some day, maybe one will be installed there. We have extra hardwood planks, although I know it's a real PITA to cut out & replace planks. Thanks for the help |
|
|
|
 |
| Thread Tools | |
|
|


