

|
 |
|
|
#226 |
|
Registered Member
Join Date: Jan 2007
Location: Charlotte, NC
Posts: 453
|
Luke, how did u get that tube out of your Ps160, this thing in mine will not come out and i keep chippin pieces from the top with my needlenose plyers?
__________________
What do you mean I have to change the water? PBITAWA Every Day |
|
|

|
|
|
#227 |
|
Registered Member
Join Date: Jan 2007
Location: Charlotte, NC
Posts: 453
|
Luke, how did u get that tube out of your Ps160, this thing in mine will not come out and i keep chippin pieces from the top with my needlenose plyers?
__________________
What do you mean I have to change the water? PBITAWA Every Day |
|
|

|
|
|
#228 |
|
Registered Member
Join Date: Jan 2007
Location: Charlotte, NC
Posts: 453
|
Sorry 4 double post
__________________
What do you mean I have to change the water? PBITAWA Every Day |
|
|

|
|
|
#229 |
|
Moved On
Join Date: Dec 2006
Location: Indiana
Posts: 8,375
|
Yea, thats the same thing that happened to me. I ended up taking my large plyers and turning it around and sticking the handle into it and rockin it back and forth, that did the trick.
|
|
|

|
|
|
#230 |
|
Registered Member
Join Date: Aug 2006
Location: Culver City, California
Posts: 146
|
Same thing happened to me with using the long nose pliers the inner tube broke. What I did was get a 1 inch pvc then put it inside the inner tube then rocking it back and forth until the bottom of the inner tube breaks. Worked for me.
|
|
|

|
|
|
#231 |
|
Moved On
Join Date: Dec 2006
Location: Indiana
Posts: 8,375
|
Jayvee, did you notice a big difference in bubble production and foam?
|
|
|

|
|
|
#232 |
|
Registered Member
Join Date: Aug 2006
Location: Culver City, California
Posts: 146
|
Yes there is on the skimate but not that much. I would say that it produced like a 1/4 cup more per day than the previous setup with the inner tube and a more darker skimmate. A slight improvement is still better and I can say based on my results that it worked. The bioload on my 50 gal is low since I do have only have 4 small fish and LPS corals. I'm still using the genx 2400 pump with 3 layers of enkamat with the DIY venturi. I will try to adjust the water level and might as well try the ball valve venturi
|
|
|

|
|
|
#233 |
|
Moved On
Join Date: Dec 2006
Location: Indiana
Posts: 8,375
|
Yea, i did the ball valve on the venturi and it seems to make it easy to control that way. The water level that is.
|
|
|

|
|
|
#234 |
|
Moved On
Join Date: Dec 2006
Location: Indiana
Posts: 8,375
|
Here's what my skimmer looks like after the mods. By the way, i'm gettin ready to post it in the used forum for 45 + shipping, all tests are done. IMO its good for a 75g or less......with these mods.
 2 days of skimmate.....it was a dark green, a bit wet, but good stuff. Pry 3-5 cups, just didn't check. 
|
|
|

|
|
|
#235 |
|
Registered Member
Join Date: Jan 2007
Location: Charlotte, NC
Posts: 453
|
I was workin on my ps 160 last night til about one in the morning and heres what happened. I finally did get the inner tube out of it using a similiar method as jayvee. I then drill a 1/4in hole in my pvc male reducer as luke and jayvee did on theirs . . . i think. Put 1/4 flex tube in it and cut it so it opened toward the intake of the pump while inside the reducer. I also had a small ball valve that would fit on the end of the tube so i could control my air flow. After all of this i turned it on, something must have happened, because the pump cannot push the water level high enough in the tube anymore. i removed the mesh i had on the impeller and switched from the pvc reducer to a piece that came with the pump and drilled it in the same way. Nothing, i can barely get any bubbles in the tube to make it to the top. No skimmate what so ever. So i ordered the genX 2400 and hope it will work better with custom venturi, just thought i would share my experiance. Has anyone else ever had this happen as well?
__________________
What do you mean I have to change the water? PBITAWA Every Day |
|
|

|
|
|
#236 |
|
Registered Member
Join Date: Aug 2006
Location: Culver City, California
Posts: 146
|
pbukow,
It seems that you need to add water flowing to the skimmer. Try adjusting it first with the pump intake, I believe that with the stock pump, you don't need to restrict the intake so take out the ball valve. Im using the genx and the water flow is to much so I need to restrict the pump input a bit to prevent it from overflowing. Just adjust the output valve of the skimmer and try closing it a bit to rise the water level. This is asuming you are getting bubbles and the only problem is the water level. |
|
|

|
|
|
#237 |
|
Registered Member
Join Date: Feb 2007
Location: North East PA
Posts: 472
|
[QUOTE]Originally posted by luke33
[B]   Luke how did you do the silencer for the venturi, i did the venturi mod with a larger tube and this thing sucks air so lout it drives me nuts. any tips or pics that look clearer it looks like you used a coke bottle or something |
|
|

|
|
|
#238 |
|
Moved On
Join Date: Dec 2006
Location: Indiana
Posts: 8,375
|
lol, yea its definately noisy. Just drill a hole the size of the tube in a water bottle, or pill jar, stuff a paper towel in it and drill the same size hole in the other end and add a small piece of tubing. Then it'll be quiet. Here'a a pic. Pill jars are much better than water bottles, i literally drank it and poked a hole in it after and put it on there. I knew it would be a temporary thing. lol

|
|
|

|
|
|
#239 |
|
Moved On
Join Date: May 2004
Location: Kingston, WA
Posts: 4,751
|
heh... What kind of water bottle is that? Almost look like a baby water bottle

|
|
|

|
|
|
#240 |
|
Moved On
Join Date: Dec 2006
Location: Indiana
Posts: 8,375
|
Thats not a water bottle, it was a vitamin bottle.........mind your business D! lol
|
|
|

|
|
|
#241 | |
|
Registered Member
Join Date: Jan 2007
Location: Charlotte, NC
Posts: 453
|
Quote:
How sad is this? I didn't know i could adjust the output of the flow on the skimmer . . . duh. I tweaked with it a little and now it seems to be working better. Wow, learn somethin everyday huh? Thanks Jayvee
__________________
What do you mean I have to change the water? PBITAWA Every Day |
|
|
|

|
|
|
#242 | |
|
Moved On
Join Date: May 2004
Location: Kingston, WA
Posts: 4,751
|
Quote:
 j/k |
|
|
|

|
|
|
#243 |
|
Moved On
Join Date: Dec 2006
Location: Indiana
Posts: 8,375
|
I do have a 3yr old ya know and some sippy cups
|
|
|

|
|
|
#244 |
|
Registered Member
 Join Date: Feb 2007
Location: Manchester, MO
Posts: 1,125
|
Ok guys well Iâm back and Iv done another mod not yet posted. As some of you might remember I was one of the first to get the PS160 and have been following/posting for a long time (WAY before the split)
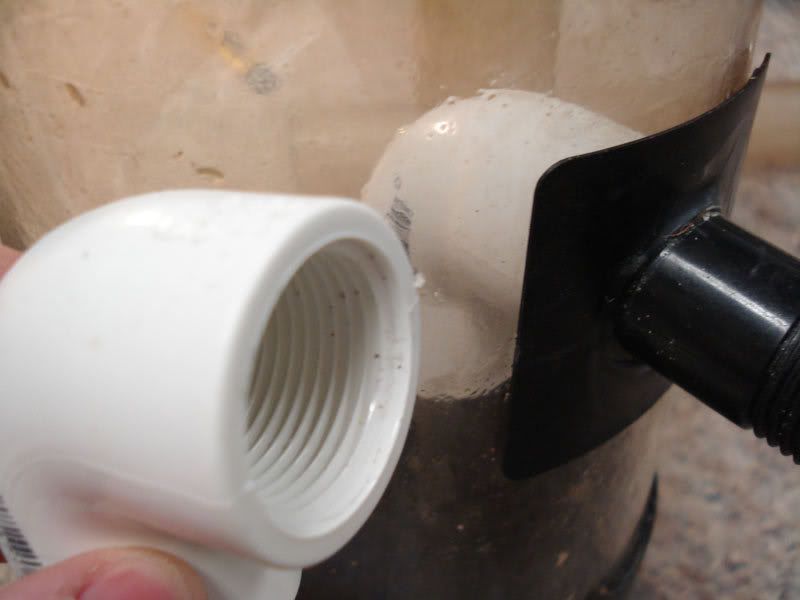
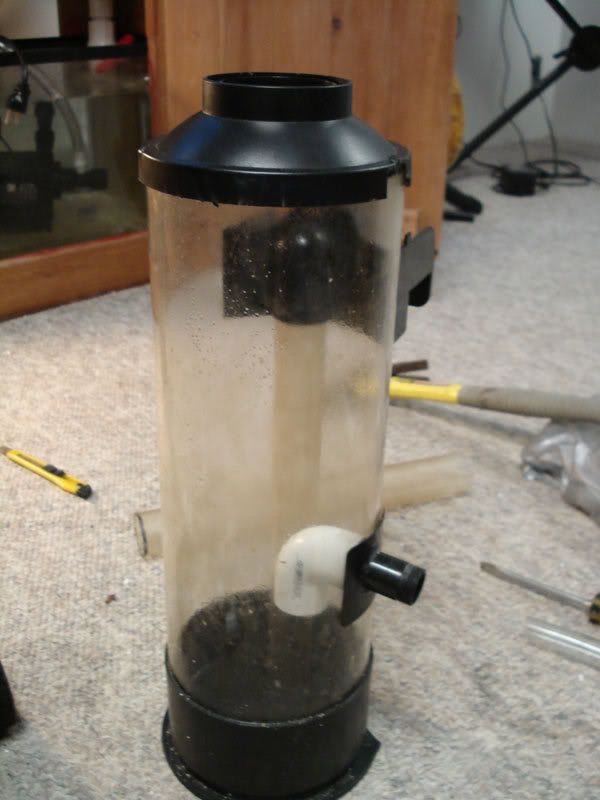
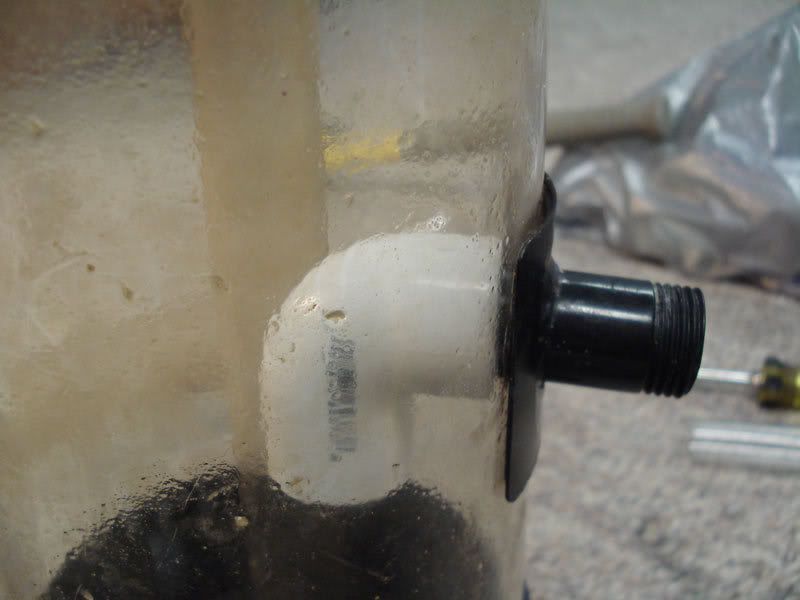
So I gotta be honest, at first (stock) I really wasnât impressed with the skimmer, in fact I was downright displeased. After I bought and meshed a new GenX2400 I still wasnât all that impressed (I was getting there). After being unsatisfied for about a month I went ahead and made a venture that improved it a lot. (The one using ½ flex tubing and a barbed connector) So after ready today I saw that chev took out the middle tube (why would they ever put that in there to begin with?!) Anyway since I had it out I was determined to fix the MOST MAJOR FLAW of this skimmer, the darn input. Who in their right mind puts an input 4 inches from the bottom of the skimmer? So hereâs my final mod. I added a 90 degree bend WITHOUT removing the top of the skimmer. Basically I used a ¾ inch male/female 90degree PVC. I know I know, words are confusingâ¦.check the pictures!   
|
|
|

|
|
|
#245 |
|
Registered Member
 Join Date: Feb 2007
Location: Manchester, MO
Posts: 1,125
|
I guess i should really add the "how to" part.
I stuck the elbow on the end of a long piece of 3/4 pvc. Then i stuck the end down the top of the skimmer and placed the threaded end (picture 1) unto the input. Slowly\carefully wiggled the 3/4 tubing off and then used the same long tubing to turn the elbow around. Since its treaded, turning the elbow down tightened the fitting even more. NO GLUE! Granted its only been a couple hours, i can already tell that the ENTIRE bottom 4 inches ARE NOW FULL OF BUBBLES!!!!
__________________
In process: 210gal, VARIOS-8 return, Kessil Lights, 80 gal sump, mp60's, and REGAL 200EXT 8" RECIRCULATING skimmer |
|
|

|
|
|
#246 |
|
Registered Member
Join Date: Jun 2005
Location: Cabo Rojo, Puerto Rico
Posts: 660
|
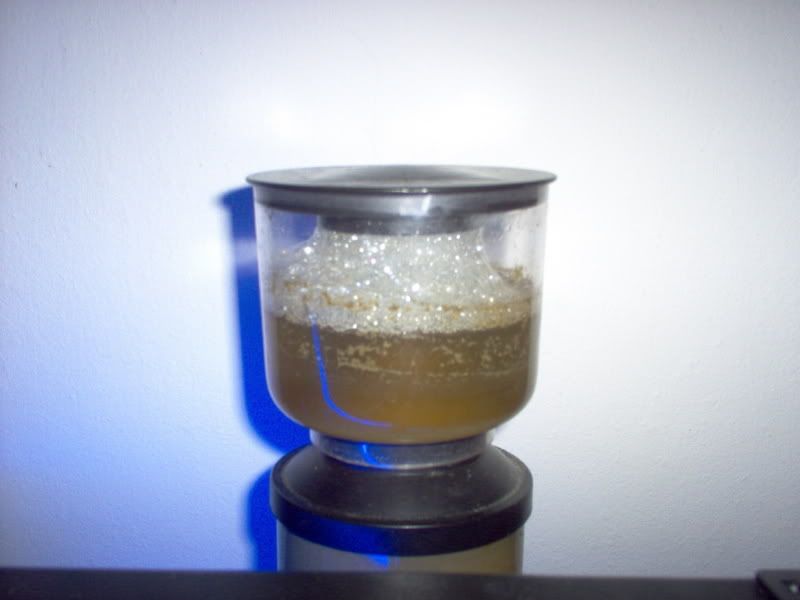
well here my ps75 with the gen-x 1500 only 3 days of some dry skimmate
 [IMG]  [/IMG] [/IMG]
|
|
|

|
|
|
#247 | |
|
Registered Member
Join Date: Jan 2007
Location: Charlotte, NC
Posts: 453
|
Quote:
Awesome job by the way clevername
__________________
What do you mean I have to change the water? PBITAWA Every Day |
|
|
|

|
|
|
#248 |
|
Registered Member
Join Date: Jan 2007
Location: Charlotte, NC
Posts: 453
|
any pics of the new workin skimmer clevername?
__________________
What do you mean I have to change the water? PBITAWA Every Day |
|
|

|
|
|
#249 |
|
Registered Member
 Join Date: Feb 2007
Location: Manchester, MO
Posts: 1,125
|
Yes, ill post some later tonight. First off, i can already tell this skimmer is now up to my standards.
To be fair, i would imagine that taking out the middle tube would has allot to do with this. I JUST emptied a great cup of skimmate. I would defiantly buy this skimmer again as long as you put the time and few extra bucks into it! Ill have pictures of the new skimmer (YES, i do mean "NEW") |
|
|

|
|
|
#250 |
|
Registered Member
Join Date: Aug 2006
Location: Culver City, California
Posts: 146
|
Good Job Clevername. This will definitely improve the contact time of air & water. I will do this mod and will also post results. I guess this is all the mods that we have to do to maximize the potential of the skimmer unless somebody here want to do the recirc mod.
|
|
|

|
 |
| Thread Tools | |
|
|