
|
|
 07/04/2008, 04:02 PM
|
#26 |
|
Registered Member
Join Date: Aug 2007
Location: Los Angeles, CA
Posts: 327
|
Aquascape
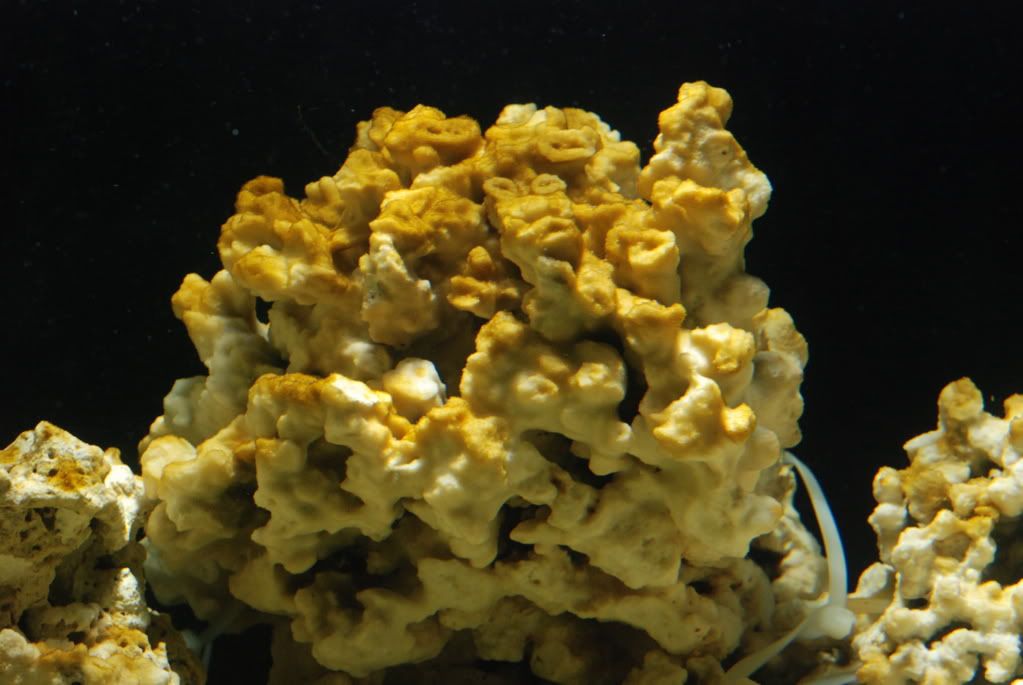
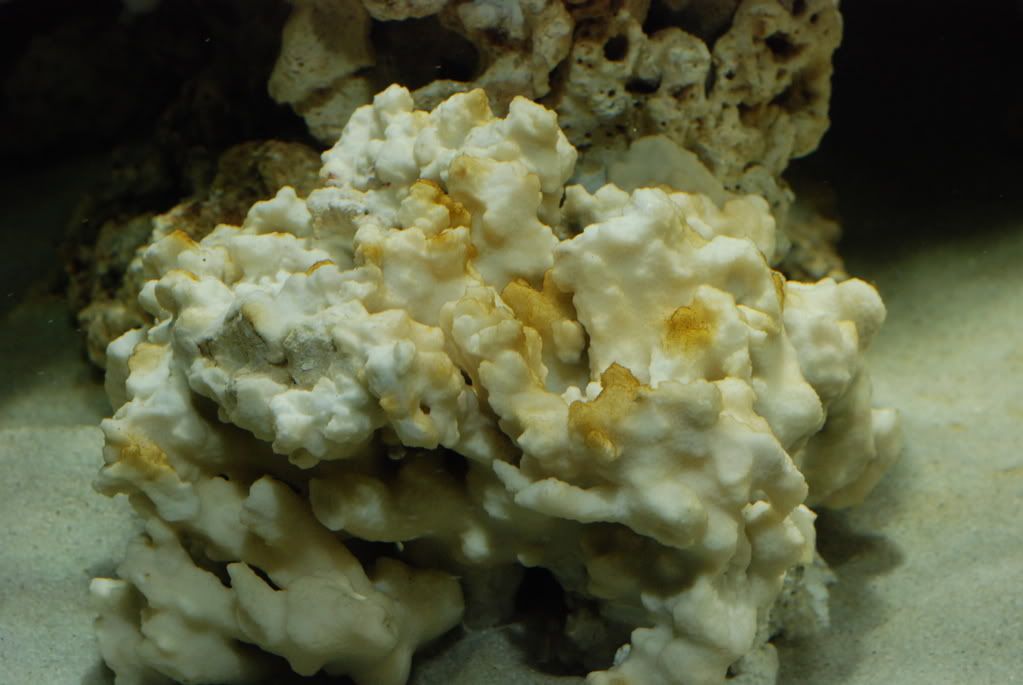
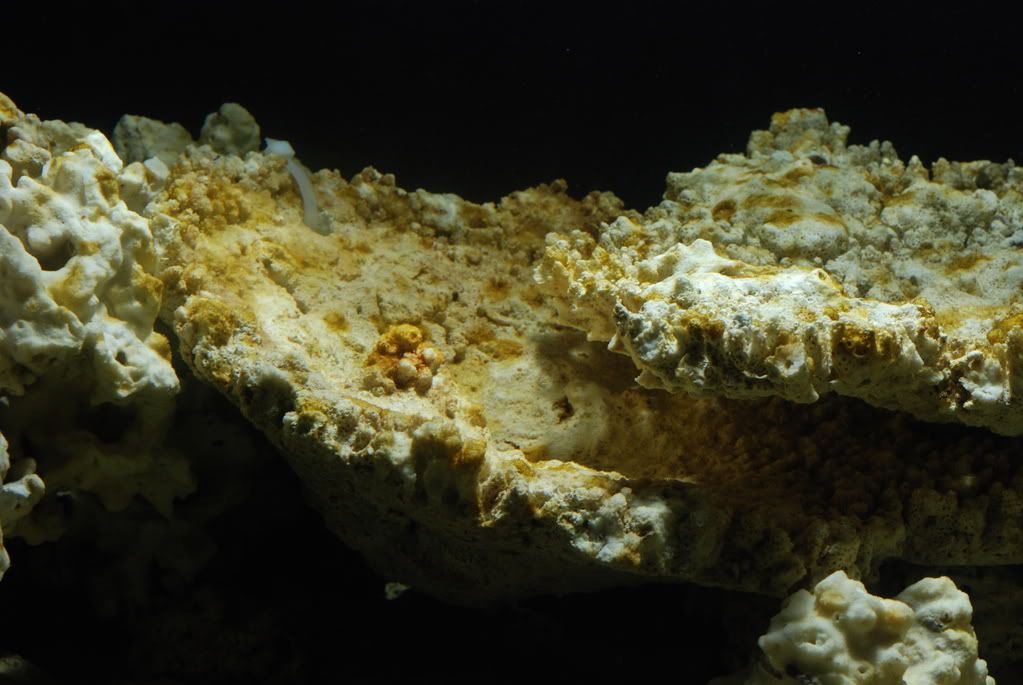
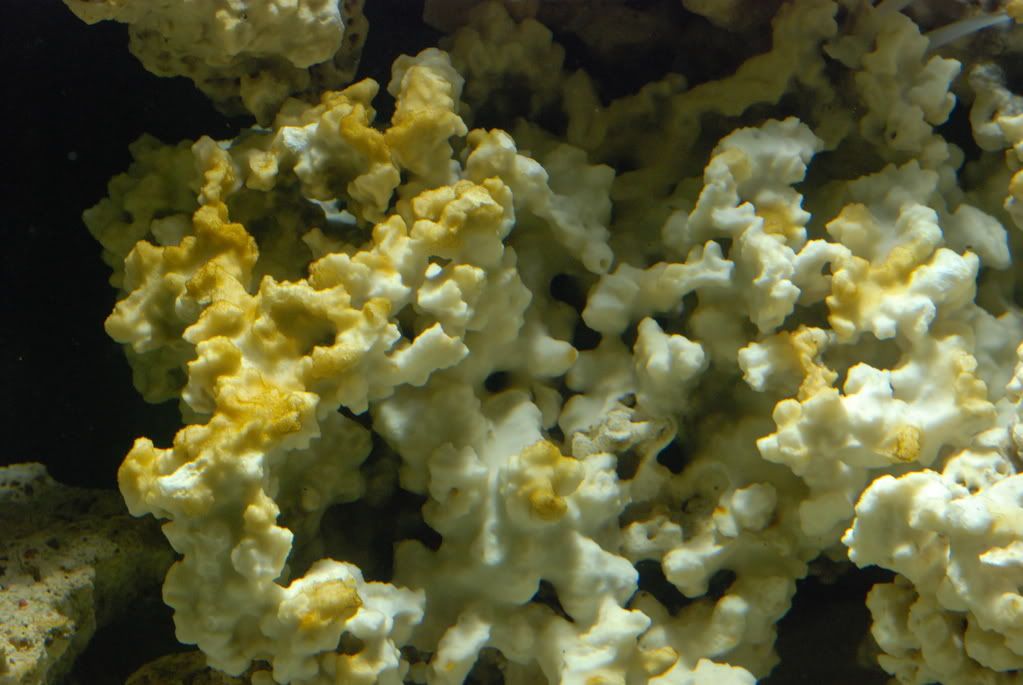
Here's the aquascape, wife did most of the work and it went pretty fast. Her sense of asthetics are much better than mine.
Sorry for the crummy pics, clearly I need to get a tripod and work on cutting out the glare. 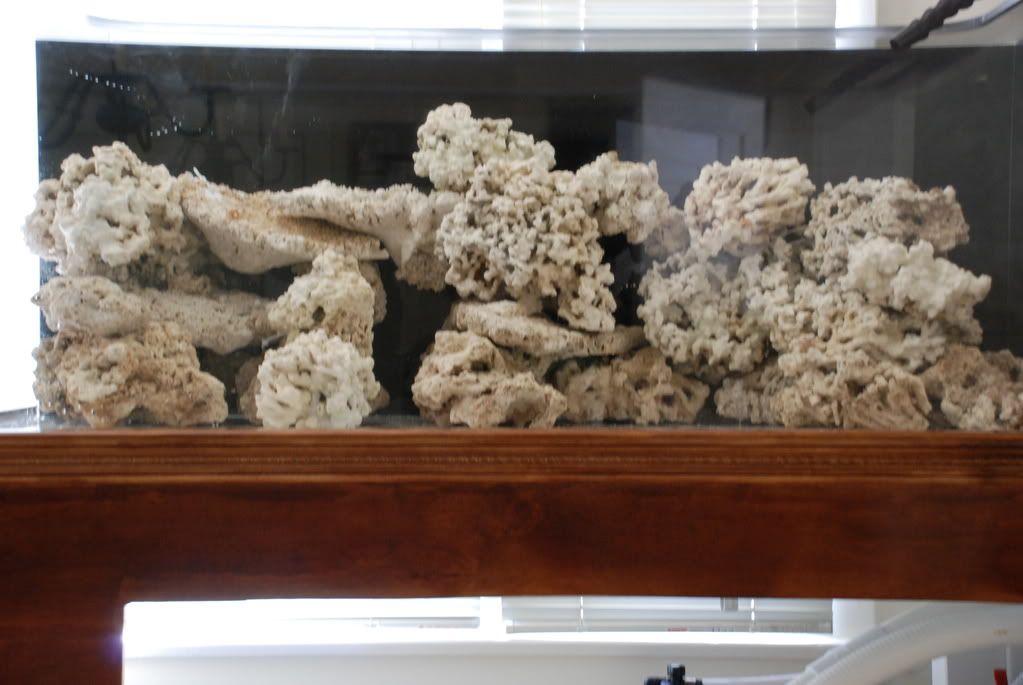 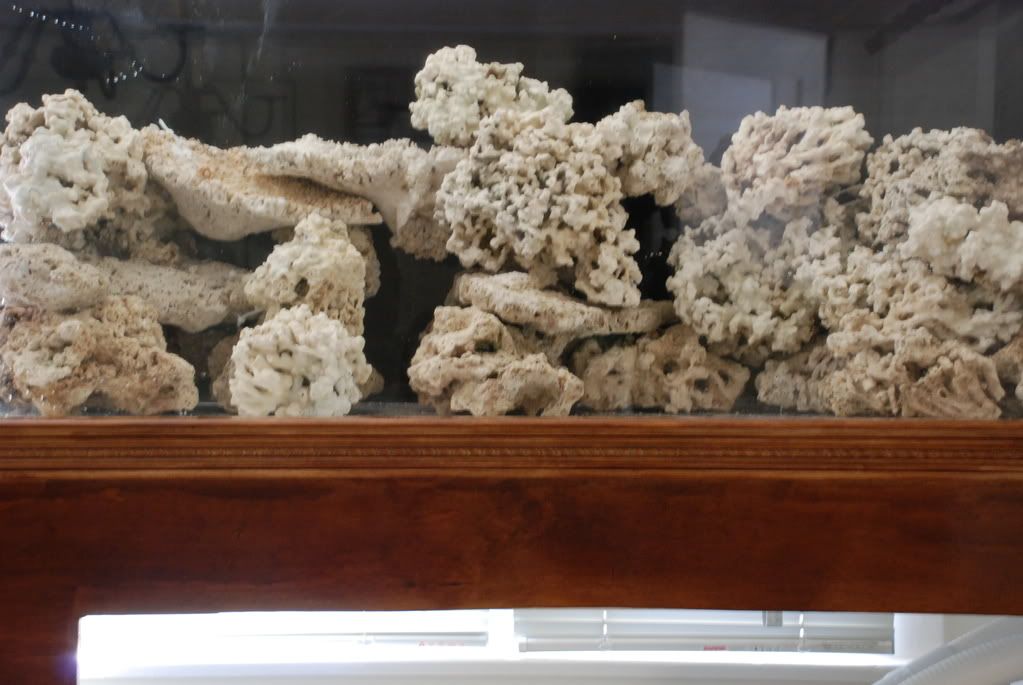  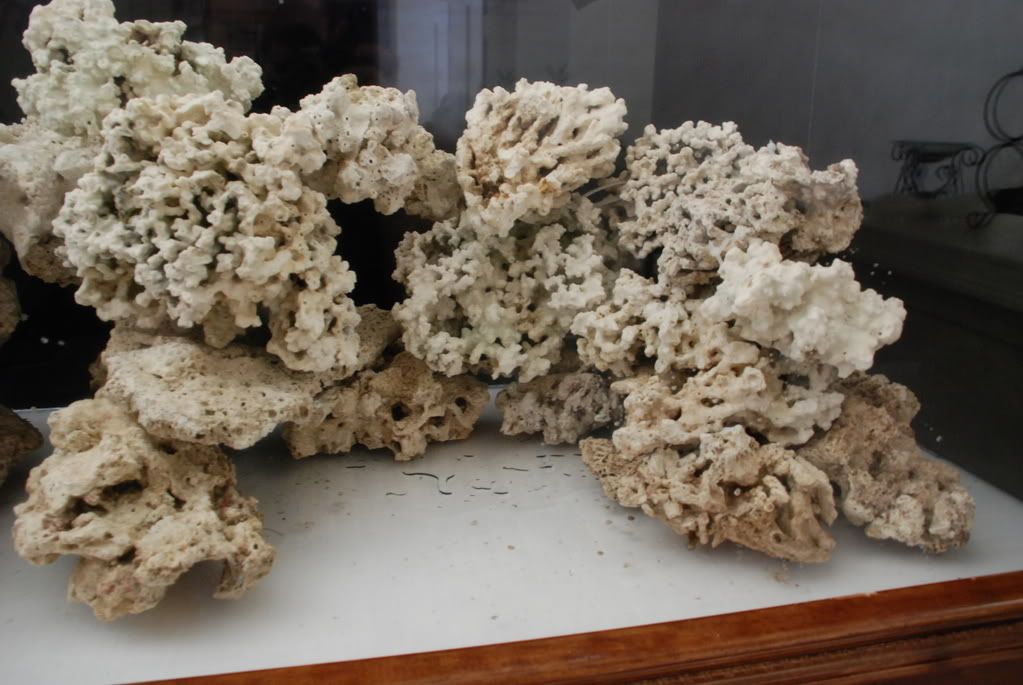 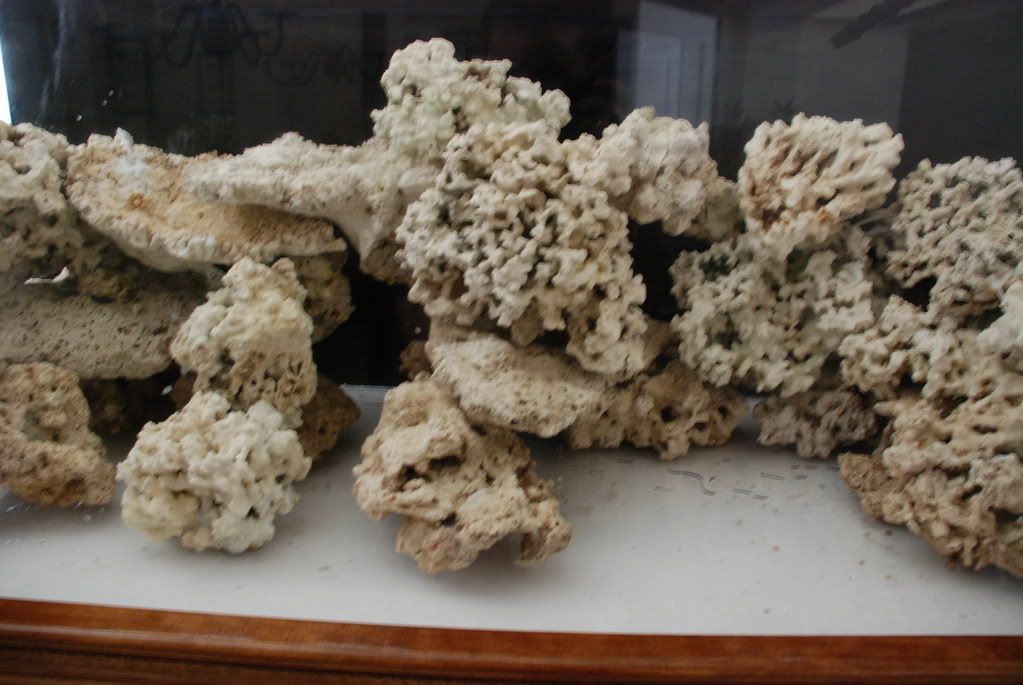 Now I started the RO/DI fill. I threw some sand in there and it was a hassle moving it around, so going to try to work with it some more once I have some water in there. Figure I'll be doing a lot of turkey basting. 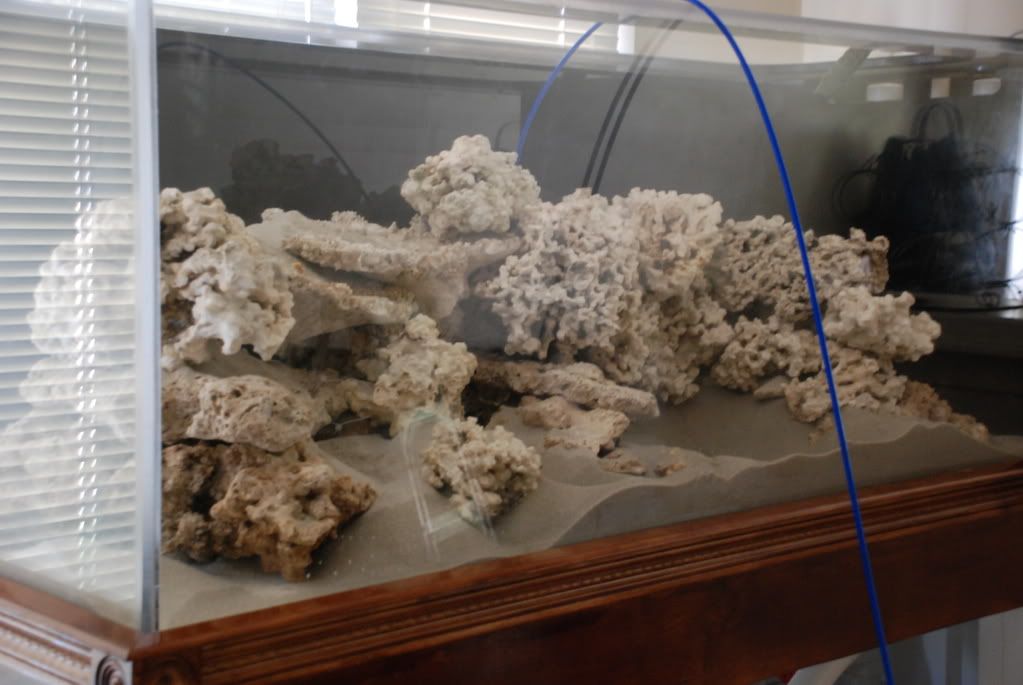
|

|

|
|
07/04/2008, 04:02 PM
|
#27 |
|
Premium Member
 Join Date: Dec 2005
Location: Bay Area - California
Posts: 636
|
Great planning and fantastic tank/sump! This will be a real treat to follow. I'm sure you'll have fun doing the aquascape, with lots of nice rocks of irregular shapes and sizes.
Ok, just saw the scape. Very nice! |
|
|
|
|
07/04/2008, 06:26 PM
|
#28 |
|
Registered Member
Join Date: Dec 2003
Location: Denver, Colorado
Posts: 9,579
|
Nice! It's looking good so far.
I realli like the to "cave piles" in the rock work. Spleify
__________________
Make it a Great Day!!!! Current Tank Info: 60 gal SPS cube, with 25 gal refugium, 400W MH, DIY Lumenarc III, DIY skimmer, DIY stand and canopy. 40 breeder LPS with 40 gallon sump, DIY stand, 250W MH |
|
|
|
|
07/04/2008, 09:54 PM
|
#29 |
|
Registered Member

Join Date: Jan 2007
Location: Upstate New York
Posts: 863
|
very clean looking build. Stand looks great.
|
|
|
|
|
07/04/2008, 10:09 PM
|
#30 |
|
Registered Member
Join Date: Dec 2007
Posts: 109
|
Awesome rock work!
I can not wait to see future pics! |
|
|
|
|
07/05/2008, 12:15 PM
|
#31 |
|
Registered Member
Join Date: Aug 2007
Location: Los Angeles, CA
Posts: 327
|
Fish List
Ok, as I sit around in anticipation of my tank filling (going to take about 48 hours) I decided to put up my fish stocking list. Any feedback is welcome, but keep in mind this is still a working list so no taking me to the toolshed!
Mostly looking for a good variety of reasonably priced fish. Tangs: Yellow, Blue, Convict Clowns: Pair (not sure of exact type yet) Pair of Cardinal Fish Mandarin Foxface Royal Gramma Basslet Anthias (pair? beautiful fish would like more than one but know they can be difficult to keep, need to do more research here). Pistol Shrimp/Goby pair Pseudochromis Dartfish Pair The following fish are a maybe, or present a specific problem. Chromis school (bioload is probably getting too high) Clown Goby pair (nips at SPS, maybe will add later) Hawkfish (harasses bottom feeders?) Filefish (eats shrimp?) Dwarf Angel (coral nipper) Wrasse of some sort (outcompete Mandarin for food?) Kole or Tomni Tang (too many tangs) |
|
|
|
|
07/05/2008, 12:23 PM
|
#32 |
|
Moved On
Join Date: Apr 2008
Location: C Hill - Jersey
Posts: 159
|
Awesome work on the aquascaping. Looks like its gonna turn out to be one heck of a tank!
|
|
|
|
|
07/05/2008, 12:51 PM
|
#33 |
|
Registered Member

Join Date: Sep 2007
Location: Little Rock, AR
Posts: 69
|
That's looking really good, keep us updated.
__________________
Member of Razorback Reef Marine Aquarium Society Current Tank Info: AP24 reef, jbj12 reef |
|
|
|
|
07/05/2008, 02:48 PM
|
#34 |
|
Registered Member

Join Date: Oct 2003
Posts: 5,069
|
Both the aquascaping and stand are top notch.
__________________
7 Years Reefing and Many Fresh 8 Foot Envisions |
|
|
|
|
07/05/2008, 05:26 PM
|
#35 |
|
Registered Member
Join Date: Jan 2007
Location: Upstate New York
Posts: 863
|
that is some premo rock to work with... will definately look even better when it livens up!
|
|
|
|
|
07/07/2008, 05:09 PM
|
#36 |
|
Registered Member
Join Date: Aug 2007
Location: Los Angeles, CA
Posts: 327
|
Thanks for all the compliments on the rockscape
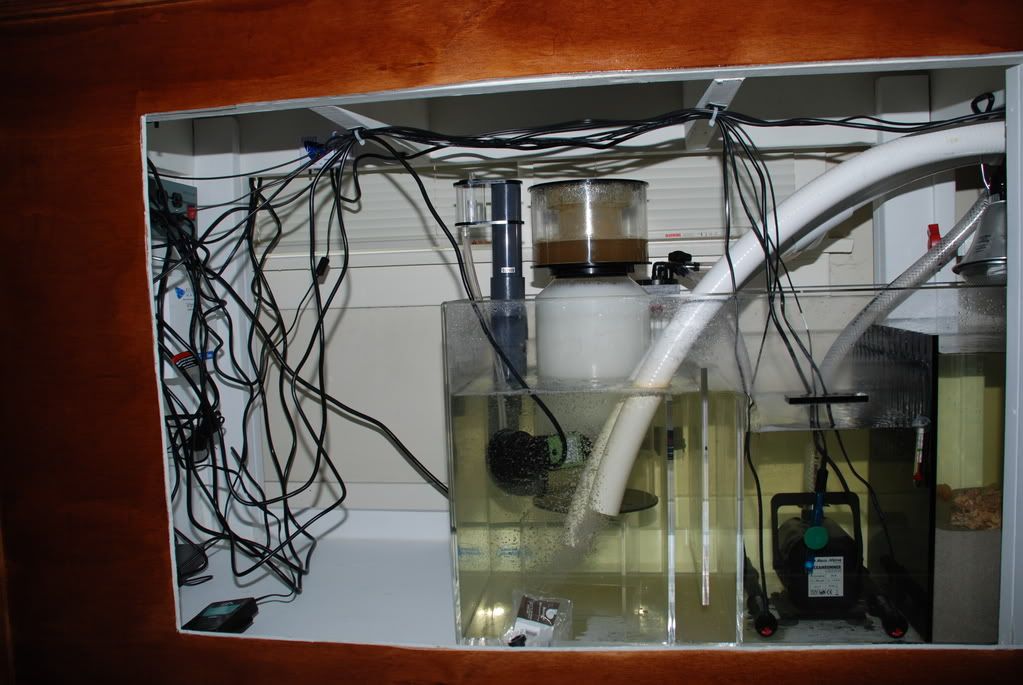
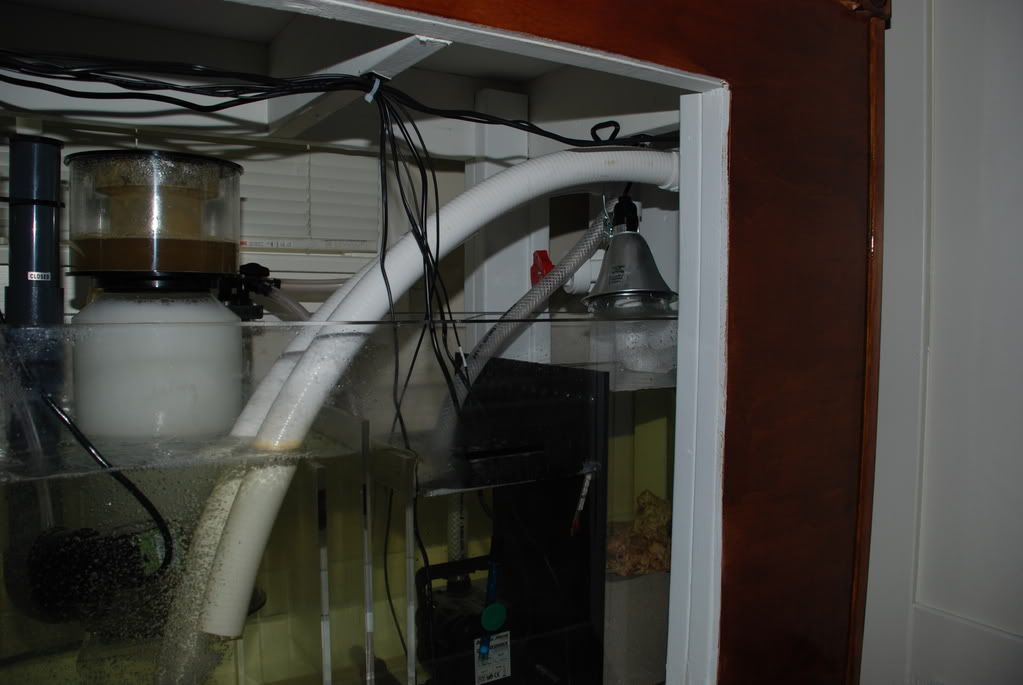
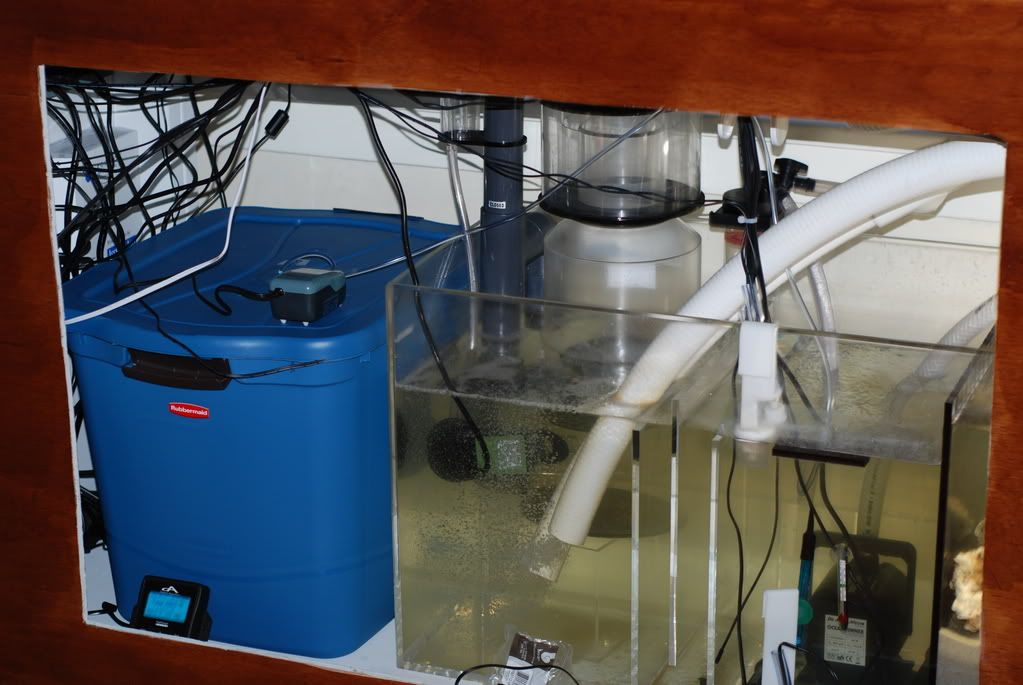
 . We are very pleased with it. . We are very pleased with it.Currently it's filled with RO/DI and most of the salt (S.G. is up to around 1.021 I think, adding it slowly as I fiddle around with other things). I've got the skimmer online; I had to redo the mesh using some fishing line instead of zip ties because I could not get the pump to start. After redoing the mesh it fired right up and it's already pulling gunk. Very nice skimmer. 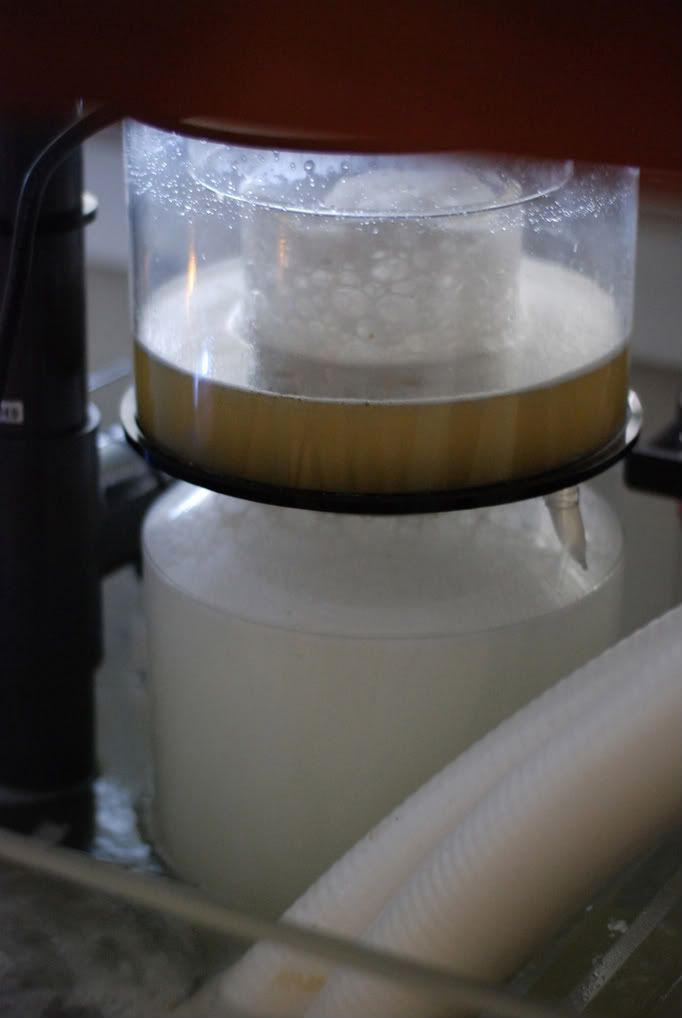 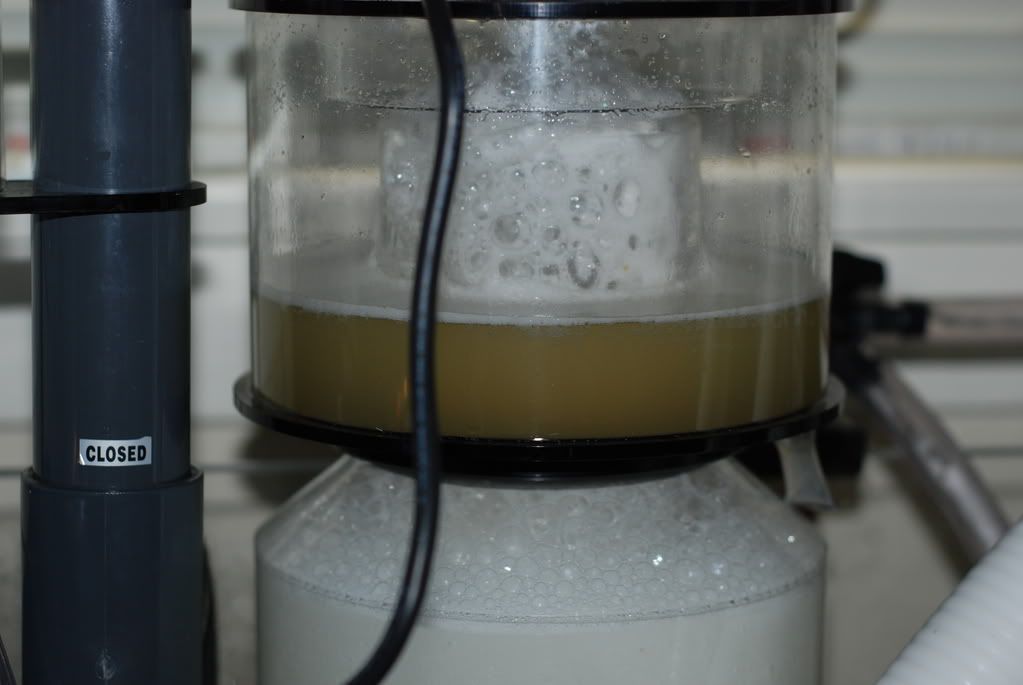 The tank has a bit of a sand storm going on. This is partly because I keep messing around with it, and partly because how I have the Vortechs in there. Right now I have the Vortechs on the back wall blowing towards the front, but this is creating a lot of undertow. I'm going to move them to the sides, but because of where the overflow is, one is going to have to go below it...placing it about halfway down in the tank. Hopefully it won't create more sandstorm problems. I'm pretty pleased with the sand though, I ended up using the Medium Grade Quikcrete Commercial Sand (silica based sand); it looks nice and is actually pretty dense, it should stay in place nicely once I'm done fooling around with the powerheads and it gets some bacteria growing in it. 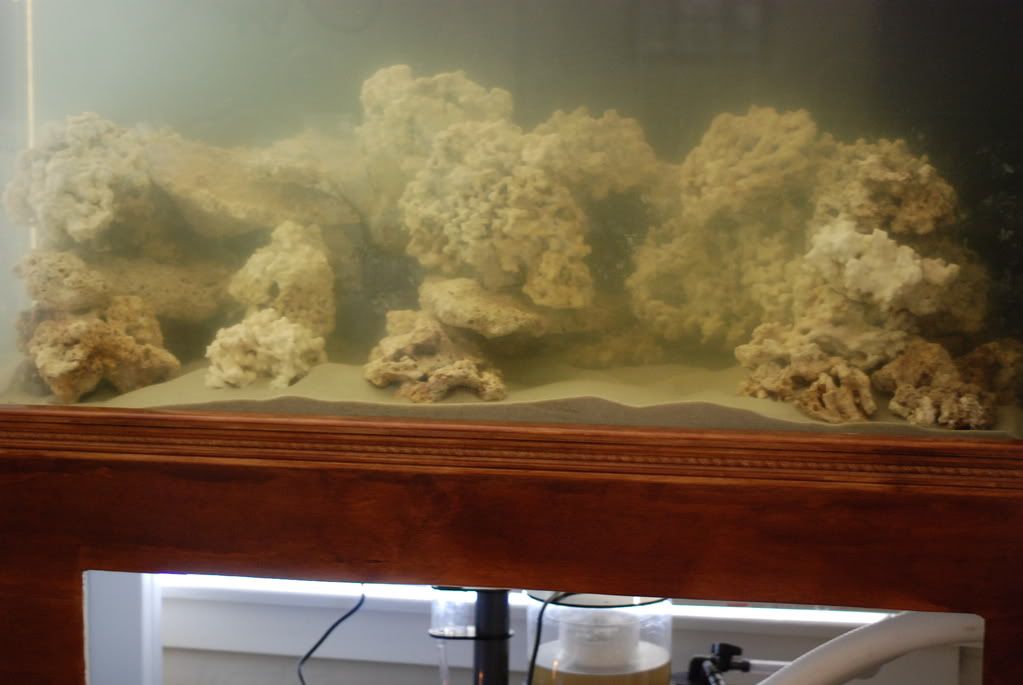 Side shot 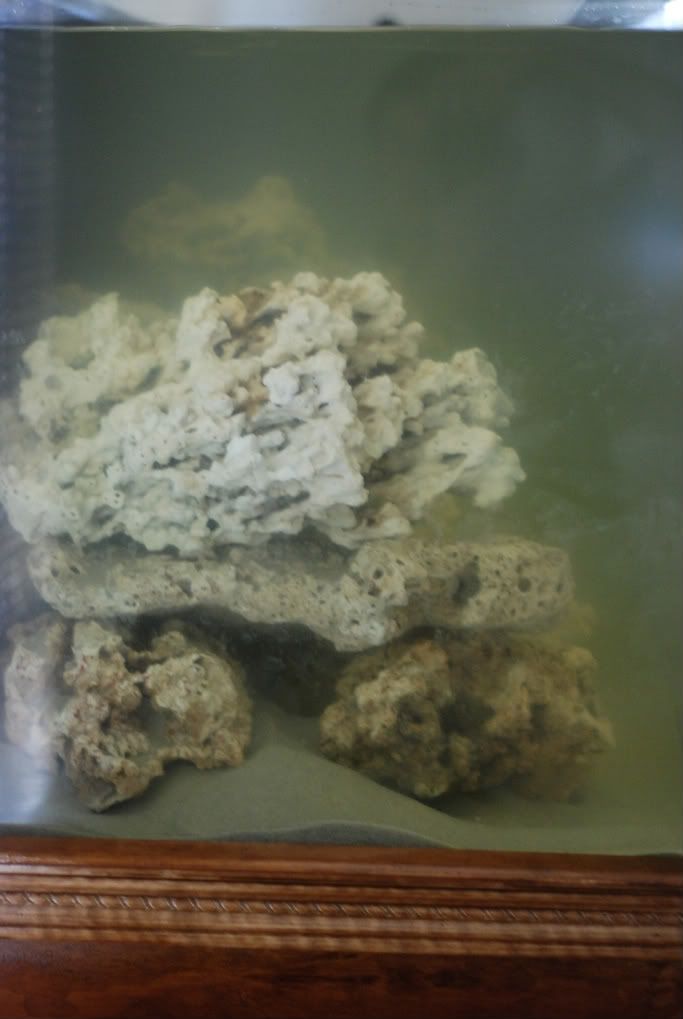 The racket from the plumbing is dying down now that the pipes are sliming up, I may cut down the stand pipes a bit further though. The water coming across the overflow slit (no teeth) comes over pretty fast...a longer overflow would probably have been better but too late now on that one. This causes the stand pipes in the rather narrow overflow box to get slammed by the waterfall. The water goes straight into the holes I drilled into the standpipe creating quite a bit of racket. I'm hoping by cutting down the pipes some more, I'll give myself some more room to play around with the restrictor on the pipes. I think I could alleviate the problem if I could get the holes fully submerged. If anybody has any ideas, please chime in. 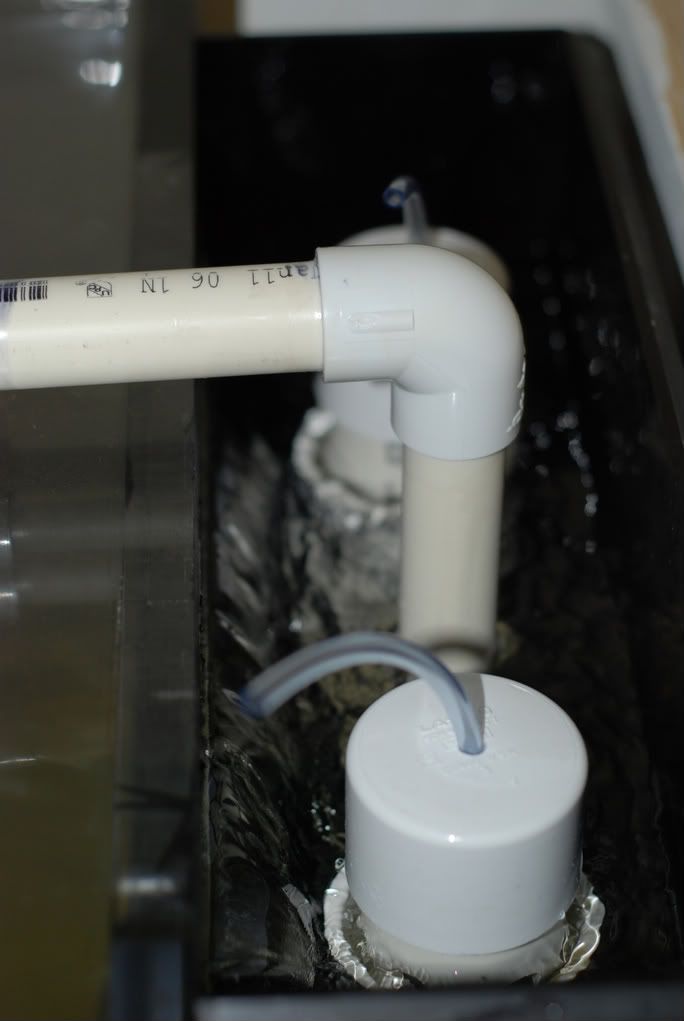 Here's a pic of the plumbing entering the refuge. The water splashing down here is making a bit of noise. I'm thinking I may extend this pipe all the way underwater eventhough I've read that the pipe should be halfway in and out of the water so that the air can escape. Any thoughts? 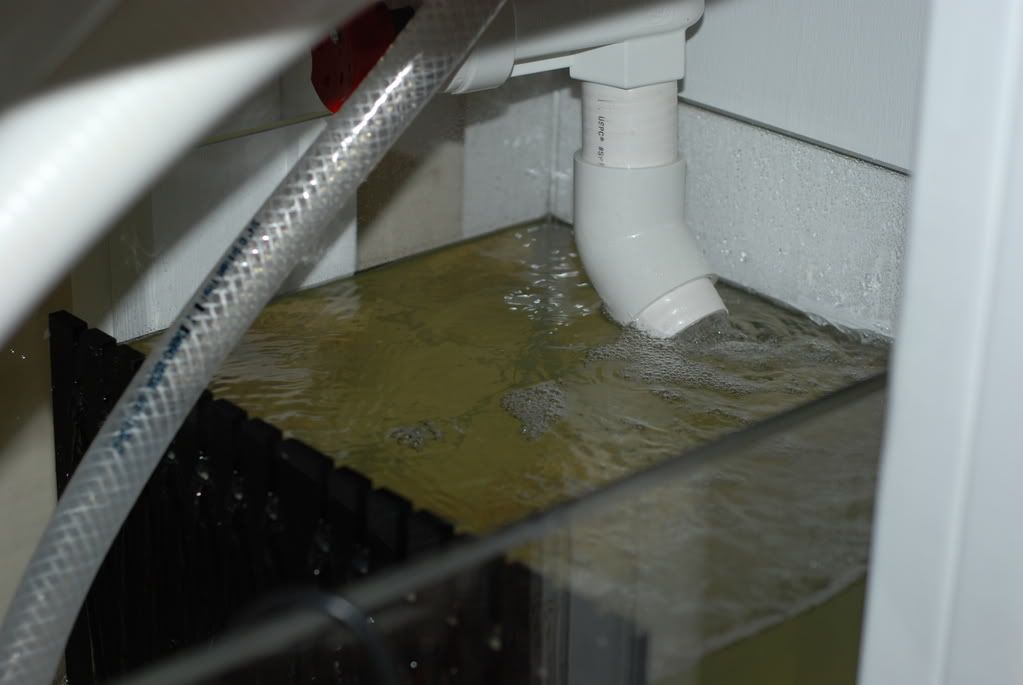 Here's a picture of the crooked door caused by the plywood on the right. The plywood isn't attached to much, so it is warpy and is pulling the door to the right. Any ideas on how I might rectify this? 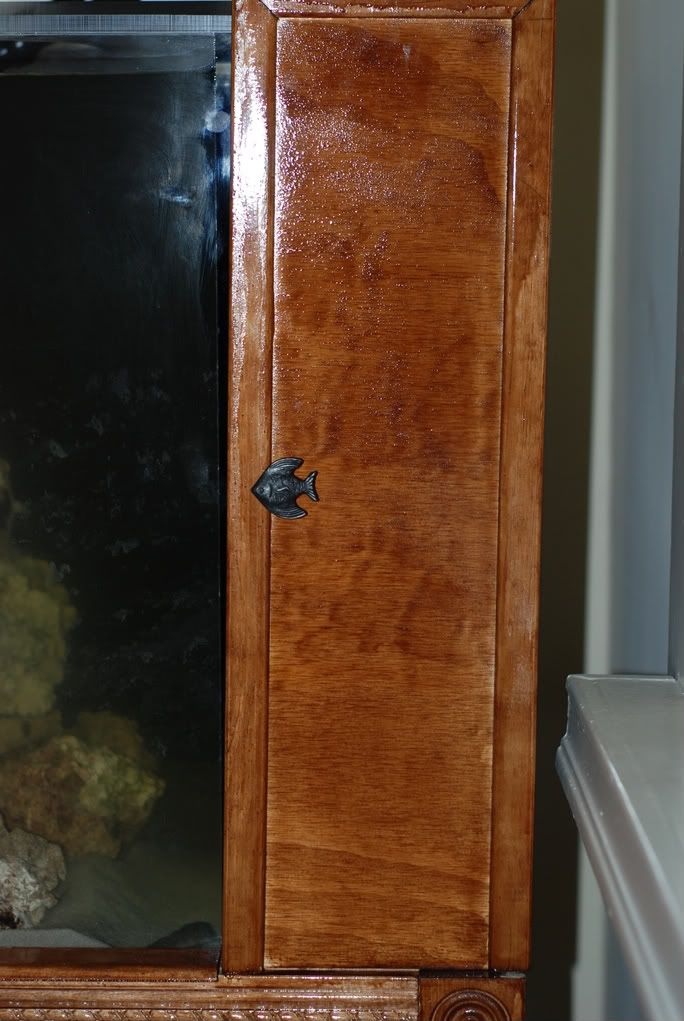 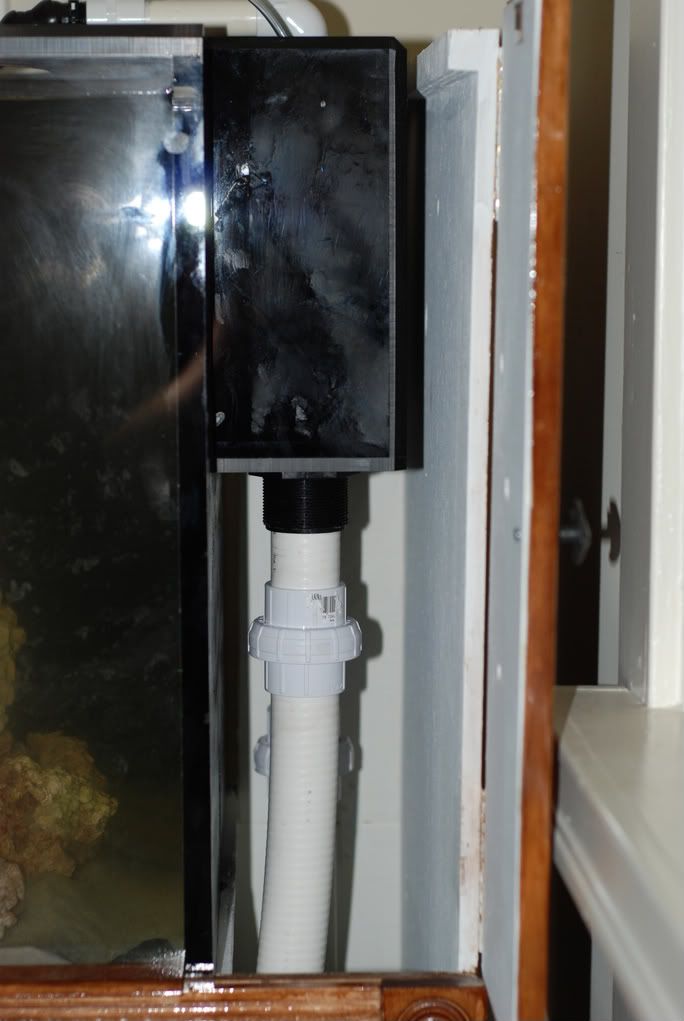 Here's a picture of the sump area. The blue container on the left is empty at the moment, but will be for fresh water topoff. Right now both drains dump into the skimmer area. They deposit quite a bit of bubbles, but they don't make it past the bubble trap. I wonder if they could interfere with the pump intake for the skimmer, but it doesn't seem to. I'm thinking I may go ahead and cut a few inches off the end of these pipes so they don't empty so far under the water. Any pros or cons to this that anybody can think of? 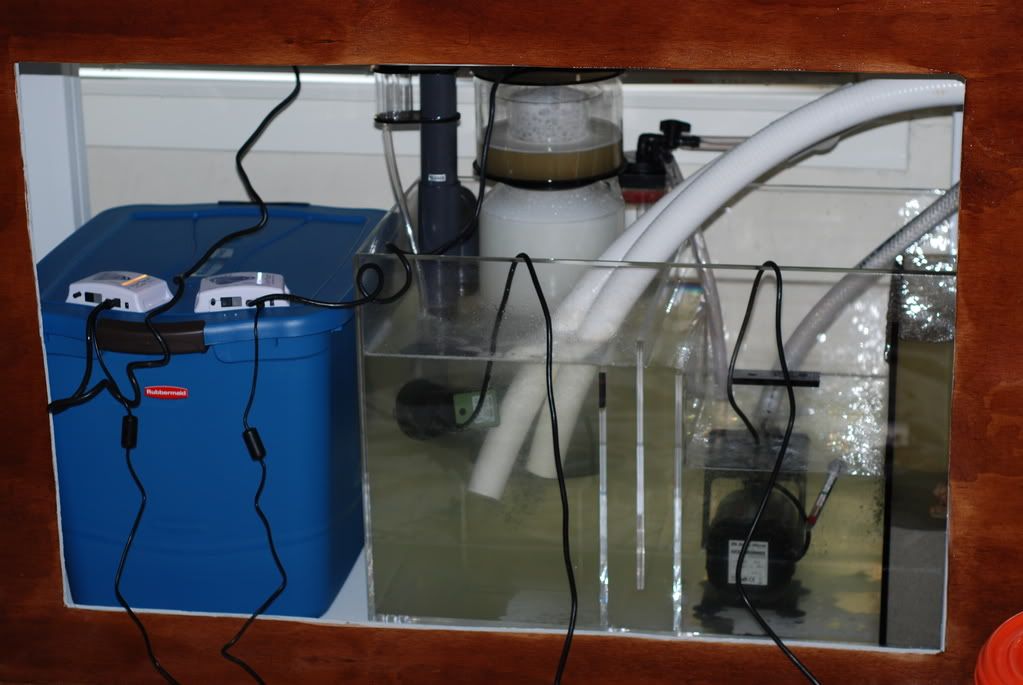
|
|
|
|
|
07/07/2008, 05:53 PM
|
#37 |
|
Registered Member
Join Date: Oct 2003
Posts: 5,069
|
Hmmm I'm terrible with overflows/ standpipes so I'll let someone else chime in. I am curious how you like the actual pipes though? I'm considering using one of those stockman style ones as opposed to a durso on my build.
Is that an MSX skimmer? Looks to be doing its job nicely.
__________________
7 Years Reefing and Many Fresh 8 Foot Envisions |
|
|
|
|
07/07/2008, 08:36 PM
|
#38 | |
|
Registered Member
Join Date: Aug 2007
Location: Los Angeles, CA
Posts: 327
|
Quote:
Yup, that's an MSX 200 
|
|
|
|
|
|
07/07/2008, 09:11 PM
|
#39 |
|
Registered Member

Join Date: Oct 2006
Location: Peoria, AZ
Posts: 238
|
Dana,
Here is how I have my main drain in to my sump. It catches all the big stuff and runs pretty quiet. It spreads out the water instead of just dumping it in one spot.  The pink filter kind of acts like a filter sock. I got a 90' roll online for about $30. I just cut off a new piece every week and toss the old one. Keeps the large stuff out of the rubble rock and quiets the water down a ton.  I just use a T fitting on the refugium and frag tank drain into the sump. Not as much water flow as the main tank so the T keeps it a little quieter and keeps the air gap you were talking about. It also keeps the salt spray from getting all over everything.  
__________________
--Ryan-- You say your wallets fat?? Get into the saltwater hobby. That'll cure it real quick (175g Bowfront coming soon. Click on the red house to see the build thread.) Current Tank Info: 175g Reef, 60g sump, 40g frag, 40g fuge. |
|
|
|
|
07/07/2008, 10:29 PM
|
#40 |
|
Registered Member
Join Date: Aug 2007
Location: Los Angeles, CA
Posts: 327
|
Great pics! Thanks for the ideas, Ryan.
I guess my problem with the refuge drain, and indeed that piece of pipe that drains down in that direction, seems to be that the water is just blasting through it. I don't have a 90 on the end like you do; I have a 45 so I may try to switch the fitting. I can make some adjustments to the speed water enters the fuge with the gate valve, but I end up with one of two problems. 1)Flow is high and I get a bunch of splashing noise and spray. 2)Flow is low and I get a bunch of gurgling as air escapes at the end of the fuge drain. So I'm thinking of just having the pipe empty entirely underwater. This will cause some bubbles in the fuge, but they don't seem to be making it back to the display. I think this is because my fuge is deeper then most...any bubbles that make it over the fuge overflow to the return section just don't make it down far enough to hit the pump intake. Still, that doesn't solve my overall problem of that particular drain being rather noisy. I play around with the stand pipes and I can generally acheive one of two states: 1) even flow through both drains with one of them (usually the one going to the fuge and T'd to the skimmer section) making a gurgling racket. 2) The majority of the flow going through the fuge/skimmer drain with no gurgling but a big waterfall racket through the first plumbing drop. |
|
|
|
|
07/11/2008, 08:10 PM
|
#41 |
|
Registered Member
Join Date: Aug 2007
Location: Los Angeles, CA
Posts: 327
|
Some updates
Got the lights up, here's a bunch of pics. FTS with actinic 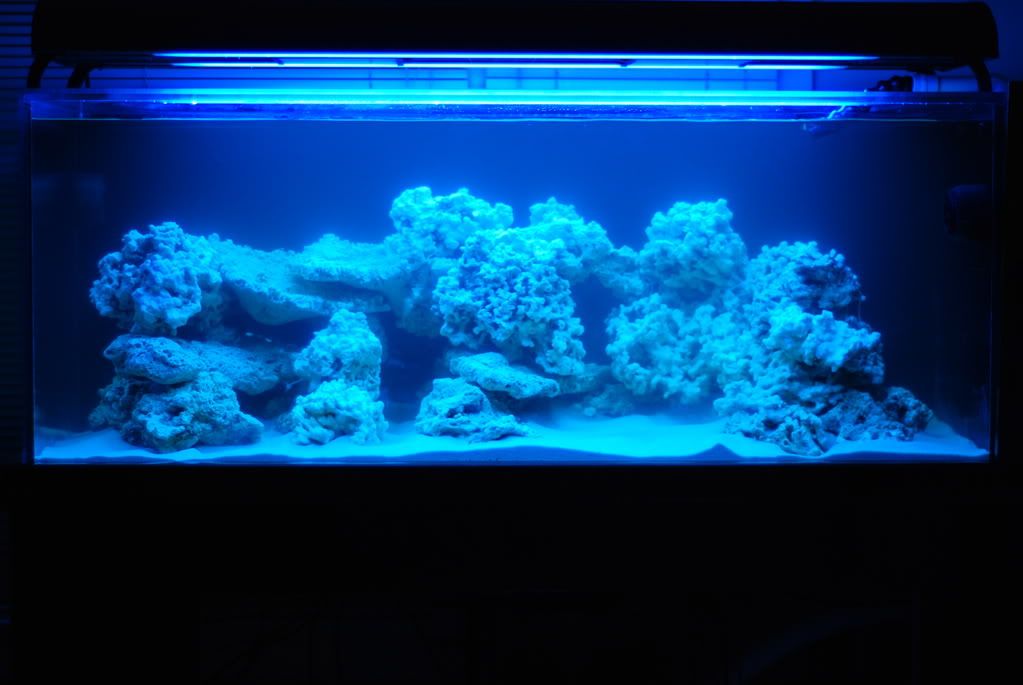 FTS with actinic and MH 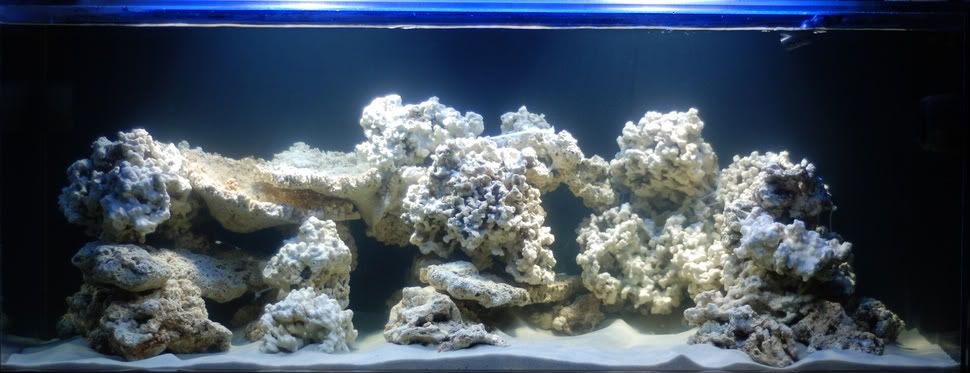 Actinic shots 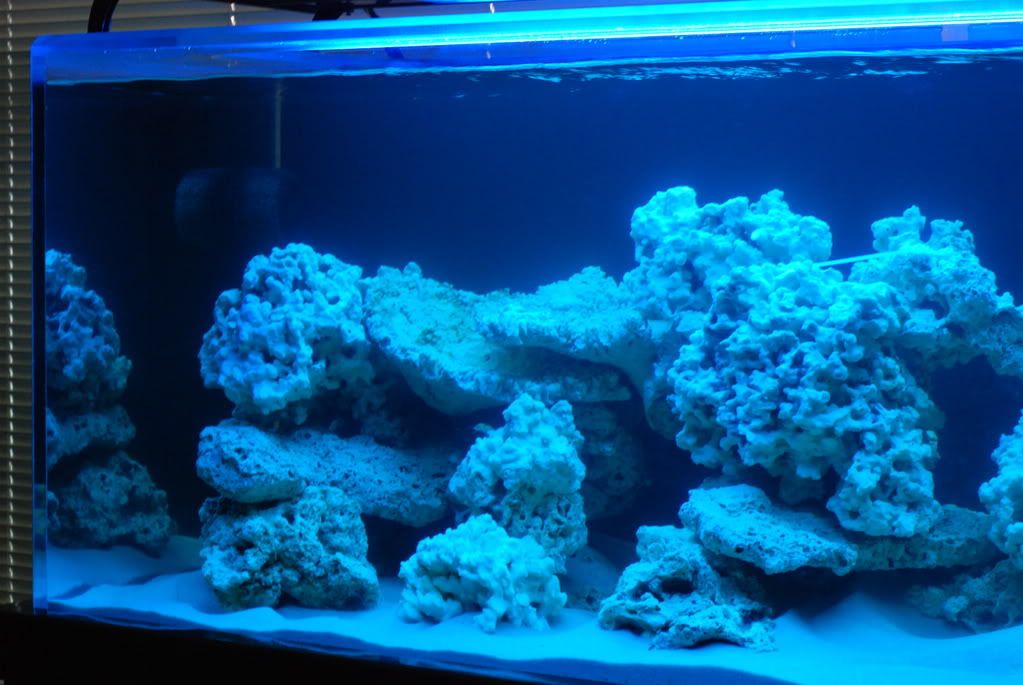  Actinic with white balance for fun 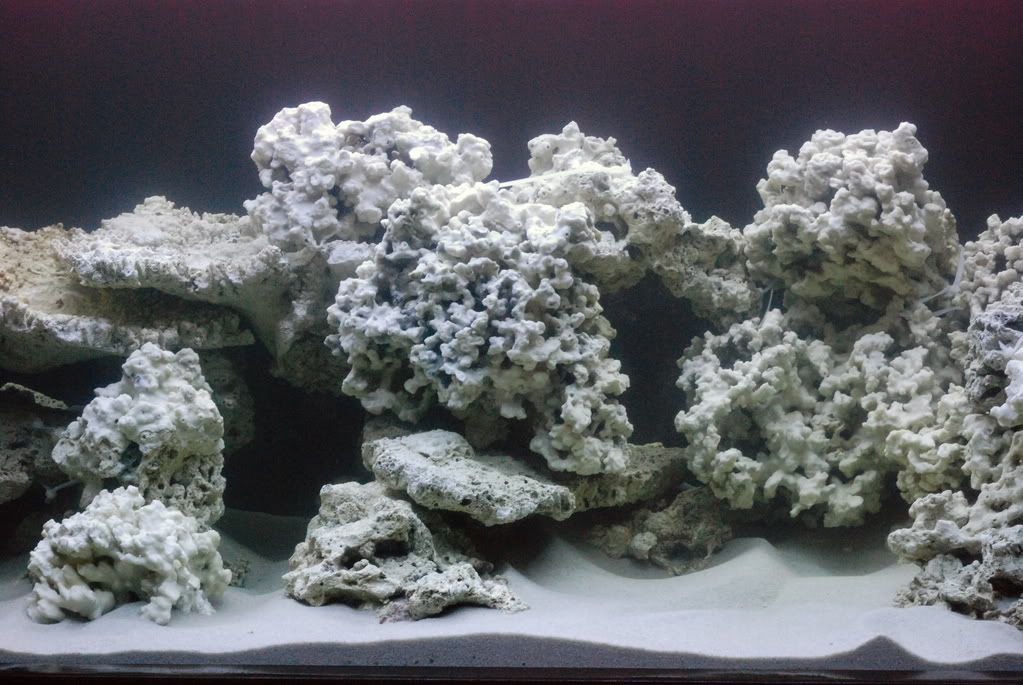 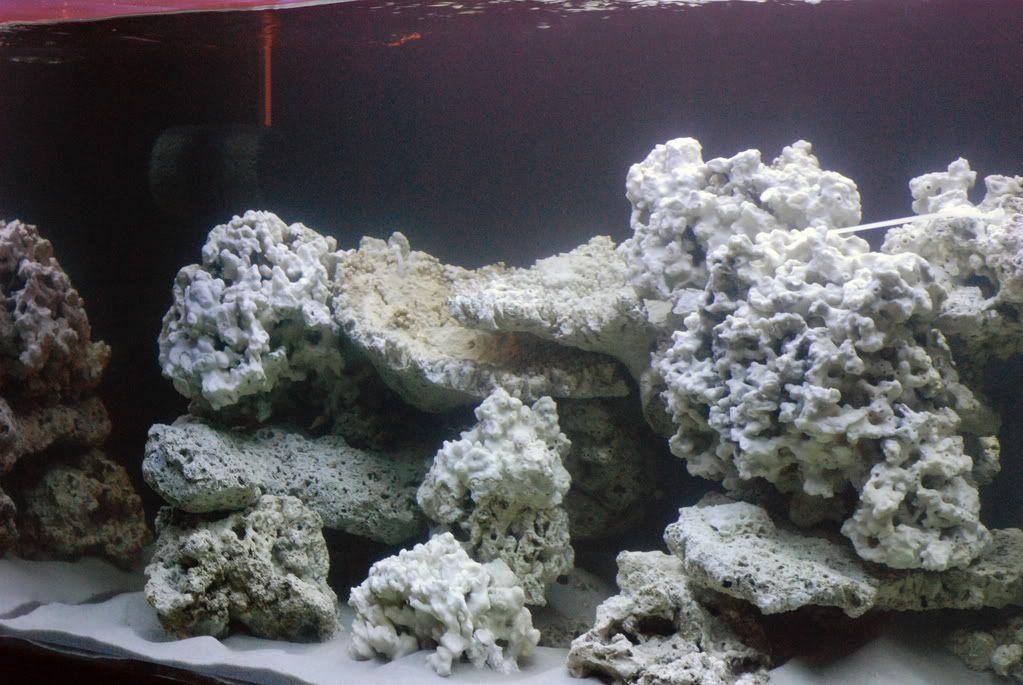
|
|
|
|
|
07/11/2008, 08:11 PM
|
#42 |
|
Registered Member
Join Date: Aug 2007
Location: Los Angeles, CA
Posts: 327
|
Got most of the electrical squared away
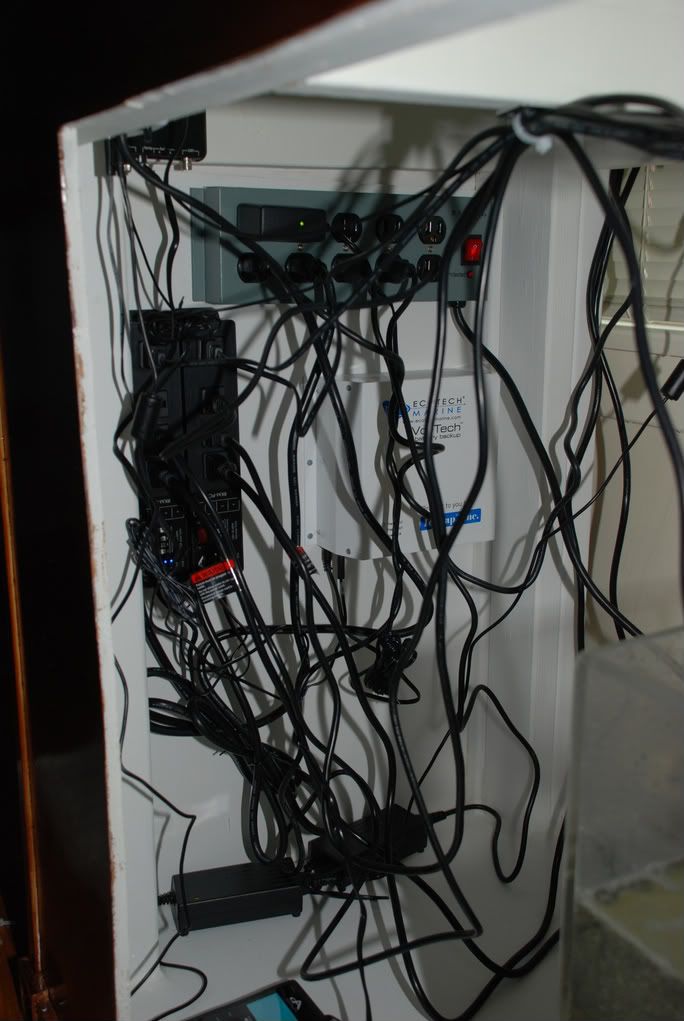   Figured out my standpipe problem; I had the outside PVC couplers set way to low. It's really quiet now.  Here's the head unit on the new RKE controller. It's pretty neat, but it's been a little buggy for me. Keeps turning off my return pump and skimmer at the same time. DA is trying to work out some of the kinks. 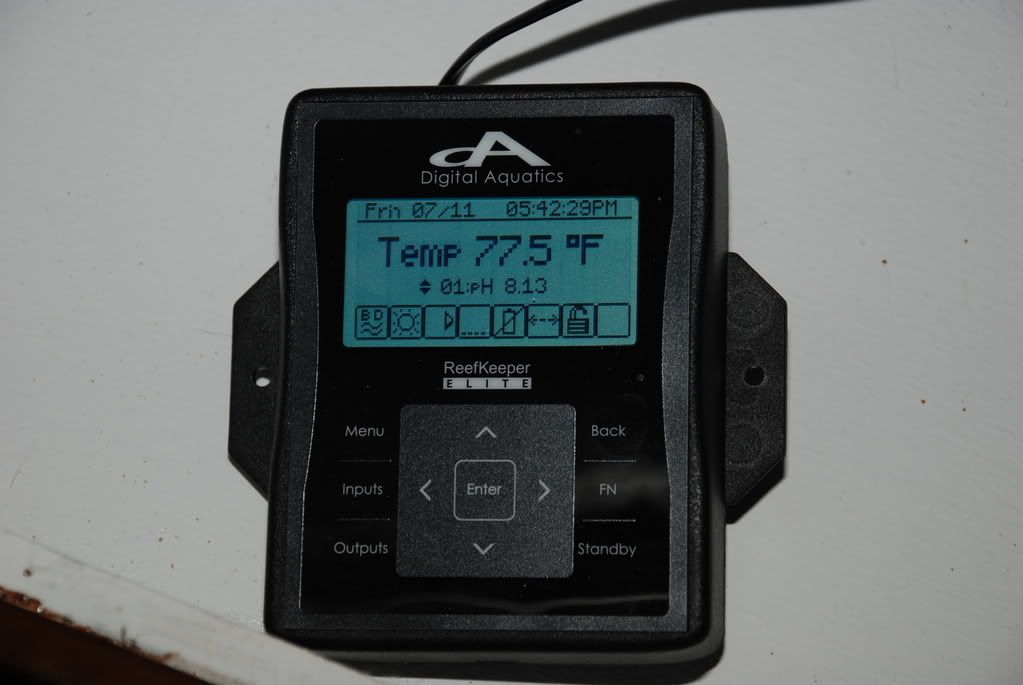 That's about it for now. Going to try to pickup some Chaeto at a fragswap/potluck tomorrow near where I live. |
|
|
|
|
07/13/2008, 08:09 PM
|
#43 |
|
Registered Member
Join Date: Aug 2007
Location: Los Angeles, CA
Posts: 327
|
At this point I'm thinking I'm pretty much done. Just need to stain and put on the doors which are still on the way. Finished up adding float switches for the top off (blue tub), a clip on fan, and some Chaeto for the fuge. I have some test kits on the way so I'll put up my numbers in a few days, but from here I imagine it will be a waiting game.
|
|
|
|
|
07/19/2008, 12:46 PM
|
#44 |
|
Registered Member
Join Date: Aug 2007
Location: Los Angeles, CA
Posts: 327
|
So, I've had my first nightmare problem
 I went to move some of the plumbing around, but could not for the life of me remove one of the unions. I ended up having to cut the pipe out. I used a coupling to put it back together again, but then I didn't measure properly and the length of pipe was too short. This caused a bend in the pipe that lead to a leak from a bulkhead. Turns out I had striped the flange on the bulkhead to compensate for the bent piece of pipe. So, I spent the better part of a day trying to cut the pipe out yet again because AGAIN I could not unscrew the darn union. Then I had to cut out the flange that I had striped using my Dremel. This was a major pain because the area I have to work in is very narrow. I went to move some of the plumbing around, but could not for the life of me remove one of the unions. I ended up having to cut the pipe out. I used a coupling to put it back together again, but then I didn't measure properly and the length of pipe was too short. This caused a bend in the pipe that lead to a leak from a bulkhead. Turns out I had striped the flange on the bulkhead to compensate for the bent piece of pipe. So, I spent the better part of a day trying to cut the pipe out yet again because AGAIN I could not unscrew the darn union. Then I had to cut out the flange that I had striped using my Dremel. This was a major pain because the area I have to work in is very narrow.Thankfully, I finally got everything back to normal but it's got to be one of the most aggravating things I've ever had to deal with. What I've learned: 1)Don't overtighten the stupid unions! In fact, only tighten them enough so they don't leak. 2)Once your plumbing is working, leave well enough alone. I am glad I decided to go with the overflow on the side...if this problem had happened to me with a rear overflow, I would have had to drain the tank and get it off the stand. As it was, it was still a pain working in the narrow side space but at least I was able to get it done. |
|
|
|
|
07/19/2008, 12:50 PM
|
#45 |
|
Registered Member
Join Date: Aug 2007
Location: Los Angeles, CA
Posts: 327
|
Oh, forgot I did run my numbers.
SG 1.025 (Refractometer) Ca 500 (API) dKH 12 (API) Mg 900 (Salifert) I think I did the Mg test wrong which is why my number there is a bit lower than I expected. I'm using Reef Crystals salt. I forgot the numbers for ammonia/nitrites but ammonia was still detectable in about the middle of the range on the chart and nitrites was off the chart. Nitrates were 20. So, I'm still somewhere in the middle of the cycle. |
|
|
|
|
07/21/2008, 12:08 PM
|
#46 |
|
Registered Member
Join Date: Aug 2007
Location: Los Angeles, CA
Posts: 327
|
Finally seeing some action! Looks like diatom growth.
    Doors are stained, just waiting on them to dry. |
|
|
|
|
07/21/2008, 05:12 PM
|
#47 |
|
Registered Member
Join Date: Aug 2007
Location: Los Angeles, CA
Posts: 327
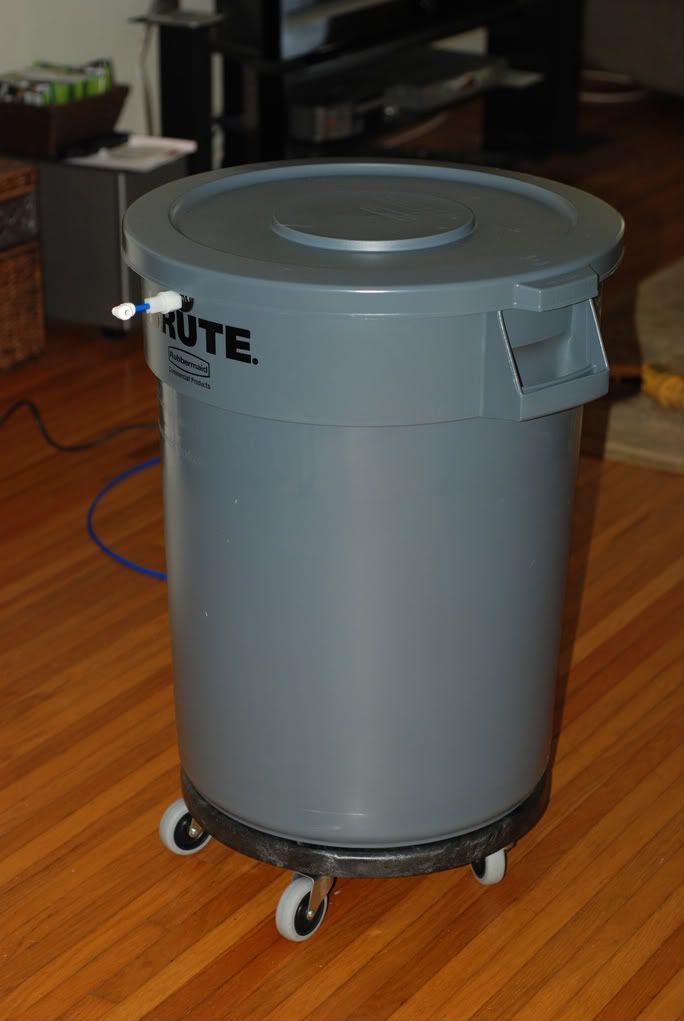
|
Saltwater storage in a 32g Brute.
|
|
|
|
|
07/21/2008, 05:20 PM
|
#48 |
|
Registered Member
Join Date: Dec 2003
Location: Denver, Colorado
Posts: 9,579
|
Wow!! This is really looking awesome!!
Spleify
__________________
Make it a Great Day!!!! Current Tank Info: 60 gal SPS cube, with 25 gal refugium, 400W MH, DIY Lumenarc III, DIY skimmer, DIY stand and canopy. 40 breeder LPS with 40 gallon sump, DIY stand, 250W MH |
|
|
|
|
07/28/2008, 08:07 PM
|
#49 |
|
Registered Member
Join Date: Aug 2007
Location: Los Angeles, CA
Posts: 327
|
Finally got the doors on. I must say I'm quite proud of the stand, but if I had to do it over again...I definetly think I would have just bought one. At the end of the day, not whole lot of money saved and an awful lot of hassle. Plus, I know every little flaw even if nobody else will probably notice!
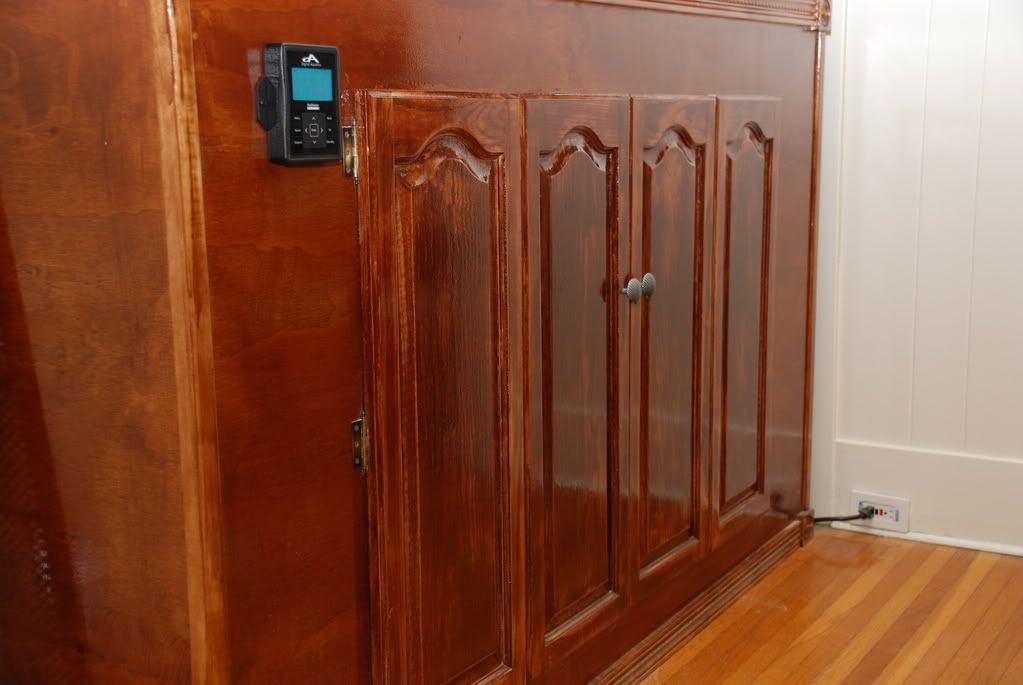  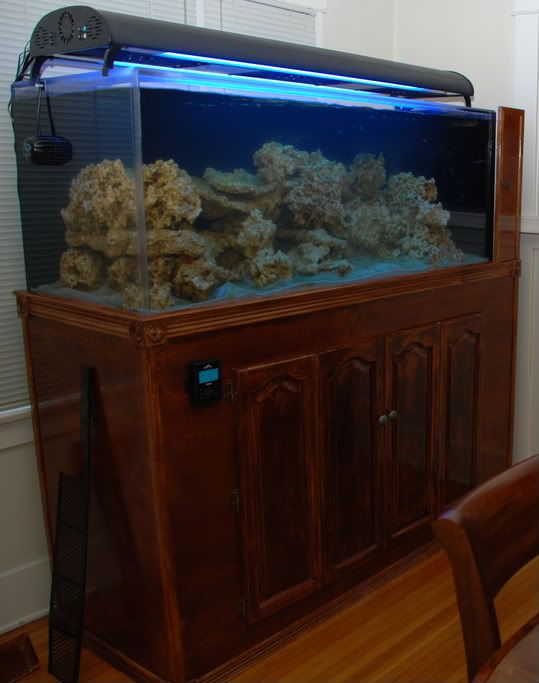 Here's a picture of the RKE mounted. 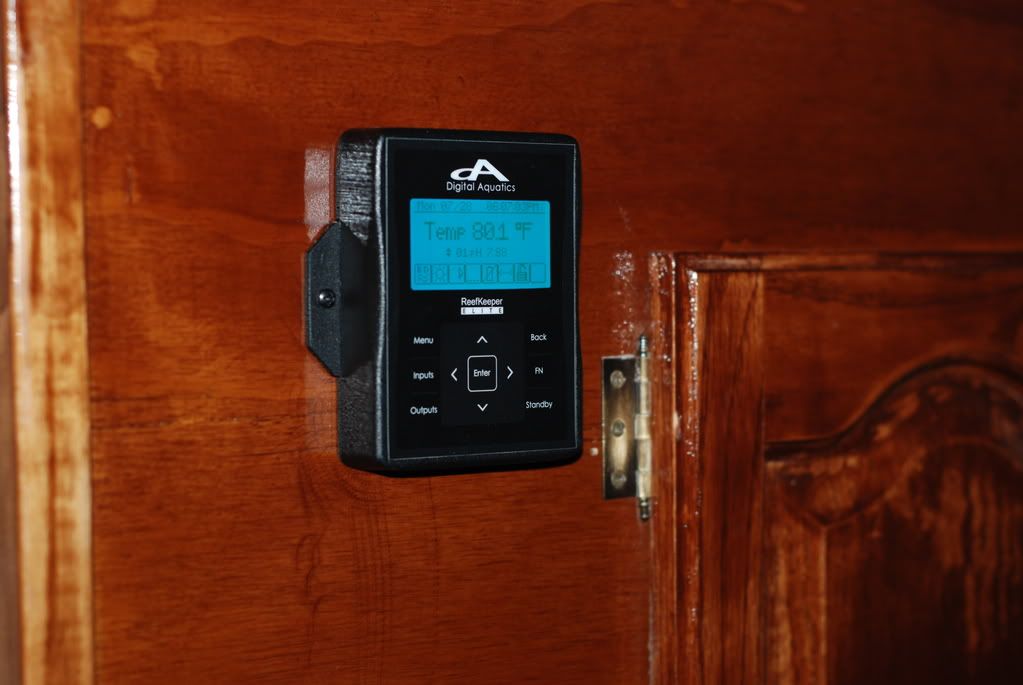 Also put some plastic gutter guard over the overflow slot. 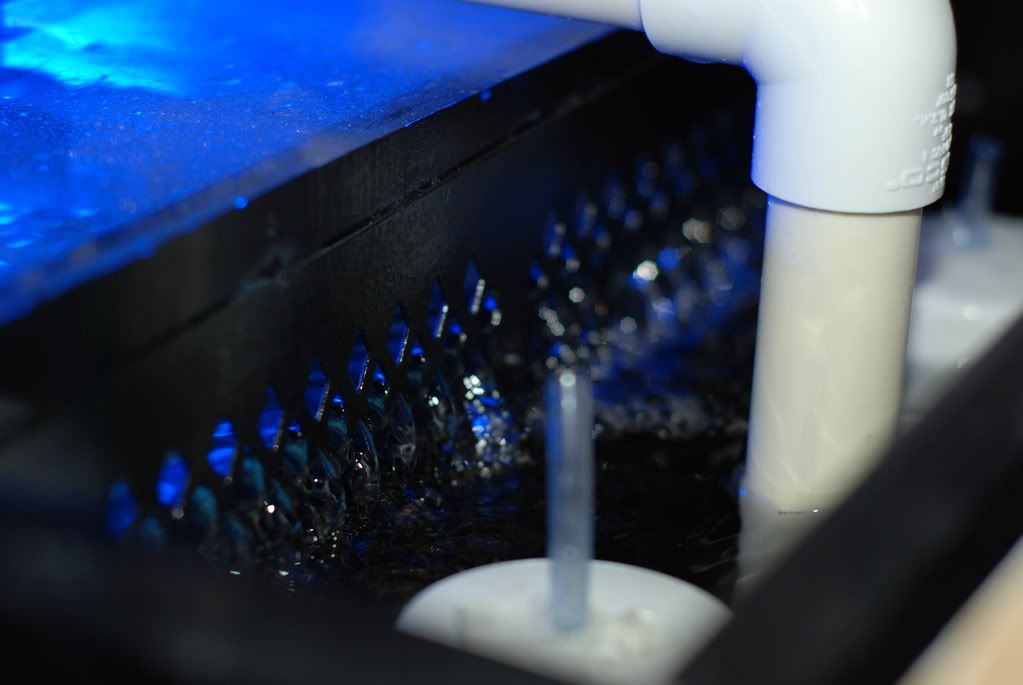 Other than that, still just waiting on the cycle to complete. Nitrites still through the roof. Been about 3.5 weeks since I put water in the tank. |
|
|
|
|
07/29/2008, 07:30 PM
|
#50 |
|
Registered Member
Join Date: Aug 2007
Location: Los Angeles, CA
Posts: 327
|
The RKE controller has, unfortunatly, been a source of a number of problems for me. The number one reason I bought it is it's expandibility; the other controllers on the market seemed to be rather limited in the total number of devices they could control. Since it's new technology, I kind of figured I'd be working out some kinks.
Right now it's pH reading is all out of whack. Reading like around a 1.5 to to 5.0 pH, but jumping to normal when the top off kicks in. The topoff is controlled by a float switch connected to the same module the pH probe is connected to, so clearly there is some kind of unholy feedback loop at work here. Also, when you turn devices off (to do maintenance, for instance) and then turn them back on, the controller sometimes has "reprogrammed" that channel as something totally random. It's aggravating to have to constantly reprogram channels after doing maintenance. There's been quite a few other problems, but DA seems to be working on them quickly and in earnest (they worked thorugh the July 4th weekend to get an update out). A number of the problems have already been solved, but there is still work to be done. As such it's hard to recommend this controller to anybody that needs it for a tank that is now up and running. Check back in a few months to see if they've worked the kinks out. On the bright side, I'm seeing a copepod bloom! Starting to see a bunch of them sticking to the glass. Also, I think the diatom phase is starting to give way to a hair algae/green algae phase but not entirely sure yet. |
|
|
|
 |
|
|


