


|
 |
|
|
#26 |
|
Registered Member
Join Date: Apr 2010
Posts: 94
|
This is VERY cool. Awesome concept renders.
|
|
|

|
|
|
#27 |
|
Registered Member
Join Date: Dec 2008
Location: 58703
Posts: 1,265
|
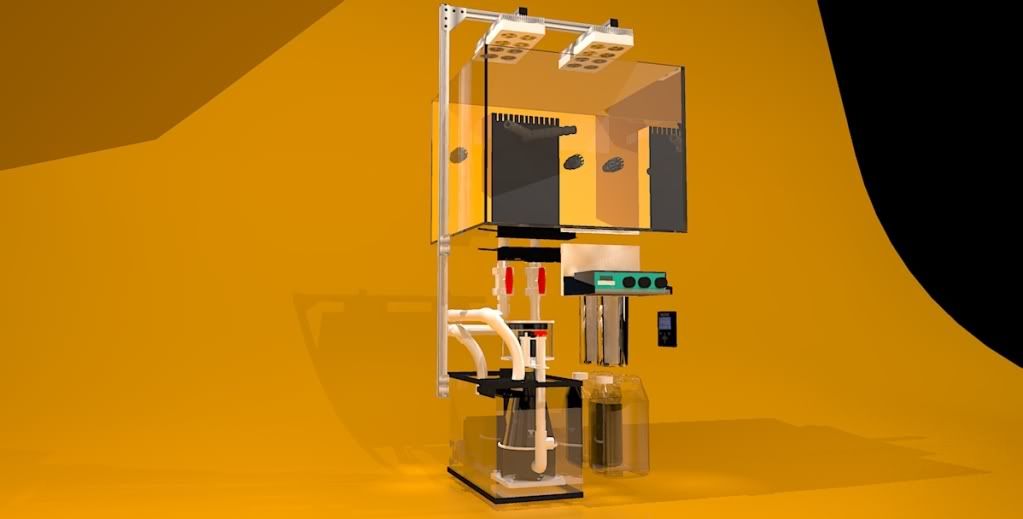
Thanks! Yeah - it's allowing me to work out the bugs, spacing, placement etc., before beginning the actual build which is probably a month or two away. Here's the third render in the series. GUTS.
__________________
T5-powered (ex-LED club member) SPS-dominant 50g. Cadlights CUBE. Current Tank Info: 16g biocube |
|
|

|
|
|
#28 |
|
Registered Member
Join Date: Dec 2008
Location: 58703
Posts: 1,265
|
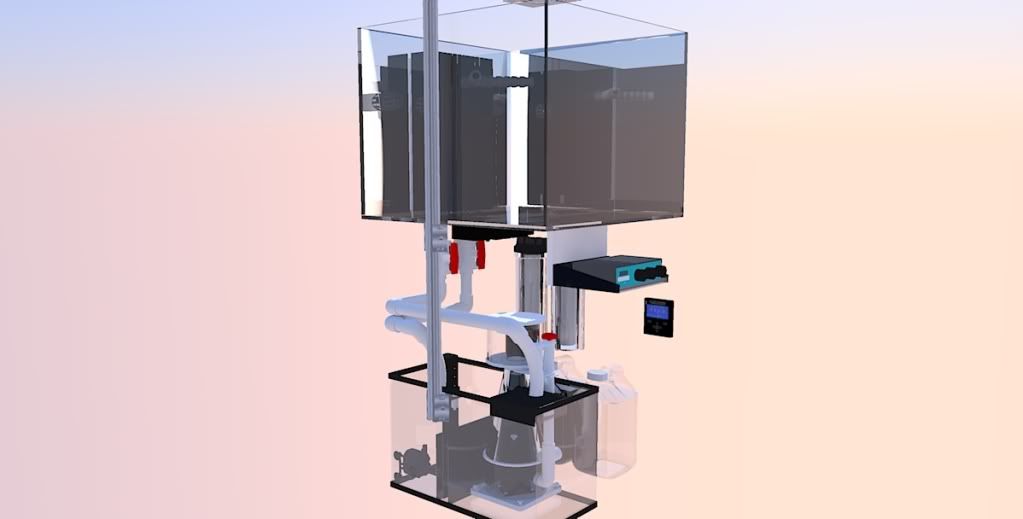
Better view of the plumbing. Going with 1" for both the drain and return lines - only looking to put about 500 GPH through the sump, perhaps less, and no real reason to restrict the return to 3/4 that I can think of. Will either go with a Waterblaster Hy-1000 (500 GPH) or a Tunze 1073.020 (634 GPH) for the return, and I can throttle with the ball valve.
__________________
T5-powered (ex-LED club member) SPS-dominant 50g. Cadlights CUBE. Current Tank Info: 16g biocube |
|
|

|
|
|
#29 |
|
Registered Member
Join Date: Dec 2008
Location: 58703
Posts: 1,265
|
Anyone aware of any tall but very narrow water containers available anywhere? Preferably covered and of 5 gallons or more...
__________________
T5-powered (ex-LED club member) SPS-dominant 50g. Cadlights CUBE. Current Tank Info: 16g biocube |
|
|

|
|
|
#30 |
|
Registered Member
Join Date: Dec 2008
Location: 58703
Posts: 1,265
|
Well, progress! I've just found a killer deal on a Cad Lights 50g 3 side starfire and 18g. glass rimless sump for $300 total - brand new, never seen a drop of water! The sump is a bit bigger than I wanted to go at 20" long by 15" wide by 9" tall, but I can make it work. I think next week I may start the cabinet build!
__________________
T5-powered (ex-LED club member) SPS-dominant 50g. Cadlights CUBE. Current Tank Info: 16g biocube |
|
|

|
|
|
#31 |
|
Registered Member
Join Date: Dec 2008
Location: 58703
Posts: 1,265
|
Can anyone that has a CadLights 50g. cube do me a favor and measure the length across the front and the width from front to back? I'd like to know the exact dimensions so I can put together a dimensioned drawing and materials and cut lists. Is it exactly 24" x 24"? Thanks!
__________________
T5-powered (ex-LED club member) SPS-dominant 50g. Cadlights CUBE. Current Tank Info: 16g biocube |
|
|

|
|
|
#32 |
|
Registered Member
Join Date: Feb 2011
Posts: 2,919
|
I like the pull out panel. I am doing something similar but flat like a drawer... How are you planning on managing the cables and hoses on that pull out? I gave some all plastic server cable management arems I am using for mine. No pics yet.
__________________
MHG (LIRA Member) 60G Cube, Kessil 360's |
|
|

|
|
|
#33 | |
|
Registered Member
Join Date: Feb 2011
Posts: 2,919
|
Quote:
I had to grind out the return hole because it was 1mm too small for any 3/4 bulk head I could find. Took all but 10 minutes...
__________________
MHG (LIRA Member) 60G Cube, Kessil 360's |
|
|
|

|
|
|
#34 |
|
Registered Member
Join Date: Dec 2008
Location: 58703
Posts: 1,265
|
Excellent, thanks! Thought I may have had to make the sides and front more than 24" - which meant a lot of wasted panel. Perfect - many thanks MHG! Do you have a link to your build thread?
__________________
T5-powered (ex-LED club member) SPS-dominant 50g. Cadlights CUBE. Current Tank Info: 16g biocube |
|
|

|
|
|
#35 |
|
Registered Member
Join Date: Feb 2011
Posts: 2,919
|
http://www.reefcentral.com/forums/sh....php?t=2007490 is the build thread
http://www.reefcentral.com/forums/sh....php?t=1997493 Is the stand thread I made mine much bigger to make more room underneath for a 24 inch sump...
__________________
MHG (LIRA Member) 60G Cube, Kessil 360's |
|
|

|
|
|
#36 |
|
Registered Member
Join Date: Dec 2010
Location: Oklahoma
Posts: 258
|
You have put more work into your tank than many people and you don't even have a a physical tank yet. sure should make the build go easier though. keep up the great work.
|
|
|

|
|
|
#37 | |
|
Registered Member
Join Date: Dec 2008
Location: 58703
Posts: 1,265
|
Quote:
__________________
T5-powered (ex-LED club member) SPS-dominant 50g. Cadlights CUBE. Current Tank Info: 16g biocube |
|
|
|

|
|
|
#38 |
|
Registered Member
Join Date: Dec 2008
Location: 58703
Posts: 1,265
|
After looking at a ridiculous number of veneers, I have settled on 4 sequential leaves of really nicely figured eucalyptus. Could not find any zebrawood that was not wavy, rough-edged, or wackily-figured. The eucalyptus is just a tad darker than what I was looking for, but the figuring of these pieces is phenomenal, and the edges have been joined, so they should go down nice and quick. It's a nice hard wood, so it shouldn't dent or gouge easily. The finish will be water-based urethane, 4-5 coats, rubbed between coats - in either matte or gloss, haven't decided yet. I think matte will be a nice juxtaposition to the high gloss white painted exterior, but gloss will match nicely with the rest of the exterior.
Have also decided how the front panel will be attached. Ordered 10 1/2" by 1/4" disk-shaped rare-earth magnets. Each is rated for 85 lbs pull capacity, so will go with 4 in the door panel and 4 in the base, bored into the wood. I have some 2-part clear liquid plastic in the lab, I will seal the magnets into their bores to both cement them in and protect the nickel from corrosion. This way, I can maximize my access without having to worry about trick hinges. Door panel veneer stock!!! 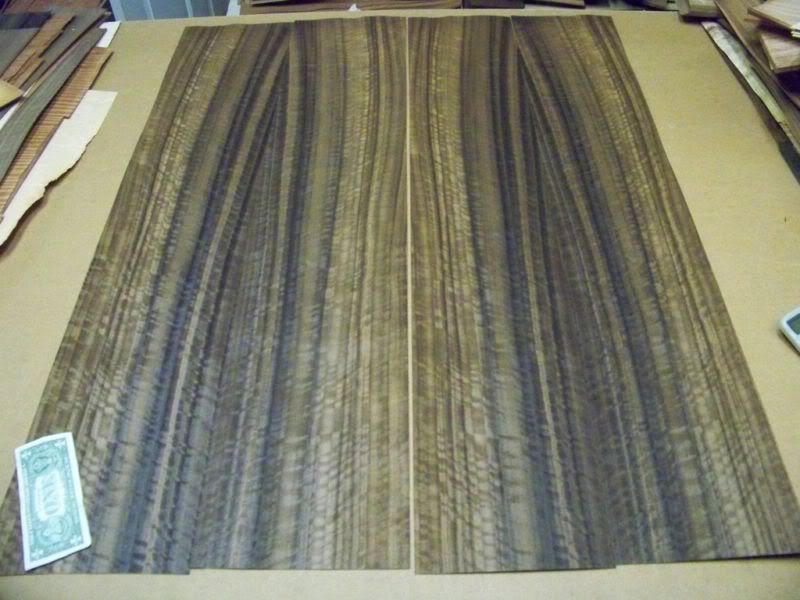
__________________
T5-powered (ex-LED club member) SPS-dominant 50g. Cadlights CUBE. Current Tank Info: 16g biocube |
|
|

|
|
|
#39 |
|
Registered Member
Join Date: Dec 2008
Location: 58703
Posts: 1,265
|
Stand Build -- Part I
I picked up the tank and sump last Friday - CadLights 50. Just in case anyone needs this information, the CadLights footprint is 23 5/8 x 23 5/8" - there really is a pretty good lack of information on CadLights website. As good as the CadLights cabinets look, they are crap. So my goal here is to make a solid, STURDY cabinet for cheap that looks great, has a modern minimalist style, and is easy to build (so no complicated joinery). I have substantial woodworking experience, but most of my tools are 3000 miles away, so this is going to be simple, yet rock solid. If you want to emulate this build, the tools you will need are:
Now, I have a small car, and my table saw is back in MA  so what is the easiest way to cut a 4x8' sheet of birch ply into dimensions needed? Home dumpster! Every Home dumpster has a really nice panel cutting saw in house. I found someone in the wood dept, asked him to cut my 4x8 sheet into 2 - 25 1/2" panels, 1 - 24" panel and the fourth was waste - you still have to buy the entire 4x8 sheet thought. Just make sure you instill in the person doing the cutting that the dimensions must be exact. Dude still cut my 24" panel to 23 7/8", but that's okay - still gives me an eighth on each side to play with. The material list is: so what is the easiest way to cut a 4x8' sheet of birch ply into dimensions needed? Home dumpster! Every Home dumpster has a really nice panel cutting saw in house. I found someone in the wood dept, asked him to cut my 4x8 sheet into 2 - 25 1/2" panels, 1 - 24" panel and the fourth was waste - you still have to buy the entire 4x8 sheet thought. Just make sure you instill in the person doing the cutting that the dimensions must be exact. Dude still cut my 24" panel to 23 7/8", but that's okay - still gives me an eighth on each side to play with. The material list is:
Here's a Sketchup view of the internal 'skeleton' of the cabinet.  However, this is not how the cabinet build progresses. I am after the squarest cabinet possible, so I started with the plywood sides and back. The sides are nice and square, so that's where I started. First, we want to cut the sides and back to the proper dimensions - 30" tall. This is where your straight edge comes in handy for making nice straight cuts. Put your work piece on sawhorses, or your work table, mark 30" with a square, and then measure the distance between the edge of your circular saw base plate and the face of the blade. now, measure this distance from the 30" measured line, and clamp your straight edge to the work piece. The saw blade should now be aligned with your mark, and the edge of your circular saw should be against the straightedge. If not, re-measure! Then, re-measure AGAIN! Of course, if you have a table saw, this part of the discussion doesn't apply. Damn, I miss the wonderfully flat 60" cast iron table on my saw that is sitting in MA... After the panels are cut to length, the next thing I did was to put 4 pocket screw holes on each side. The spacing and number of screws is up to you, but these screws are more to hold the carcass together at this point than to add any fastening strength, but they do a bit of both. After drilling the pockets, find a nice flat, level are for the assembly of the carcass. Apply a bead of Gorilla Glue (henceforth referred to as GG for keystroke savings) to one of the edges of the rear panel and smooth it across the entire edge with your finger to ensure even coverage. Because your panel edges are both square, and the area you have chosen for assembly is level and flat your joint will true automatically as long as you line the edges up correctly. Line the bottom up, and put a pocket screw in, same with the top, then the 2 middles. Wipe up any glue squeeze out. Repeat for the second side. Here's what you should have after this step.  Next, we want to start building the skeleton inside the carcass. Here's a quickie dimensioned render that shows how this step progresses. 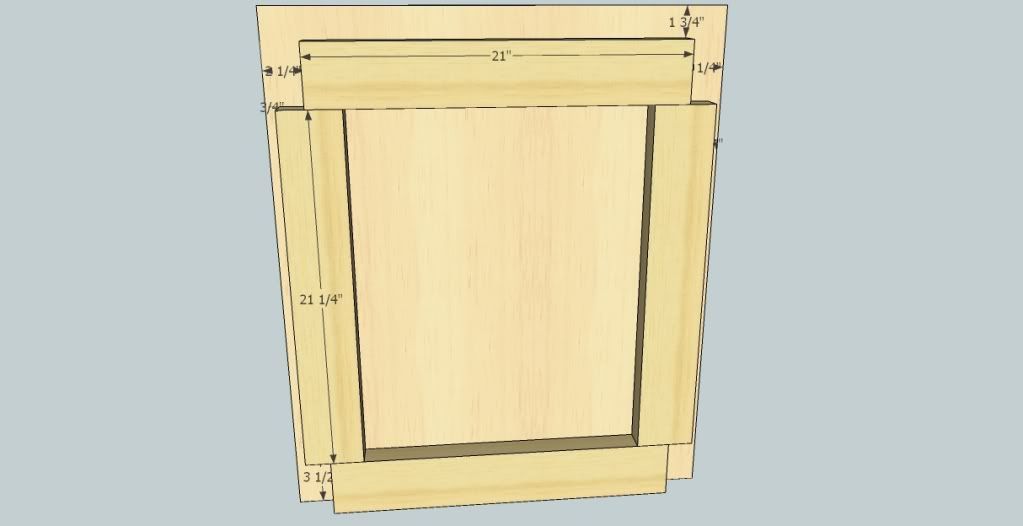 Starting on the bottom back of the carcass, install the 24" long lower bottom piece first. Make sure this piece is parallel to the floor and to the back, then GG and screw (using 2" drywall screws) to the back panel. Don't worry about the top rear yet. Next, cut and assemble the pieces of the skeleton for the two sides. Start the assembly with the bottom 21" piece, GG and screw to the panel and to the rear member. Next, install the rear upright 21 1/4" piece, GG ans screw. For the front piece, you'll need a piece of scrap 3/4" ply for a gauge. You want to align the front upright so that you have approximately 11/16" in front. Why not a full 3/4" you ask? EDGE BANDING! We're going to hide the ply end grain with iron on edge banding, which is approximately 1/16", thus, we have to be about 1/16" short of 3/4" from the front edge of the ply. Start at the bottom, position the upright in place, using your gauge, but maintaining about a 1/16" gap, clamp the upright in place, and GG and screw. Now, for the upper 21" member, first clamp a piece of scrap 2x4 in place (no glue or screws) in the upper back of the panel (where the rear upper support piece will eventually go. This is your gauge for installing the upper member. Butt the upper member against the gauge and GG and screw in place. This is what the side panel will look like now.  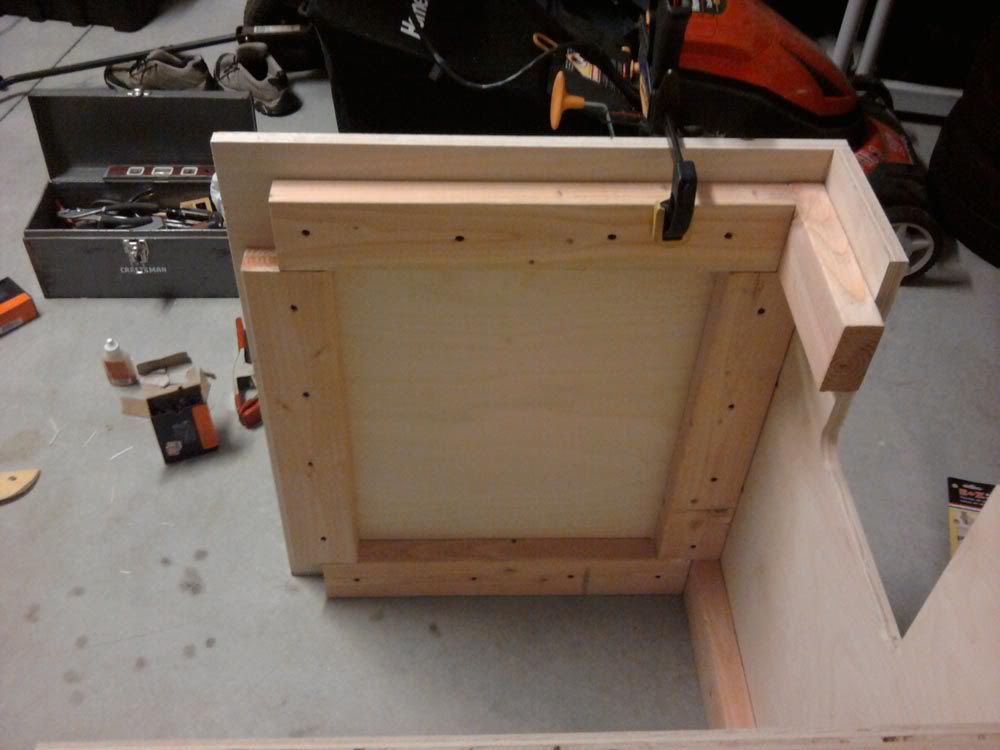 Repeat for the other side. Next, we want two 2x4" pieces for the front upper and lower members - these are 24" long, and get 2 pockets in each end. Put the lower member into position first, GG all wood-to-wood contacts, and screw the pocket screws into place. Take one 3" drywall screw, and drive this through the front member into the side member for a bit of extra mechanical fastening. Repeat with the upper member. Check the cabinet diagonals for square - take a tape measure from the back right corner to the front left corner - remember this measurement. Now check the back left to front right. The two numbers should be nearly identical. A sixteenth or so isn't a problem. If they are off more than that, adjust with pipeclamps and cawls. But, if your edges are square, your assembly space is level, and you use care in aligning your edges, there should be no problems with square. The completed carcass and load bearing skeleton. 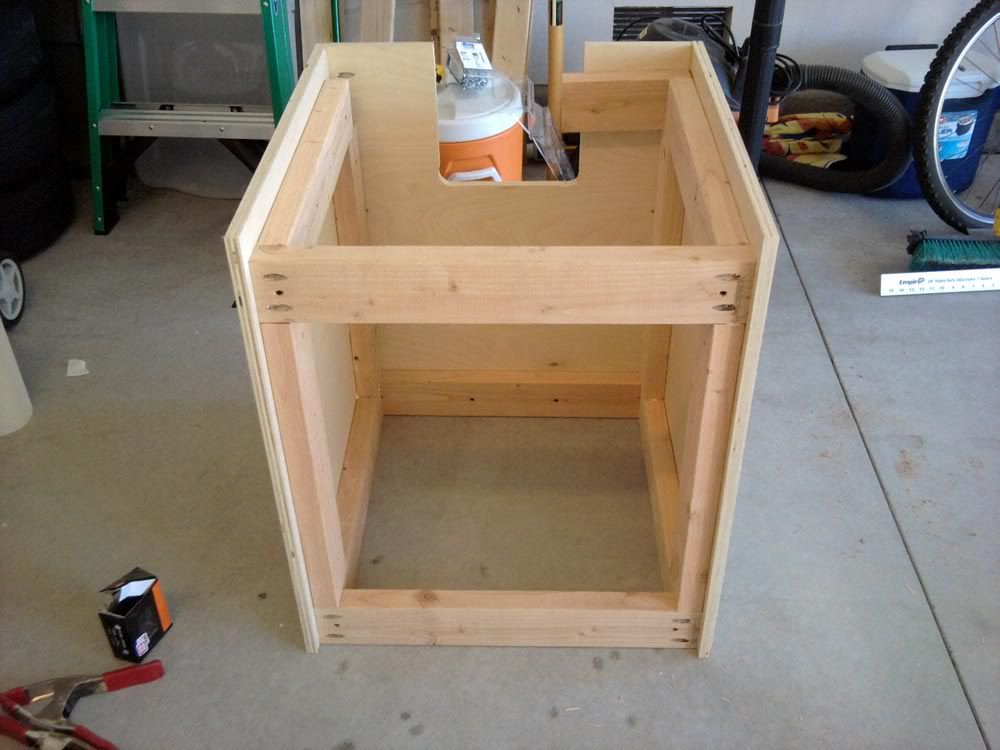 The two short back upper pieces are only being held in position with friction - these are not going to be glued/screwed until the MDF top panel is in place, that way maximum flatness of the top can be achieved. Am using MDF for the top because all ply had a bit of cupping or bowing, and with a rimless, you want the top F-L-A-T. Don't worry, we'll address the shortcoming of the material (absorbency) in the next part. Stay tuned.
__________________
T5-powered (ex-LED club member) SPS-dominant 50g. Cadlights CUBE. Current Tank Info: 16g biocube |
|
|

|
|
|
#40 |
|
Registered Member
Join Date: Dec 2008
Location: 58703
Posts: 1,265
|
Question for all of you rimless cube people out there - what did you use under your tank, the regular styrofoam (white, kind of flakes, comes apart easily), or the more dense poly foam insulation type stuff? Thanks!
__________________
T5-powered (ex-LED club member) SPS-dominant 50g. Cadlights CUBE. Current Tank Info: 16g biocube |
|
|

|
|
|
#41 |
|
Registered Member
Join Date: Dec 2008
Location: 58703
Posts: 1,265
|
Stand Build -- Part II
A full day's work, and seemingly not much accomplished! I hate painting - takes a lot of time, is mind-numbing, and you have to wait for it to dry.
Since last time, I have applied iron-on birch edging - the materials in Part I should be amended - only 1 roll of edge banding is required, and the 24x48" sheet of mdf should only be 24x24" - it is only needed for the top - there is plenty of extra 3/4" ply to cut the bottom panel from. The edging goes on nice and quick and looks great. I used birch - nice even grain, sands well and will take paint nicely. After I applied each band, I used a single edge razor blade from the bottom side to trim off the extra. Use very light pressure with the blade laid right against the side panels making multiple passes, and it comes out nearly flush to the panels. A bit of sanding with 220 grit and the edging is flush with the side panels. Next I used wood filler to fill in the screw holes. After that dried, I sanded the panels lightly with 220, and the 2x4's with 120. Applied a second coat of wood filler, then sand everything again to 220. Started priming today. Well, actually, I started yesterday - for the mdf top only. Before putting the top on, I applied a nice coat of water based polyurethane to the edges. Once it was installed, I applied a nice even coat to the top and bottom. The water based urethane is less viscous than the oil-based stuff (and will not yellow), so it soaked right into the mdf nicely. Sanded lightly with 220 after it dried to give the primer some tooth to grab onto. The primer I am using is Zinsser Bulls Eye 1-2-3 water based primer sealer. It is a bonding primer, meaning that it really grabs on to whatever surface it coats, and has a wide range of surfaces that it can be applied over. I chose this primer specifically because I knew I wanted to use a poly base coat on the mdf, and this stuff is recommended for coating poly. Let me tell you - this is some TOUGH stuff. I cut in with a disposable 1" brush, the used a small 2" foam roller to do the rest. I really like the foam rollers - no little hairs embedded into your finished job. This is the primer I used.  After priming the carcass, I scrubbed my hands with Gojo, then took a shower, and this stuff is still all over my fingers. Bonding primer, indeed! So this is where I am now - stand is primed with one coat. 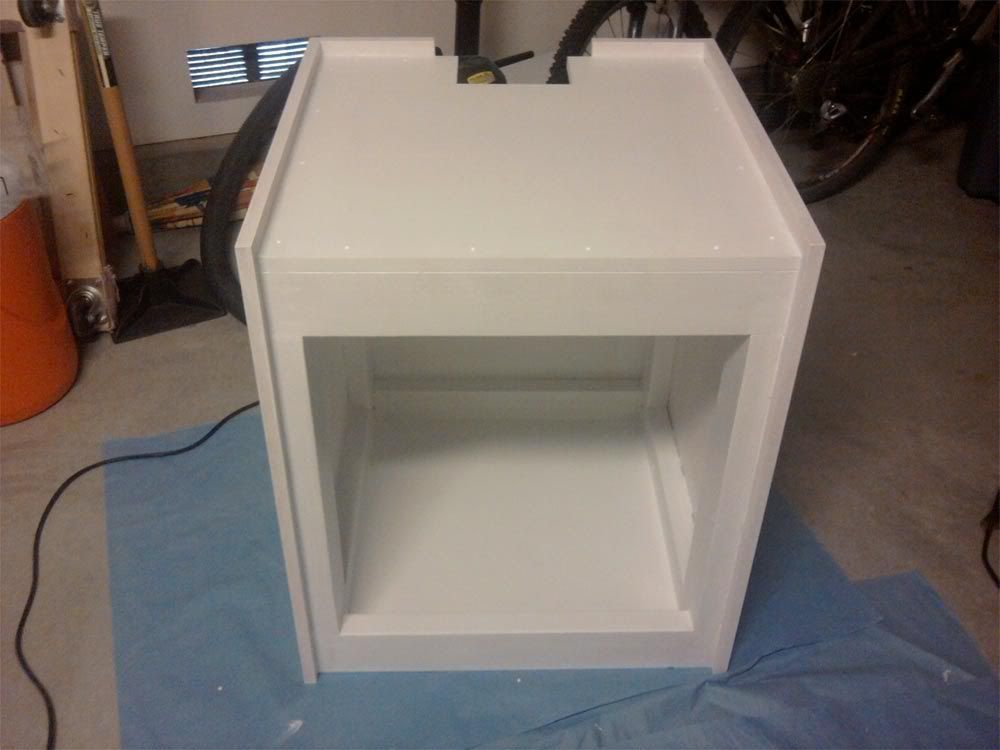 Next will be another light sanding to 220, followed by some spray can painting! Veneer will be here on Monday, so door construction will probably start on Tuesday evening. Anyone who set up a CadLights cube (or other tank) - did you use the styrofoam that came under the tank as your foam base? I have no idea how thick that stuff is, so just wondering. I don't want to have to buy a 4x8' sheet of half inch foam if I don't have to - I will never use the rest of it! Anyone know where you can get half sheets of 1/2" foam for the underlayment?
__________________
T5-powered (ex-LED club member) SPS-dominant 50g. Cadlights CUBE. Current Tank Info: 16g biocube |
|
|

|
|
|
#42 |
|
Registered Member
Join Date: Feb 2003
Location: Grand Blanc Michigan
Posts: 1,446
|
Dude, what does my tattoo say? SWEET!!
__________________
CL Current Tank Info: 50 breeder, 2 x XR15w pro (G4), 1 x MP40wQD, Apex JR, Ehiem-Jager 200 watt heater, Jabao DC6000 return, Reef Octo 150 elite SSS skimmer |
|
|

|
|
|
#43 |
|
Registered Member
Join Date: Dec 2008
Location: 58703
Posts: 1,265
|
Stand Build - Part II.V
A bit of an update. I hate painting.
So for the inside of the stand, I went with Rust-Oleum appliance epoxy paint. It is rock hard and has the added benefit of being fairly low viscosity. That means it can be put on with a foam brush and foam roller. I've been painting the inside of the cabinet one side at a time, laying the cabinet so that the side I'm painting is horizontal. The paint flattens out very nicely and the brush strokes and roller marks nearly completely disappear. It can be recoated in about an hour, so I do the second coat and let that set up for an hour, then rotate the stand and start on another side. I've got one side left for the inside, then I have to sand the first coat on the outside panels to 320, and spray on the second coat. I'll sand that lightly with 320 after it dries, then spray the panels with a couple light coats of water-based poly, sanding to 600 between coats. The final step to complete the stand will be to calk all inside corners with clear silicone. I used white silicone on a previous stand, but the white color didn't quite match the paint color, so I think the clear will be a bit less visible to the eye. I've also cut the door panel blank. I've ripped it to 29 5/8" to give a bit of a shadow line at the bottom so it appears to 'float' just above the floor. Can't wait to see the eucalyptus veneer when it arrives on Monday! Here's what watching paint dry looks like (cab is upside-down for painting the underside of the top and the bottom of the base). Door blank leaning over the front opening. 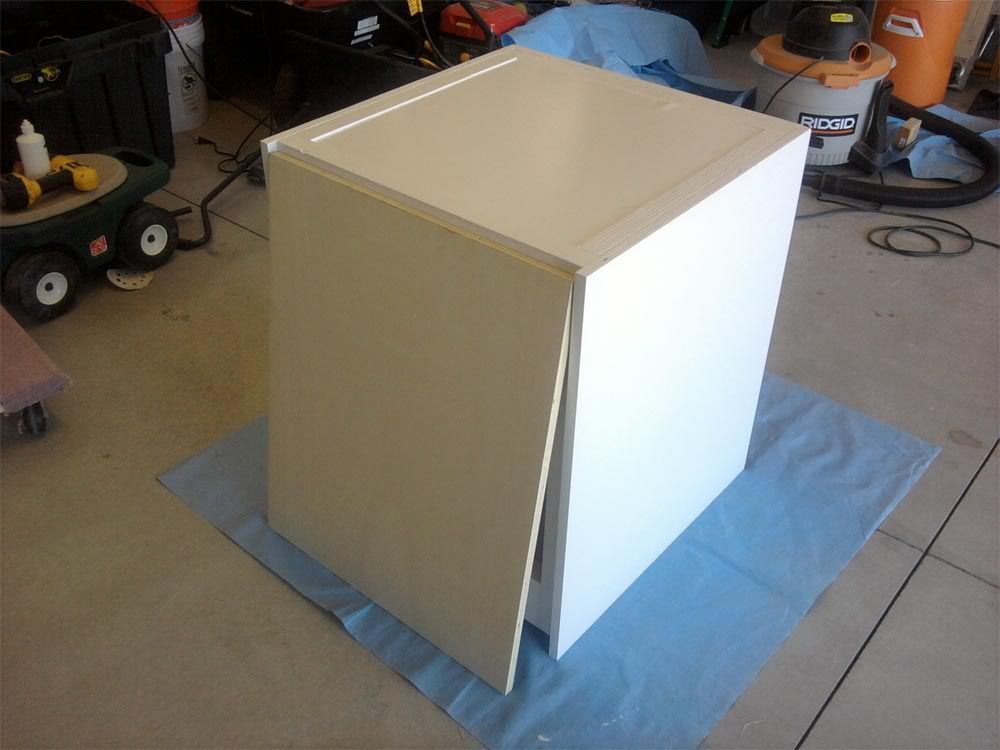 I've also ordered my skimmer. Bought the SWC-120 from Big Al's online for $202 shipped with a 10% off coupon (code: plant10). That's cheaper than I've seen some people trying to sell their used ones for. Just have to order some misc stuff from BRS this week - need the bracket for my BM dosing pump, some filter socks, etc. Hopefully, the paintwork will be done by tomorrow. I hate watching paint dry. 
__________________
T5-powered (ex-LED club member) SPS-dominant 50g. Cadlights CUBE. Current Tank Info: 16g biocube |
|
|

|
|
|
#44 |
|
Registered Member
Join Date: Jul 2009
Location: Virginia Beach
Posts: 6,659
|
Wow. Those are some great plans. The stand looks great. Cant wait to see more
|
|
|

|
|
|
#45 |
|
Registered Member
Join Date: Feb 2011
Location: chicago area
Posts: 119
|
Very nice virtual build my friend . I cant wait for the real thing!
|
|
|

|
|
|
#46 |
|
Registered Member
Join Date: Dec 2008
Location: 58703
Posts: 1,265
|
Thanks guys. The paint is coming out really nicely - I really like the appliance epoxy and cannot say enough good things about it. It has the exact right characteristics - very hard when cured, water resistant, flows well eliminating tool marks and sets up pretty quickly so you can put the second coat on within about an hour. I think this in combination with the zinsser bonding primer (which 2 days later is STILL clinging to my fingers) will be a tough-as-nails combination.
Just ordered my return pump as well - went with a Tunze silence 1073.20. Rated for 634gph at only 30 watts! That's a bit on the high side for what I want to put through the sump, but this pump has an adjustable flow rate. I am really energy conscious - I have been using LEDs exclusively for the last nearly 3 years, and I'm always looking to trim watts off of my energy consumption whenever I can, so this return fits the bill great. Supposed to be incredibly hard to hear as well, another important factor that influenced my decision. The pump that comes with the SWC-120 skimmer is supposed to be incredibly quiet as well. In addition to energy efficiency and durability, I'm aiming for as close to a silent system as possible because it will be in the living room. Back to my earlier question though - anyone know where I can get half sheets (or quarter sheets) of 1/2" foam for the tank underlayment?
__________________
T5-powered (ex-LED club member) SPS-dominant 50g. Cadlights CUBE. Current Tank Info: 16g biocube |
|
|

|
|
|
#47 |
|
Registered Member
Join Date: Dec 2008
Location: 58703
Posts: 1,265
|
Light Tree materials ordered
Just ordered all of the stock, parts and hardware for the light tree. I downloaded a deflection calculator from 80/20's website, just to see if there would be any significant deflection under load. For a 30" span carrying a 9 pound load, the deflection is less than 0.05". This is not taking the 26" upright into consideration, though. To approximate the total deflection from vertical, I just added up the two lenghts - the upright will be approximately 26 inches and the horizontal member will be 24 inches. Using 50" total under 9 lbs load, and the 1010 profile, I get a deflection of 0.33 inches. I can deal with a third of an inch. Also, the load will not be at the end of the profile, it will be inboard a good 6 inches at least. We'll see how much actual deflection the tree will take on under load in a few weeks!
Have had quite a few inquiries about the light tree. Here's a render from the last page to give an idea of what it will look like. 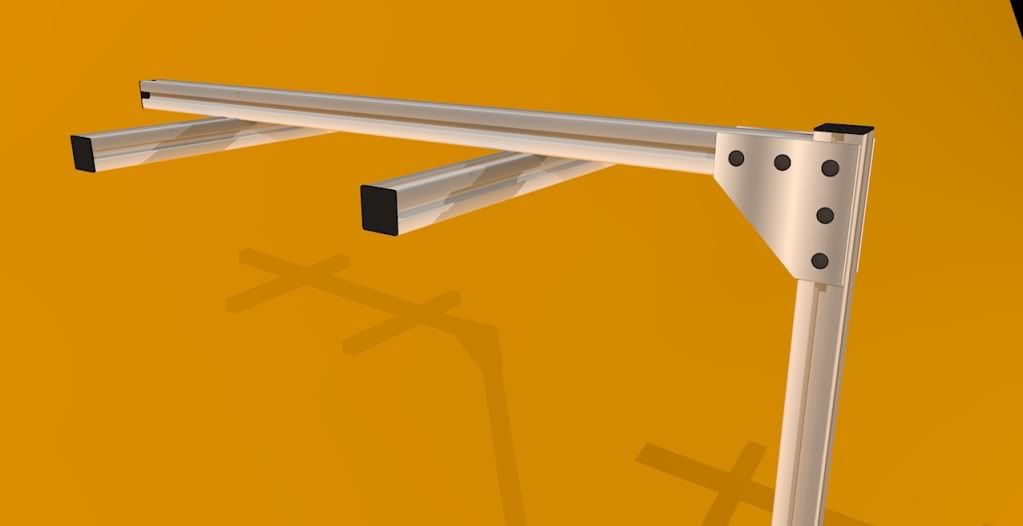 For anyone interested in replicating the light tree, the materials can be purchased from Amazon (a bit mroe expensive) or from fleabay directly from 80/20. The required materials for a 2 AI tree are:
These pieces will build a light tree that looks just like the render above with a few minor changes. The brackets that connect the 1010 profile to the cabinet are slightly different (a bit beefier), and the 1010 that mounts to the AI units get brackets to connect to the main horizontal member instead of floating on a single bolt. Total cost for materials is around 92 bucks, so this is NOT a cheap option, but it will look sleek, modern, and S-U-A-V-E! (and looks much better than any of the commercially available light trees that I have seen, IMO). I don't suggest anyone try building this until I confirm what the loaded deflection of the horizontal member is, just to be on the safe side! It's coming together! I will be doing fieldwork and working in the Smithsonian's invert fossil collections for the entire month of August, so this will be on hold in a few weeks.
__________________
T5-powered (ex-LED club member) SPS-dominant 50g. Cadlights CUBE. Current Tank Info: 16g biocube |
|
|

|
|
|
#48 |
|
Registered Member
Join Date: Mar 2001
Location: Naples, FL
Posts: 215
|
I've been following your tread since the beginning, mainly because I had somewhat similar vision for my setup. I started working on the LED fixture using 80/20 1030 T Slot Aluminum Extrusion, and I'll be using 1010 Extrusion for the light tree. The idea was to have the entire light fixture act as one large heatsink.
This stuff is really great to work with. Once complete, I'm gonna have it powder coated or anodized in black. 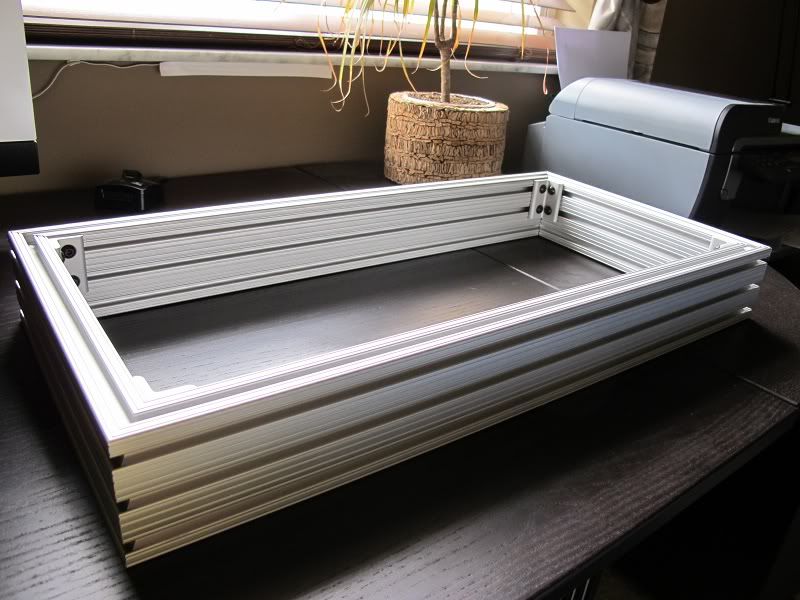 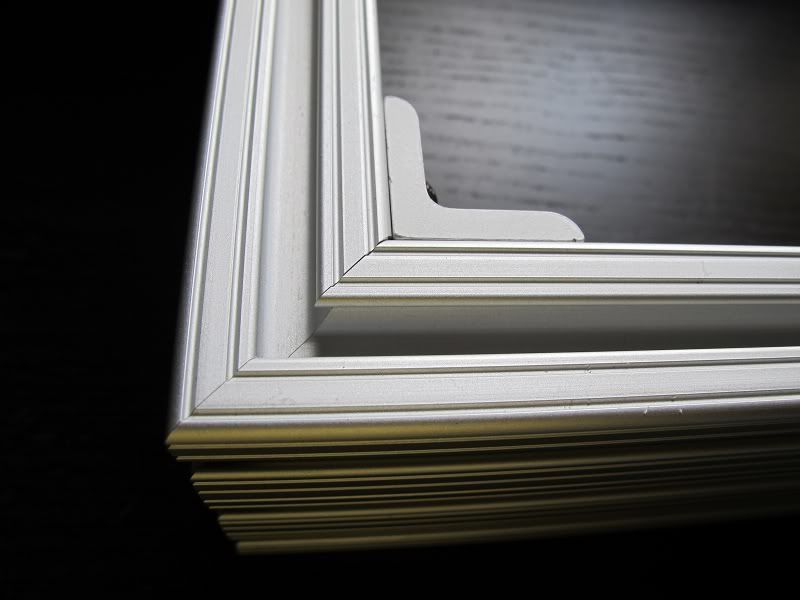 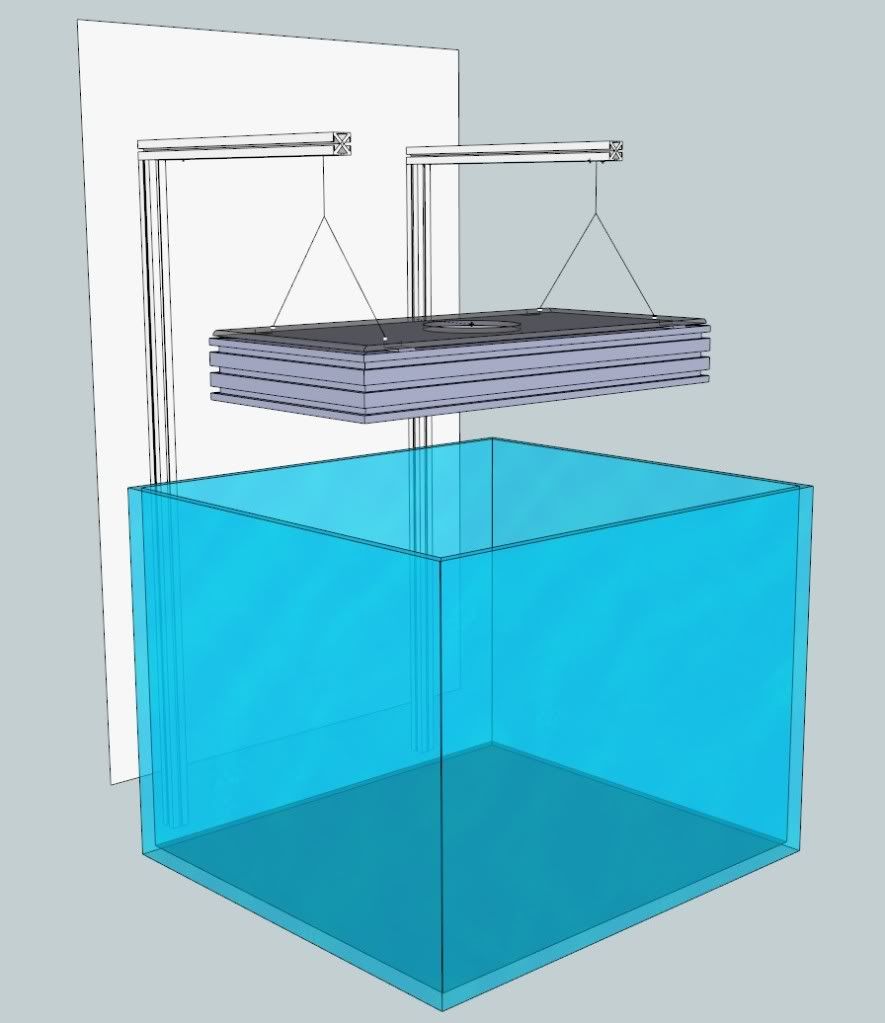 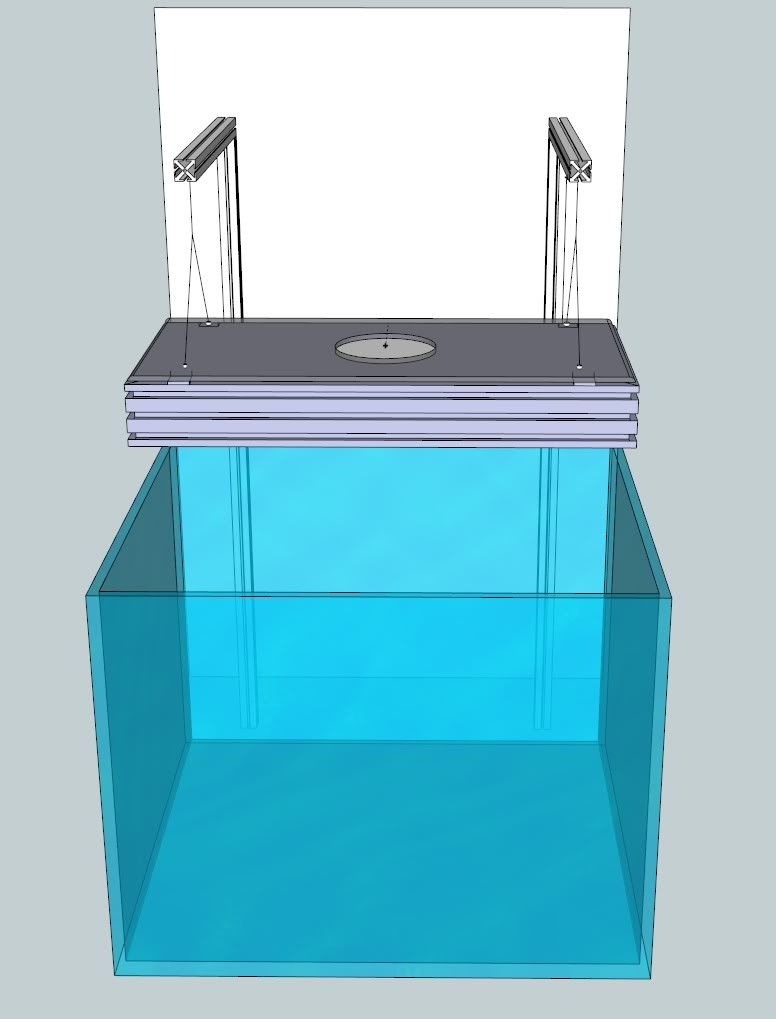 Regards, Ralph
__________________
Current Tank Info: Reef SAVVY 55 gallon 26" x 24" x 20" |
|
|

|
|
|
#49 |
|
Registered Member
Join Date: Feb 2011
Posts: 2,919
|
You may have addressed this earlier, but I assume you have some work related use of 3d CAD tools or way way too much time on your hands... If I spent that much time on drawings my project would never ever get done.
Amazing piece of work you are doing.... Cant wait for more...
__________________
MHG (LIRA Member) 60G Cube, Kessil 360's |
|
|

|
|
|
#50 |
|
Registered Member
Join Date: Dec 2008
Location: 58703
Posts: 1,265
|
Snootch - looks great - the 80/20 stuff seems to have nearly unlimited uses. Can't wait to see your fixture finished. It will definitely have a nice refined look when it's done.
MHG - have quite a bit of graphics and design experience, and once you learn Sketchup, you really can knock things out quickly. Also, didn't get a teaching gig this summer, so yeah, had a bit of time to work the design through so I could be 100% sure things would work before building/buying. This build (both the 3D and physical work) has also taken my mind off of some personal junk that was really getting me down before I started in on it - it's been very therapeutic. So it's been nearly three full days working on the finish, and there will be at least one more full day. Early this morning I sprayed one outside panel with the second coat and calked the interior corners. That side was just completely dry to the touch (about 7 hours later), so flipped it over, sanded to 320 and sprayed the other outside panel. Tomorrow will be a light sanding to 320 over the dust spots, then a light steel wool-ing followed by the first of 3 or 4 very light coats of gloss water-based poly over then entire exterior (steel wool and tack cloth between each coat). That should level the panels and give them a nice smooth mirror-like finish that should be just about bullet-proof (I think it has more layers than kevlar!) Painting SUCKS! Here's where it is now. 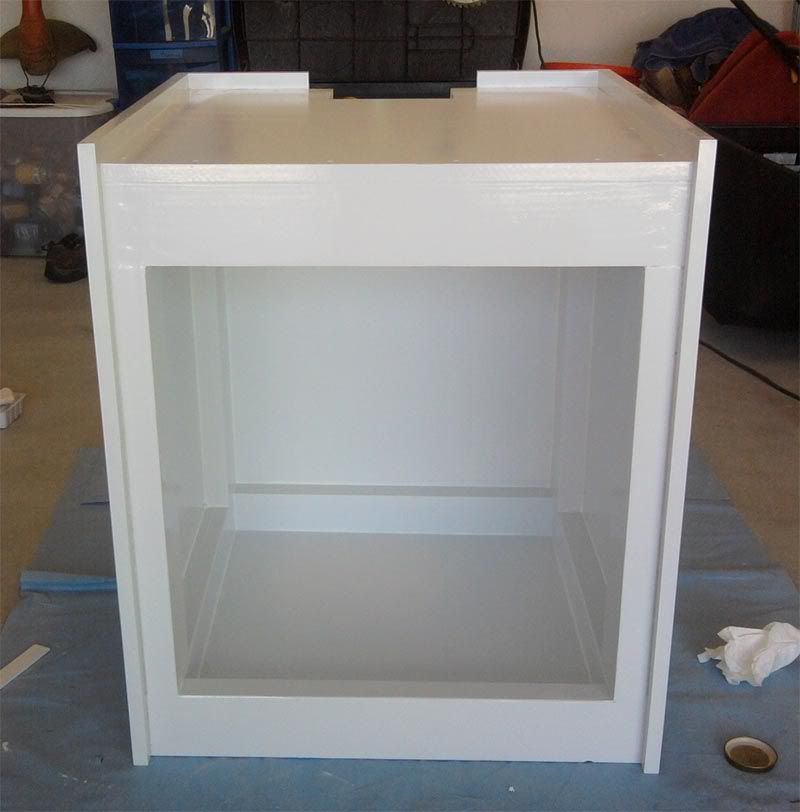
__________________
T5-powered (ex-LED club member) SPS-dominant 50g. Cadlights CUBE. Current Tank Info: 16g biocube |
|
|

|
 |
| Tags |
| 50 gallon, cadlights 50 artisan, rimless cube, veneering |
|
|
 Similar Threads
|
||||
| Thread | Thread Starter | Forum | Replies | Last Post |
| 20 gallon long Bean animal reef build | nemosworld | Nano Reefs | 34 | 07/23/2012 08:12 PM |
| Aegeon's 25G Cube Build | Aegeon | Nano Reefs | 74 | 03/02/2012 11:05 AM |
| LED Build Bio Cube 29 Pictures | Doughboy911 | Do It Yourself |
2 | 06/09/2011 07:31 AM |
| starting my inwall build. Long slow trip. | Tampico96 | North Central Pennsylvania Aquarium Reef Society (NCPARS) | 2 | 03/08/2011 08:09 AM |
| My build | ocean17 | Do It Yourself |
9 | 12/28/2009 09:14 AM |