


|
 |
|
|
#101 |
|
Registered Member
Join Date: Jun 2013
Posts: 34
|
Your suggestion of Brasso was fantastic. The regulator was kinda messy(and cheap). Looks very nice now. It came with stock gauges with plastic covers, but those forged brass and glass Wikas are sweet looking.
What it looked like on eBay... 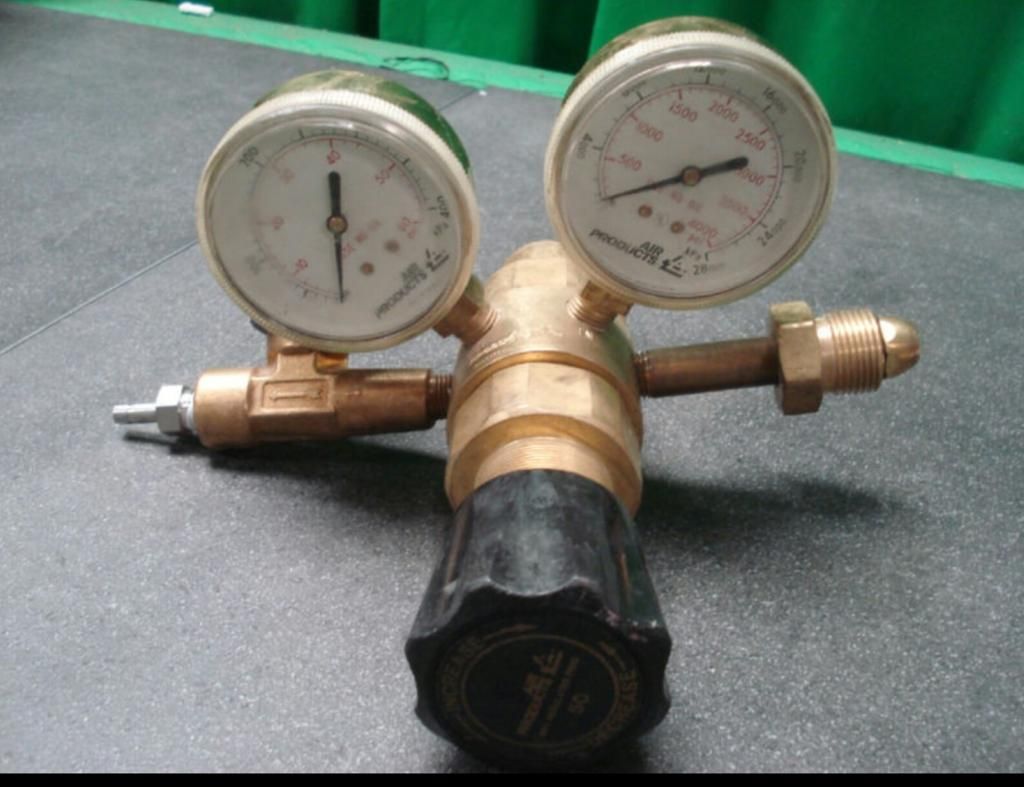 Im Plastidipping the knob and CO2 tank and its knob, red and white to match the Vertex equipment. When I saw your brass one on the front page, I woulda swore that was out of my price range or budget. It looked like $1000 worth of sexy shiney brass to me. It came in less than that Carbon Doser regulator. Last edited by Farkwar; 01/19/2015 at 10:58 PM. |
|
|

|
|
|
#102 |
|
Registered Member
Join Date: May 2013
Posts: 307
|
Quote:
Plastidip the knob is a great idea. I learned something new from you. Check out airgas.com and you will be surprised how much these dual stage rigs cost :-) |
|
|

|
|
|
#103 |
|
Registered Member
Join Date: May 2013
Posts: 307
|
How to build a CO2 regulator for your calcium reactor.
Here is an example of the stainless steel Parker IR4000 single stage regulator. Airgas sells it for $668.
http://airgas.com/product/Gas-Equipm.../p/Y11C444F350 The same regulator but dual stage in great condition is going for $150 or best offer on ebay. http://m.ebay.com/itm/331430361422?nav=SEARCH I'm just making an example. The output of this regulator is a bit high so dont get it. By the way, imo Airgas regulators are nice. Search for "airgas y12" on ebay. These are dual stages. Last edited by alanle; 01/20/2015 at 03:07 AM. |
|
|

|
|
|
#104 |
|
Registered Member
Join Date: Apr 2004
Posts: 240
|
Ooooh, shiny! Nice job Farkwar.
|
|
|

|
|
|
#105 |
|
Registered Member
Join Date: May 2013
Posts: 307
|
|
|
|

|
|
|
#106 | |
|
Registered Member
Join Date: Aug 2012
Location: Brampton, ON, Canada
Posts: 958
|
Quote:
Dennis
__________________
560G Miracles tank in process making a DIY DyMiCo style filter (for 560G) Current Tank Info: 560G Miracles tank in progress, 80Frag Temporary |
|
|
|

|
|
|
#107 |
|
Registered Member
Join Date: May 2013
Posts: 307
|
Sad news! I just want to share with you guys that the man who taught us how to build these custom regulators passed away on November 9, 2013. I did not know until today. He will be missed.
http://www.barrreport.com/forum/barr...ith-aka-left-c |
|
|

|
|
|
#108 |
|
Registered Member
Join Date: May 2013
Posts: 307
|
Here is a really nice stainless steel Concoa 432. It's a little pricey for a used unit. I would pay $70 to $80 for it.
http://m.ebay.com/itm/171652246196 |
|
|

|
|
|
#109 |
|
Registered Member
Join Date: May 2013
Posts: 307
|
Here is a regulator that I would love to have. This is a mini dual stage regulator that can fits in your palm.
http://www.restek.com/catalog/view/37770/26372 |
|
|

|
|
|
#110 |
|
Registered Member
Join Date: Apr 2011
Posts: 70
|
Alan,
That 432 doesn't take returns, so I wonder if its working. It's also listed as a PARTS thing, so I'm not sure. I bought a ton of regulators off of craigslist, a guy had a huge lot he was selling of (supposedly) working regulators. You can see the pictures of them here: One Drive Album Around 10 212's from concoa, a ton of other ones too. IR6002 is the one I'm probably going to end up using, that a good regulator alan? |
|
|

|
|
|
#111 |
|
Registered Member
Join Date: Aug 2012
Location: Brampton, ON, Canada
Posts: 958
|
I am curious about what the issue is that happens to the single stage regulators at the end of the tank? Does the pressure of the dumped CO2 exceed the pressure the regulator was set for?
I am just wondering if a second small (external) regulator after a single stage one (like the Clippard MMR-1N) can remove the deficiencies of a single stage regulator. I realize getting a good quality 2 stage would be a better approach, but I am just curious. Dennis
__________________
560G Miracles tank in process making a DIY DyMiCo style filter (for 560G) Current Tank Info: 560G Miracles tank in progress, 80Frag Temporary |
|
|

|
|
|
#112 |
|
Registered Member
Join Date: Dec 2011
Location: Pacifica
Posts: 3,741
|
Hey Alan quick question I believe you stated to use a 12v power supply with the burkert valves but it says 24v on it. should I use a 24v one? I have one of each so it's no big deal to me just wondering..
And also is the only way to know if it's a dual stage regulator from just looking at it the size of the body? I know my single stage Milwaukee is a lot shorter than the dual stage one I'm getting but I was just curious as a friend asked me and that's what I said lol..
__________________
15 years in the hobby yet still learning every day. 280g radium lit sps flat living in my garage rent free. Current Tank Info: 105g SPS dominant euro braced powered by 4 ecotech pumps and lit by an ATI powermodule controlled by a reef angel =). |
|
|

|
|
|
#113 | |
|
Registered Member
Join Date: May 2013
Posts: 307
|
Quote:
-Alan |
|
|
|

|
|
|
#114 |
|
Registered Member
Join Date: Jun 2006
Location: S.Fla
Posts: 1,041
|
this may be a stupid question, but what is the overall +- dimension for a 20lb co2 tank and regulator, more concerned with the height and diameter of a set up.
The calcium reactor project has been put on hold. I am in the process of setting up the tank and decided to build a stand , canopy is next. I plan on building a separate box next to the tank to hold the co2 tank, masterflex, ballasts/drivers if it is a good idea to put them in the box. Would like to incorporate the chiller into the design as well. Don't know how tall the box has to be. thanks |
|
|

|
|
|
#115 | |
|
Registered Member
Join Date: May 2013
Posts: 307
|
How to build a CO2 regulator for your calcium reactor.
Quote:
20lb CO2 cylinder usually stands at 23-24". However check with the seller before you make the purchase. -Alan |
|
|
|

|
|
|
#116 |
|
Registered Member
Join Date: Jun 2006
Location: S.Fla
Posts: 1,041
|
great, thanks again Alan
|
|
|

|
|
|
#117 |
|
Registered Member
Join Date: Apr 2004
Posts: 240
|
I have a 20# cylinder for my system. From base to top of the guard around the valve it's 27.5" tall. I would guess it's around 8" to 9" in diameter.
|
|
|

|
|
|
#118 |
|
Premium Member
 Join Date: Oct 2002
Location: Arvada, CO
Posts: 1,003
|
I'm confused on the power supply for the Burkert solenoid. Aquarium Plants adds a grounded power cord as an option and there's a tutorial on the web on how to add a power cord. So does that mean the solenoid plugs directly into a wall outlet?
I thought I had read somewhere that the solenoid may need a power adaptor? |
|
|

|
|
|
#119 |
|
Registered Member
Join Date: Dec 2011
Location: Pacifica
Posts: 3,741
|
Yeah the solenoid does need a power adapter. Possibly the AP one is AC?
What I find is a little off also is that the weatherproof connector on the burkert is sized for a standard cable size not really the small power adapter sized cords on the power supplies. Looking at my Milwaukee solenoid it's just a grounded plug so I'm guessing it's AC . I'm going to be powering mine up here pretty soon so I'll post a picture of it when I'm done. On a side note I ended up getting a new older style Harris dual stage for oxygen from work. It has never been used but I need to test it to make sure it doesn't have any internal leaks.. It's the older style but being that it's new once I get the fittings I should be off to the races.
__________________
15 years in the hobby yet still learning every day. 280g radium lit sps flat living in my garage rent free. Current Tank Info: 105g SPS dominant euro braced powered by 4 ecotech pumps and lit by an ATI powermodule controlled by a reef angel =). |
|
|

|
|
|
#120 |
|
Registered Member
Join Date: Apr 2011
Posts: 70
|
Pic of my finished system
I used what fittings I could find locally off of craigslist and from home depot to finish mine. I have a veriflo 6000 stainless regulator, but the rest of it is all brass.
Full res pictures here: http://1drv.ms/1HlnCaD In terms of the power supply, each solenoid will have different power requirements. Some are 120v AC and just spliced in to a power cord, but mine was 12v. I got a IP67 constant current LED power supply and used waterproof wire caps to attach the solenoid power cables to the power supply. Did the test as Alan prescribed, no problems and nothing bubbles when doing the soap test. |
|
|

|
|
|
#121 |
|
Registered Member
Join Date: Mar 2001
Location: Long Island, NY
Posts: 9,207
|
So I ended up buying a Veriflo unit off ebay. I have a few questions I wondered if somone could help me with.
Here are the pics of the unit, it looks to be in very good shape. 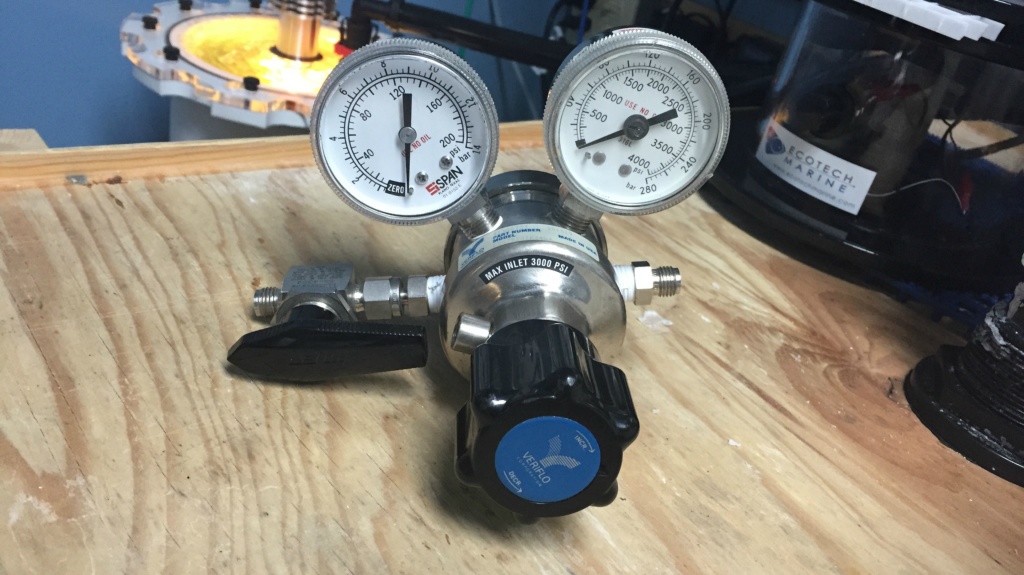 There are a few open connectors on the front and back I am not sure what to do with. Are they open, or do I need to plug them? The back of the unit 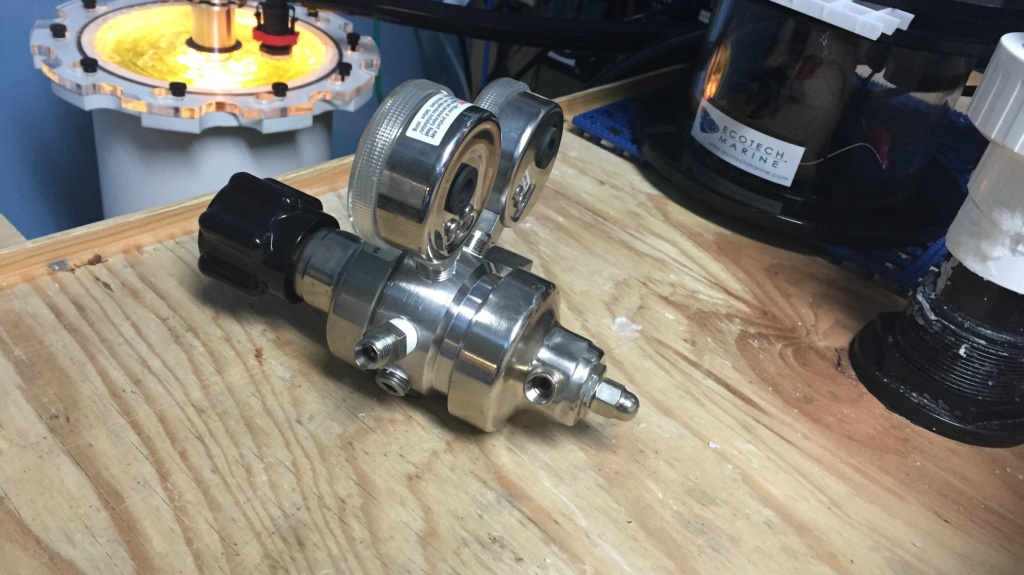 Front 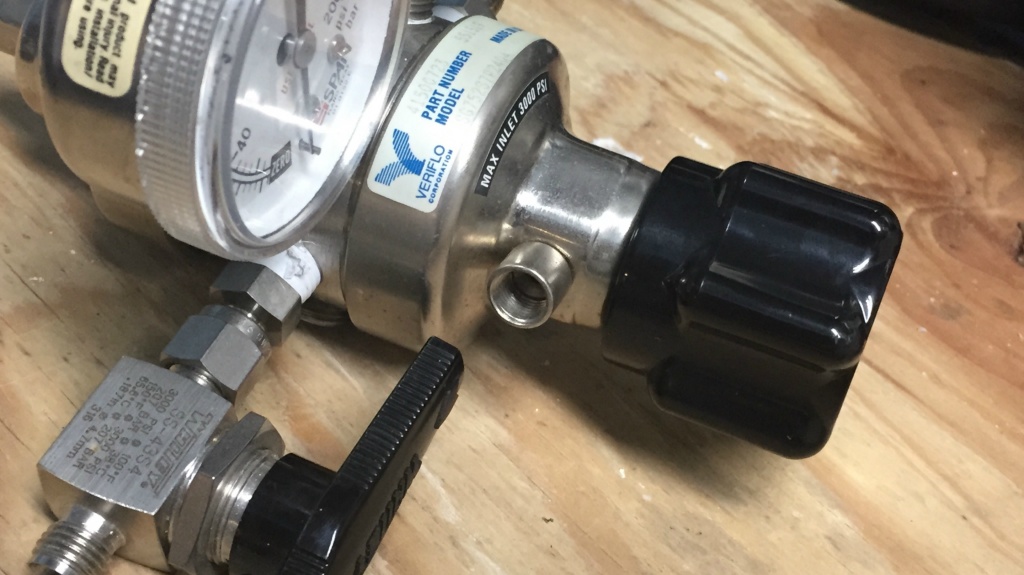 Also the bottom has three other opening that are already plugged, I assume I do not have to do anything to them. 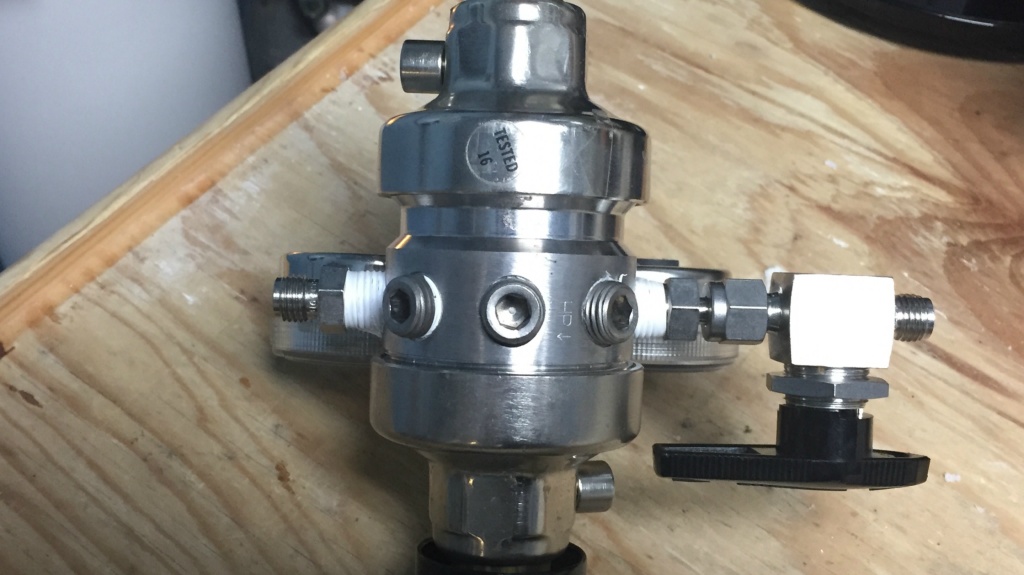 I have had CO2 regulators for well over ten years. But this will be the first that I have put together myself.
__________________
-Joe TOTM Sept 2002 | Reefland April 2004 | CORAL Magazine Nov 2007 Featured Tank "Coral Reef Aquarium" 2011 | Reef Spotlight 2018 Current Tank Info: 270G SPS Tank, 140G sumps, 35G Frag Tank, Ultra Reef Akula UKS-200 Skimmer, Apex, Giesemann Spectra 3x250W MH 4x80W T5, 2xReefbrite Tech 72" Blue LED, Triton Dosing, ARID C30 Algae Reactor, Maxspect Gyre |
|
|

|
|
|
#122 |
|
Registered Member
Join Date: Apr 2011
Posts: 70
|
Those tubes in the front and back are just there in case the diaphragm fails and it has to vent the air. In some setups you want to vent that to a specific place, but for our purpose just leave the holes be.
|
|
|

|
|
|
#123 | |
|
Registered Member
Join Date: May 2013
Posts: 307
|
Quote:
Thats a sweet regulator! Adding a 1/8 male x 1/8 female between the solenoid and the needle valve will save you some spaces. The needle valve will be pointing toward the user thus more convenience to do the adjustment. As for the solenoid power supply, some Burkert solenoids are 120v, 12vdc and 24vdc. The model I mentioned is a 24vdc. It does not require a ground wire. All you need is a 24vdc 500mA power adapter. It's available on eBay. |
|
|
|

|
|
|
#124 | |
|
Registered Member
Join Date: May 2013
Posts: 307
|
Quote:
This is a nice ss Parker Veriflo. As Dnh828 mentioned, you do not need to do anything to the back and front ports. Just remove the high pressure inlet fitting and attach the CGA320 nipple and nut then remove the stop valve on the low pressure outlet and attach the post body from there. Let me know if you need solenoid, and needle valve. I have a few left and can spare you a set. |
|
|
|

|
|
|
#125 |
|
Registered Member
Join Date: May 2013
Posts: 307
|
|
|
|

|
 |
|
|