The ProfiLux tutorial and Review
Posted 03/23/2010 at 03:13 PM by AQD_ottawa
Well now the "Aqua Digital Tank Build" is nearing set up completion its now time to move onto the profiLux and show everyone what really can be done.
I thought I would do this step by step guide including software screen shots.
So lets start with
[B]Temperature.[/B]
As you can see here all probes including the Temp probe are situated in the sump at a level that the probes will never be completely submersed.
[IMG]http://i71.photobucket.com/albums/i159/monitors-direct/IMG_2363.jpg[/IMG]
(The white tipped probe is the new generic pH probe that will be coming with all beginner packs as of April, just field testing it)
So here is a screen shot of the temperature software screen. Here you can see my nominal value is 28 degrees and the hys is set to .02 meaning the tank will only fluctuate by .02, my graphing clearly shows this as an even saw tooth over a 24 hours period. Any more switching than this in a small tank that does not hold heat well could cause thermostat bounce, something to be aware of more so with chillers.
[IMG]http://i71.photobucket.com/albums/i159/monitors-direct/tempinput.jpg[/IMG]
So thats the input but what about turning the heater on and off at the set value?
Next step is to program the power bar to control the heater, but first set the thermostat of your heater to 1-2 degrees above your nominal value, this is so the GHL had control over the heater but still allowing for failure redundancy, no matter how good your controller is, it could be made by Nasa for all I care, make sure you have redundancy or 3rd party cut out for such devices.
Ok onto the power bar. here you can see the power bar input screen and I have chosen socket 1 to be the temperature "heating" control socket. The socket is edited to be Temperature 1 - Heater. If you want to also control a chiller just select another socket i.e socket 2 and program that to Temperature 1 - Chiller. The ProfiLux will then turn either device on or off depending on your nominal value and Hys' set.
[IMG]http://i71.photobucket.com/albums/i159/monitors-direct/socket1.jpg[/IMG]
More about the other sockets later.
So thats the temperature set up. - Next pH
Total Comments 8
Comments
-
 OK so pH -
Well once you have set up the Temp everything stat to fall into place like a jigsaw really, setting pH up is no different you are just dealing with different values.
So here we have the pH screen
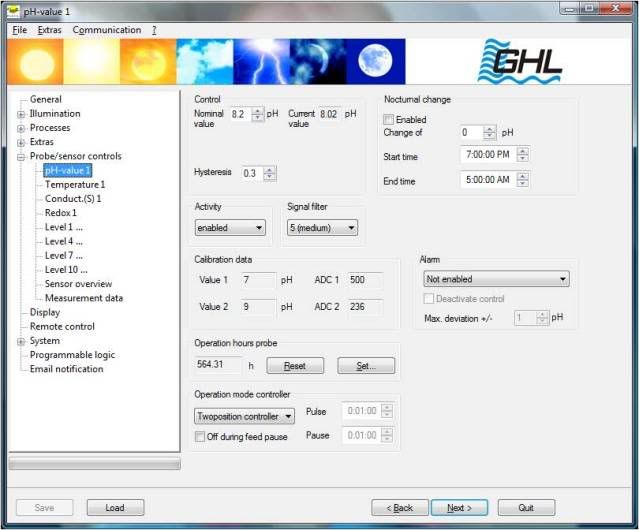
Just as the temperature control page, you have nominal value current value and hys'. As with the temp input there are plenty of other funky add ons to play with if you wished here, for example nocturnal mode etc, this is important only if you really do not like natures ability to lower pH at night, I personally let the tank follow a rythm.
So what can pH be used for? In my case its just monitoring, of course I can set an alarm to wake me at 2am if it drops too low, or goes to high if my Alk dosing got stuck on, or if running a kalk stirrer etc. But the main purpose in reef tanks for pH control other than just monitoring the tank is calcium reactor control.
So to set up a ca reactor Co2 solenoid (I do not have this on my tank as I cast that old pony out long ago )
First set up your nominal value in a ca reactor it should be around 6.2 to 6.5 depending on your media. The Hys' can be set to 0.1 in this case, we are controlling a solenoid so does not have so many issues with being switched on and off often.
Now go back to the socket function screen and decide what socket you wish the solenoid to be plugged into, lets say socket 2 for now.
Just as you did with the temp socket set up, select the socket to be edited and set as follows
pH - downward
thats it you are set, of course you can name the socket Co2 control or Freds Diner what ever you choose
If you want to control a Kalk stirrer you can do the same but opposite, if the pH drops you want the kalk to be turned on so set to pH up.
Next Salinity control - Oh thats a scary one.Posted 03/23/2010 at 05:45 PM by AQD_ottawa 
-
 So salinity - This will take a while
First thing I need to address here is YES when you plug in your highly expensive lab grade platinum plated conductivity probe and follow the instructions to calibrate it to the letter, you will then test your refractometer and drop the whisky glass in disbelief!! WOW can the GHL be that innacurate?? Whaooo stop there
Lets look at what the old trusted refractometer is really designed for? Reading NSW? Nope, reading wee? Yep, Reading NACL? YES, but NOT natural salt water! To do this you must calibrate the refractometer using an NSW solution, the most trusted until recently was Pinpoint 53mS but then along came Fauna Marin with its highly technical "multi reference test solution" I strongly recommend anyone getting a GHL salinity probe and wish to match its reading to a refractometer to get this stuff.
We are getting a bit deep here and away from reviewing the ProfiLux but what i am trying to say is do not panic if you see the GHL reading different then the old trusted dog the refract' calibrate the refract correctly and you will not see much of a difference.
My refract - digital pen and GHL probe is calibrated to fauna solution at 53mS. This does not mean the GHL stuff is innacurate at 50Ms it is just no good for calibrating a refractometer. So if you want to match both you need an NSW solution for the refract.
OK so we have follwed the calibration instructions to the letter (mega important) so now what can we do with salinity control?
I do not personally do this but I know many GHL users do and that is control their ATO based on the salinity level of the tank.
Here is the salinity screen
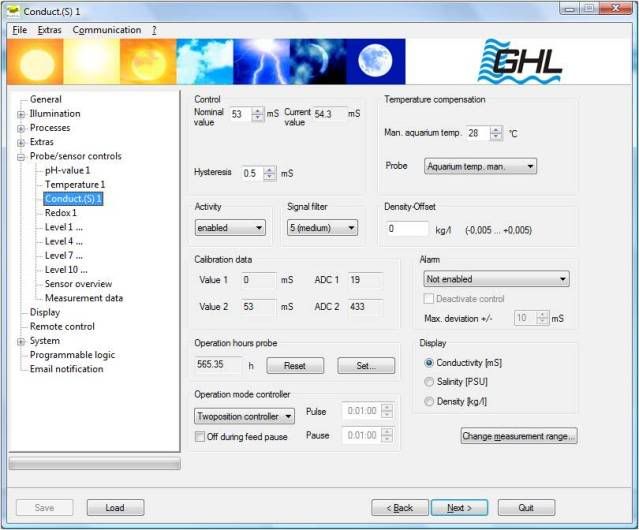
I am not going to touch on setting this up here to control ATO, if you wish to do this then let me know and once the review is finished I will discuss more detailed subjects.
And next is level control ATO and AWC and alarms.Posted 03/23/2010 at 06:08 PM by AQD_ottawa 
-
 So good ole level control etc etc
Lets start with the basics.
ATO.
There are different ways of doing this
Direct from the RO unit (my choice)
From storage container (most popular)
From one of the above controlled by a salinity probe instead of level sensor (advance topic - later)
So which ever you choose of the first two the only thing that changes in the set up is what you plug into the assigned power bar socket, whether it be a water solenoid of water pump. In my case water solenoid.
So first thing we must do is set a float or optical level sensor up in the sump to the desired (controlled) level point.
Here is mine.

Set up the assembly and loose fit to the sump so it can be adjusted, now go to the profilux front screen and go to level - diagnostic - level 1, adjust the sensor until it just turns off, you now have your level set at where you wish the water to always be maintained at.
So back to the software.
Go to the level control screen
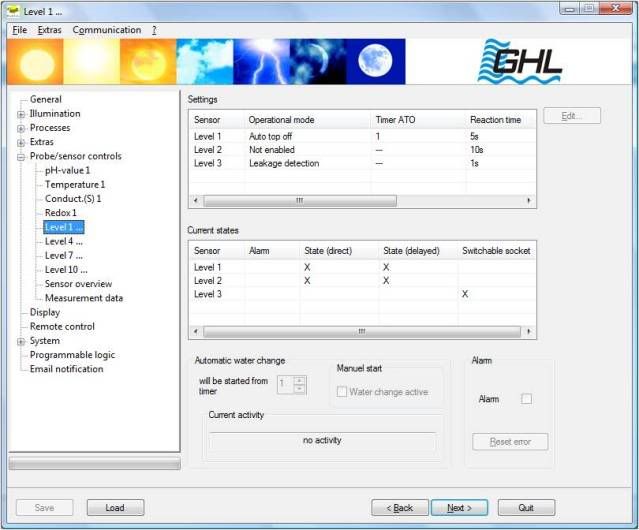
By now you should have plugged in your sensor to the back of the profilux and not by mistake plugged it into the temperature port instead!!
Double click on Level 1 in the settings tab at the top and up pops -
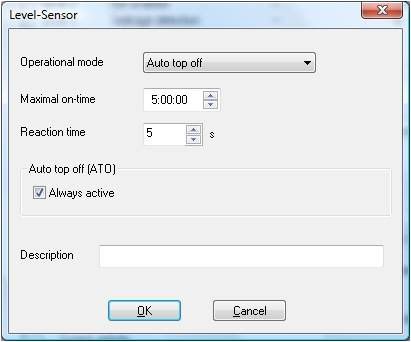
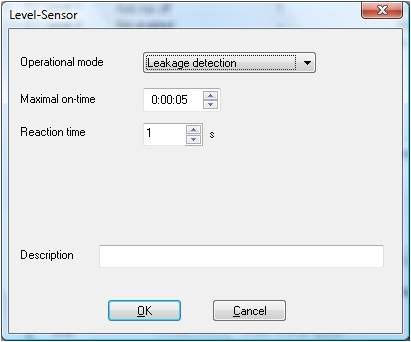
In this box you can set all sorts of treats, the first important thing to set is the function, in this case ATO, the next most important is Max on time, this is your safety net, lets say heavens forbid you forgot to clean your ATO sensor and it stuck on, you are in Cuba and downing a lovely cool local brew while your ATO goes AWOL and floods the Granny apartment below! To avoid such minor issues here you set the maximum time you wish the sensor to be in an active state. So in my case 5 minutes is, well probably to long and needs to adjust that down to 30 seconds, thats a good target. So now you have fail safe ATO
next in the same screen you need to set up the reaction time, no this is not the time you have to get back from Cuba to sort out the mess in the apartment below, but the amount of time the sensor is active before the controlled socket is switched, this is ideal for tanks with turbulance or other things that can make the sensor switch on and off periodically. I have mine set to 5 secs, which is just right.
So thats the ATO sensor set up, what about the socket?
You have now chosen a socket to control your pump or solenoid. Just as before go to socket function and click edit the chosen socket. Set this to water 1.
Waheyy, you now have fail safe fully set up ATOPosted 03/23/2010 at 06:42 PM by AQD_ottawa 
-
 So for the topic tonight - water alarms.
You can have all manner of alarms -
Maximum on time alarm (this is described in ATO set up)
Low water level alarm
High water level alarm
Leakage alarm
Depending on the amount of sensors you have depends on how many alarm states you can create. I have main tank ovefill alarm and max on time ATO alarm and here i will show you how to create an alarm and shut off for the main pump if the drain got blocked.
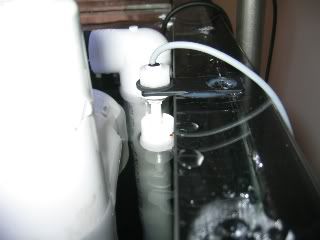
As you can see from the photo I have attached a float level sensor to the Euro brace inside the weir box, the sensor will then be triggered if the water level rises too high, in doing so setting off an alarm and turning off the main pump. You can set the same thing up for low water in your sump by putting the sensor there instead, mounted differently of course.
So how to program?
First connect the sensor to a level sensor port.
Now go to level control in the software and select the sensor for editing. Set the sensor to leakage detection and set your max on times etc as you choose.
Now go to socket function outlet and choose what socket you want the return pump plugged into then edit this socket as follows
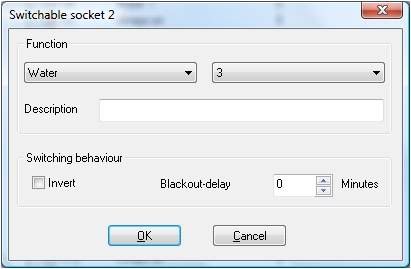
Here you will see I am using sensor 3 so have programmed as water 3.
If using an optical sensor, when setting up the socket fnction remember to "invert" the socket function.
Thats all for tonight folksPosted 03/24/2010 at 05:50 PM by AQD_ottawa 
-
 i had just made an led system with a dimmable power supply when i saw the post on profilux and aquaillumination. That sent me on a price hunt for aquarium computers. The problem was not many people had posts on the other features profilux has. they always raved about the light features and how amazing they were. so thanks for talking about the other features
Posted 07/14/2010 at 01:44 AM by Mmckibben 
-
 Glad I could help
The ProfiLux features have expended even further since my post here, if you would like to here more up to date info drop me an email at sales@aqua-digital.com where I can go through in great detail everything the profiLux can offer you
Posted 07/14/2010 at 06:02 AM by AQD_ottawa 
-

Posted 07/14/2010 at 12:20 PM by Mmckibben 
-

Posted 07/14/2010 at 12:50 PM by AQD_ottawa 


