

|
 |
|
|
#1 |
|
Registered Member
Join Date: Jan 2008
Location: Jacksonville,Florida
Posts: 733
|
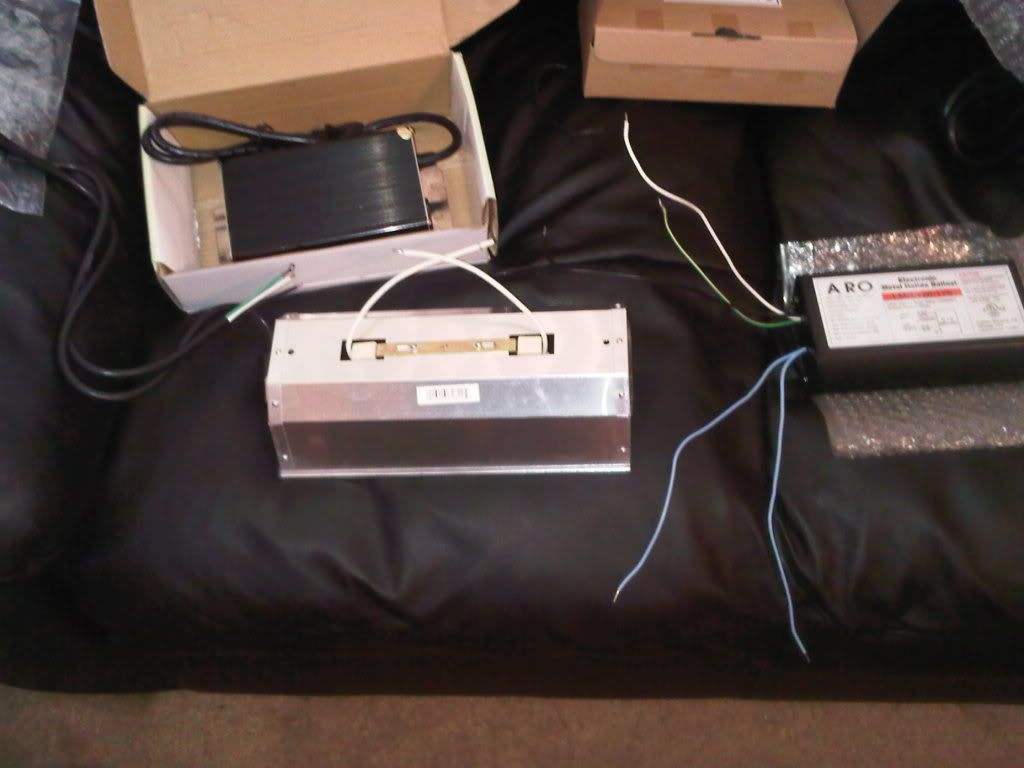
How Do You Assemble Metal Halide light

|
|
|

|
|
|
#2 |
|
Team RC Member
 Join Date: Sep 2003
Location: NY
Posts: 17,749
|
Very carefully. With wire nuts.
 Is there a wiring diagram on that ARO ballast? What's the black box in the upper-left?
__________________
Inconveniencing marine life since 1992 "It is my personal belief that reef aquaria should be thriving communities of biodiversity, representative of their wild counterparts, and not merely collections of pretty specimens growing on tidy clean rock shelves covered in purple coralline algae." (Eric Borneman) |
|
|

|
|
|
#3 | |
|
Registered Member
Join Date: Jan 2008
Location: Jacksonville,Florida
Posts: 733
|
Quote:
that just another ballast |
|
|
|

|
|
|
#4 |
|
Team RC Member
 Join Date: Sep 2003
Location: NY
Posts: 17,749
|
Can you list all the parts you are trying to assemble?
__________________
Inconveniencing marine life since 1992 "It is my personal belief that reef aquaria should be thriving communities of biodiversity, representative of their wild counterparts, and not merely collections of pretty specimens growing on tidy clean rock shelves covered in purple coralline algae." (Eric Borneman) |
|
|

|
|
|
#5 |
|
Registered Member
Join Date: Jan 2008
Location: Jacksonville,Florida
Posts: 733
|
ARO Ballast connected to the reflector
|
|
|

|
|
|
#6 |
|
Team RC Member
 Join Date: Sep 2003
Location: NY
Posts: 17,749
|
Have you done any electrical work before? If not, you might want to get a book on basic wiring or have someone with experience help you your first time.
Basically you want to use wire nuts for the connections, and follow the diagram on the ballast to know what to connect to what. It's likely that you will have to use some loose wire to extend the leads, since you don't want the ballast sitting right next to the reflector.
__________________
Inconveniencing marine life since 1992 "It is my personal belief that reef aquaria should be thriving communities of biodiversity, representative of their wild counterparts, and not merely collections of pretty specimens growing on tidy clean rock shelves covered in purple coralline algae." (Eric Borneman) |
|
|

|
|
|
#7 |
|
Registered Member
Join Date: Dec 2008
Location: The beautiful State of Jefferson
Posts: 2,751
|
Also make sure after you connect with wire nuts, you wrap them with electrical tape. First wrap each nut, sealing the gap between the wires and nut, then bundle the wires and tape them up as a unit. A warm, saltwater environment is murder on those untaped connections.
I dont get the second ballast...but I'm far from an expert on the matter I would take the whole unit to an electric contractor and have him show you. He can probably explain it in 2 minutes, just take notes, sometimes those guys talk fast when they get excited. LOL One more thing. Dont let your wife see that equipment on the leather couch!! 
__________________
Broke Back Mountain is not a movie, its the pile of dead ninjas in Chuck Norris' back yard |
|
|

|
|
|
#8 |
|
Registered Member
Join Date: Jun 2008
Location: Springfield, MA
Posts: 2,100
|
Looks pretty simple.
Green, Black & White to power cord Two blues to light fixture. Not sure if direction matters. Verify with diagram on ballast or on manufacturer's website. I'm not an electrician. |
|
|

|
|
|
#9 |
|
Registered Member
Join Date: Jan 2009
Location: Elmira Heights, NY
Posts: 2,812
|
Match your Black, White, Green from the cord to the wires on the ballast and then take the 2 blues to your light. It doesn't matter which way the blues hook up or the fixture would've specified it. As for the wire nuts, you will want to get a roll of rubber tape and use this as your first layer, then use a high quality electrical tape (super 88 or super 33) as your second layer. Stretch the rubber tape somewhat when you wrap your wires and wire nuts. And as someone else already said, you will want to extend the blue wires with some jumpers to the white wires on the pendant to keep your ballast as far away from the water as possible. I mounted my ballast under my stand and used a NEMA 3 rated weatherproof box with a rubber chase bushing to keep any possible leaks off the ballast connections. Good luck, and please make sure to be careful when dealing with anything running off of a ballast. These MH ballasts produce a voltage of around 350, which would really zap you even at only 1.8 amps
__________________
A new beginning........... JIM Current Tank Info: 5g standard softie/zoa tank, just starting a 20H |
|
|

|
|
|
#10 |
|
Another Brick in the Wall
 Join Date: Jul 2001
Location: Wenatchee, WA
Posts: 571
|
I solders my leads to disconnects and used shrink tubing over the solder joints and both joints together. Sealed each shrink tube with liquid tape.
__________________
Keep Reefin! ><((((º>`•.¸¸.•´¯`•...¸><((((º> ¸. •´¯`•.¸.´¯`•.. ><((((º>`•.¸¸.•...¸><((((º> ><((((º>`•.¸.•´¯`•...¸><((((º> •.¸.´¯`•.. ><((((º> |
|
|

|
 |
|
|