Reef Central Online Community

Go Back   Reef Central Online Community > General Interest Forums > Tank Journals & Builds
Blogs FAQ Calendar

Notices

User Tag List

Reply
Thread Tools
Unread 03/31/2016, 11:08 PM   #1
jcreeftankguy
Registered Member
 
Join Date: Mar 2014
Posts: 80
75g peninsula coast to coast build!

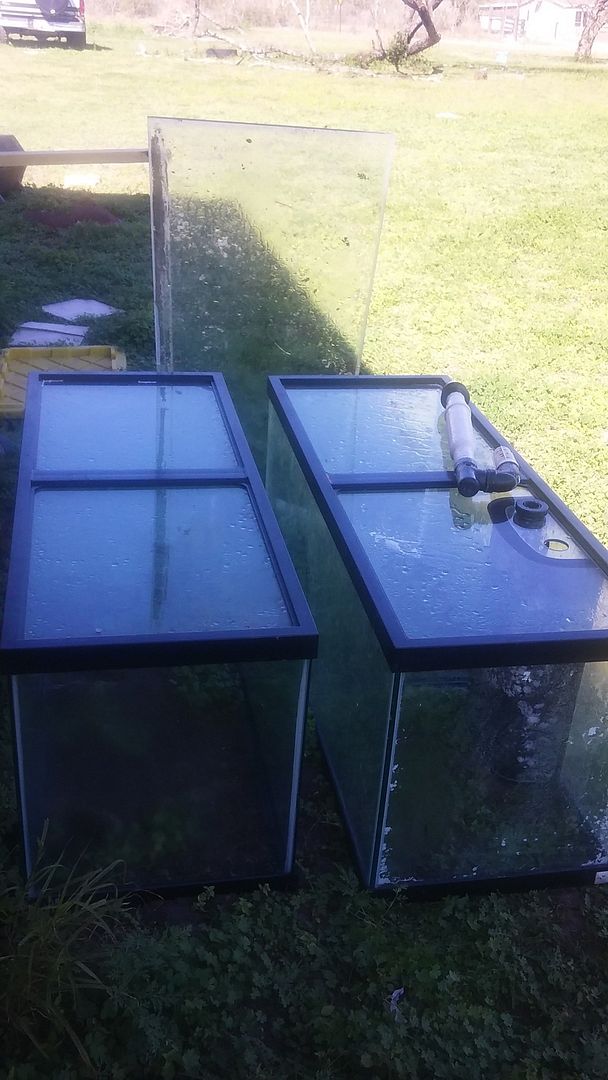
I've been building this tank very slowly! I had a 75g with an internal overflow box that sat inn the left hand side of the tank and completely hated it. It till up so much precious room. Well I decided to scrap that tank and start over! I really liked the ghost overflow design but wasn't willing to shell out 300 bucks when I could do something similar with a ten dollar piece of plastic! I got my wet tile saw and went to work as well. I'll be running a beananimal design into a 20g sump I was able to put together. Here are a few pics of my progress thus far!


jcreeftankguy is offline   Reply With Quote
Unread 03/31/2016, 11:20 PM   #2
jcreeftankguy
Registered Member
 
Join Date: Mar 2014
Posts: 80
Getting started


jcreeftankguy is offline   Reply With Quote
Unread 03/31/2016, 11:20 PM   #3
jcreeftankguy
Registered Member
 
Join Date: Mar 2014
Posts: 80


jcreeftankguy is offline   Reply With Quote
Unread 03/31/2016, 11:21 PM   #4
jcreeftankguy
Registered Member
 
Join Date: Mar 2014
Posts: 80
Getting antsy!


jcreeftankguy is offline   Reply With Quote
Unread 03/31/2016, 11:23 PM   #5
jcreeftankguy
Registered Member
 
Join Date: Mar 2014
Posts: 80
You'll never go platinum without the blues!


jcreeftankguy is offline   Reply With Quote
Unread 03/31/2016, 11:23 PM   #6
jcreeftankguy
Registered Member
 
Join Date: Mar 2014
Posts: 80


jcreeftankguy is offline   Reply With Quote
Unread 03/31/2016, 11:25 PM   #7
jcreeftankguy
Registered Member
 
Join Date: Mar 2014
Posts: 80
And the force awakens!


jcreeftankguy is offline   Reply With Quote
Unread 03/31/2016, 11:26 PM   #8
jcreeftankguy
Registered Member
 
Join Date: Mar 2014
Posts: 80
Looking under her skirt!


jcreeftankguy is offline   Reply With Quote
Unread 03/31/2016, 11:28 PM   #9
jcreeftankguy
Registered Member
 
Join Date: Mar 2014
Posts: 80
Getting her wet and breaking her in!


jcreeftankguy is offline   Reply With Quote
Unread 03/31/2016, 11:28 PM   #10
jcreeftankguy
Registered Member
 
Join Date: Mar 2014
Posts: 80
And that's it for now!


jcreeftankguy is offline   Reply With Quote
Unread 04/01/2016, 06:20 AM   #11
juzz.raath
Registered Member
 
juzz.raath's Avatar
 
Join Date: Oct 2015
Posts: 99
Nice build. Keep the updates coming. Are those triangular braces underneath your overflow tub?


juzz.raath is offline   Reply With Quote
Unread 04/01/2016, 09:53 AM   #12
henelay
Registered Member
 
henelay's Avatar
 
Join Date: Sep 2015
Posts: 67
Did you buy the baffles for the sump, or are they DIY?


henelay is offline   Reply With Quote
Unread 04/01/2016, 03:36 PM   #13
jcreeftankguy
Registered Member
 
Join Date: Mar 2014
Posts: 80
Quote:
Originally Posted by juzz.raath View Post
Nice build. Keep the updates coming. Are those triangular braces underneath your overflow tub?
No they are the square acrlic rods. I get that stuff dirt cheap. Less than a dollar a foot so I roll with it!


jcreeftankguy is offline   Reply With Quote
Unread 04/01/2016, 03:41 PM   #14
jcreeftankguy
Registered Member
 
Join Date: Mar 2014
Posts: 80
Quote:
Originally Posted by henelay View Post
Did you buy the baffles for the sump, or are they DIY?
I did them myself out of 1/8" acrylic! I plucked the blue stuff out the scrap bin of a local plastic shop for like 7 bucks and had the smoke grey stuff I used got lid on hand at work from an instrumentation panel we put back together. I save stuff like this even it gets tossed because you never know when you can use it.


jcreeftankguy is offline   Reply With Quote
Unread 04/01/2016, 05:44 PM   #15
henelay
Registered Member
 
henelay's Avatar
 
Join Date: Sep 2015
Posts: 67
Nice! Keep up the good work 👍


henelay is offline   Reply With Quote
Unread 04/01/2016, 08:29 PM   #16
jcreeftankguy
Registered Member
 
Join Date: Mar 2014
Posts: 80
Thank you for the kind words of encouragement! I'm working late in the night trying to get it plumbed together so I can do a wet test hopefully tonight or tomorrow morning! I've got plenty of beer to keep me working lol!


jcreeftankguy is offline   Reply With Quote
Unread 04/06/2016, 12:11 AM   #17
jcreeftankguy
Registered Member
 
Join Date: Mar 2014
Posts: 80
Been toying around the last couple days trying to work out the kinks! I should hopefully be gassing this tank cycling by the end of the weekend! I've spent lots of time just getting to this point soon I'm getting a little anxious to get it all going already!


jcreeftankguy is offline   Reply With Quote
Unread 04/07/2016, 09:31 PM   #18
jcreeftankguy
Registered Member
 
Join Date: Mar 2014
Posts: 80
Got a little work done but since I'll going with a photoless cycle I got a little bit of time to finish it out. Still need a pair of reflectors and to build another diy stunner strip for the other side of the canopy.


jcreeftankguy is offline   Reply With Quote
Unread 04/07/2016, 09:34 PM   #19
jcreeftankguy
Registered Member
 
Join Date: Mar 2014
Posts: 80
Also got the plumbing ran and testing it out. The beananimal is working flawlessly and completely silent which is a huge upgrade compared to the herbie overflow on my old 75g. I'm thinking tomorrow I'll move the tank in it's final place and begin cycling the dry rock!


jcreeftankguy is offline   Reply With Quote
Unread 06/15/2016, 07:51 PM   #20
jcreeftankguy
Registered Member
 
Join Date: Mar 2014
Posts: 80
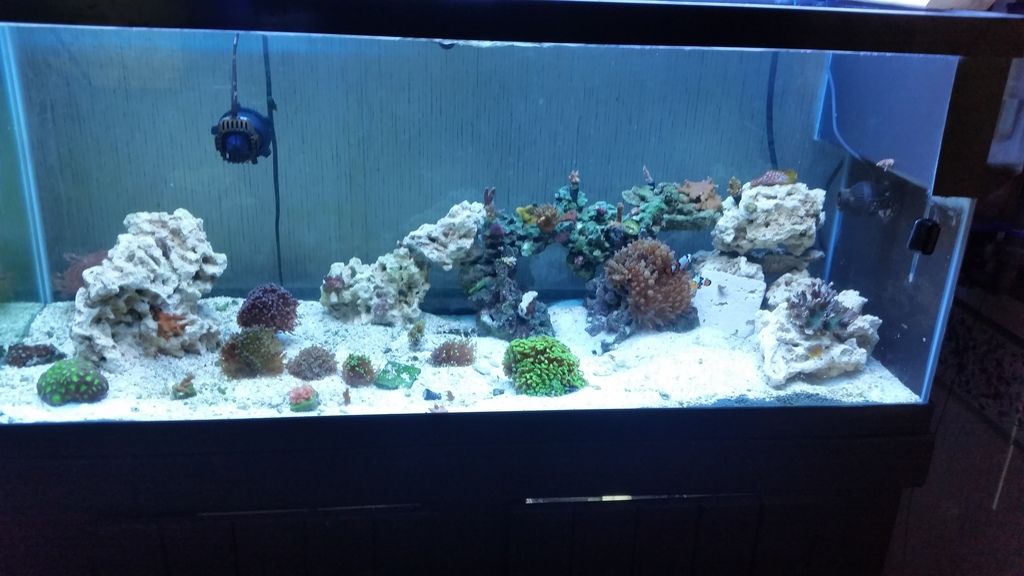
So got all my dry rock cycled and finally made the swap. This is everything I had sitting in my 20l. The tank has been running with all coral added in now for about 3 weeks with no issues. I'd say the transfer was successful. Good thing I waited because the diatom bloom on the dry rock would've wiped everything out!


jcreeftankguy is offline   Reply With Quote
Unread 06/15/2016, 07:52 PM   #21
jcreeftankguy
Registered Member
 
Join Date: Mar 2014
Posts: 80


jcreeftankguy is offline   Reply With Quote
Unread 06/15/2016, 07:53 PM   #22
jcreeftankguy
Registered Member
 
Join Date: Mar 2014
Posts: 80


jcreeftankguy is offline   Reply With Quote
Unread 06/19/2016, 09:46 AM   #23
jcreeftankguy
Registered Member
 
Join Date: Mar 2014
Posts: 80
Quote:
Originally Posted by juzz.raath View Post
Nice build. Keep the updates coming. Are those triangular braces underneath your overflow tub?
Yes I used my wet/dry tile cutter to cut them out. That box also supports my hob skimmer so it needs to be supported.


jcreeftankguy is offline   Reply With Quote
Unread 06/19/2016, 04:08 PM   #24
ProZack199
Moved On
 
Join Date: Dec 2013
Posts: 10
Very Nice Build Keep it Up


ProZack199 is offline   Reply With Quote
Unread 06/21/2016, 08:04 PM   #25
jcreeftankguy
Registered Member
 
Join Date: Mar 2014
Posts: 80
Quote:
Originally Posted by ProZack199 View Post
Very Nice Build Keep it Up
Thanks! It's been a long slow process!


jcreeftankguy is offline   Reply With Quote
Reply


Posting Rules
You may not post new threads
You may not post replies
You may not post attachments
You may not edit your posts

BB code is On
Smilies are On
[IMG] code is On
HTML code is On


All times are GMT -6. The time now is 11:37 AM.


Powered by vBulletin® Version 3.8.4
Copyright ©2000 - 2025, Jelsoft Enterprises Ltd.
Powered by Searchlight © 2025 Axivo Inc.
Use of this web site is subject to the terms and conditions described in the user agreement.
Reef CentralTM Reef Central, LLC. Copyright ©1999-2022
User Alert System provided by Advanced User Tagging v3.3.0 (Pro) - vBulletin Mods & Addons Copyright © 2025 DragonByte Technologies Ltd.