
|
|
 03/11/2006, 08:20 AM
|
#76 |
|
Persona Non Grata
Join Date: Jul 2005
Location: Oklahoma City
Posts: 2,106
|
Very nice. Can't wait to see the progression. Tagging along.
__________________
The worst thing about an unwritten law is that you don't know where to go to erase it. Current Tank Info: 20 Long.10 months to my 240 In wall with Fish Room. |

|

|
|
03/11/2006, 12:19 PM
|
#77 |
|
Registered Member

Join Date: Feb 2005
Location: Chillicothe, Ohio
Posts: 479
|
Looks great can't wait to see the finished product.
__________________
kwgozy CORA Member Current Tank Info: 150 gl RR with daul over flows. 2 400wt 10,000k MH with 2 3' 96 wt .03 atinic, 2 Tunze 6100 streams with Multicontroller, Aquatronica controller, 75gl sump/fuge |
|
|
|
|
03/11/2006, 12:20 PM
|
#78 |
|
Registered Member
Join Date: Feb 2005
Location: Chillicothe, Ohio
Posts: 479
|
Looks great can't wait to see the finished product.
__________________
kwgozy CORA Member Current Tank Info: 150 gl RR with daul over flows. 2 400wt 10,000k MH with 2 3' 96 wt .03 atinic, 2 Tunze 6100 streams with Multicontroller, Aquatronica controller, 75gl sump/fuge |
|
|
|
|
03/12/2006, 01:10 PM
|
#79 |
|
Registered Member
Join Date: Feb 2004
Location: So Cal
Posts: 659
|
Your work is great! I hope mine comes out as nice...
So far I am only at the sketching point, as I have about 5 months till I am moving. I am going to be installing my 120 in my new house. http://www.reefcentral.com/forums/sh...hreadid=792732 I am also very interested in what you think of the megaflow system. I was going to build my own overflow, but now I m having second thoughts... Great stuff! Friend |
|
|
|
|
03/12/2006, 03:35 PM
|
#80 | |
|
Registered Member
Join Date: Nov 2003
Location: Boynton Beach, FL.
Posts: 317
|
Quote:
__________________
"It's the magic of risking everything for a dream that nobody sees but you." "Every day passes whether you participate or not. " Current Tank Info: 120 gal, 48x24x24 euro rim. Mostly Acros and Montipora Chalice, a couple of Acans I could not resist, 5 small fish. |
|
|
|
|
|
03/12/2006, 03:42 PM
|
#81 | |
|
Registered Member
Join Date: Nov 2003
Location: Boynton Beach, FL.
Posts: 317
|
Quote:
The name of the place on Federal is ââ¬ÅTanks a lotââ¬Â , great people, lots of livestock. They let me take a close look at their big display stand Iââ¬â¢m stealing some ideas from there.
__________________
"It's the magic of risking everything for a dream that nobody sees but you." "Every day passes whether you participate or not. " Current Tank Info: 120 gal, 48x24x24 euro rim. Mostly Acros and Montipora Chalice, a couple of Acans I could not resist, 5 small fish. |
|
|
|
|
|
03/12/2006, 03:49 PM
|
#82 | |
|
Registered Member
Join Date: Nov 2003
Location: Boynton Beach, FL.
Posts: 317
|
Quote:
I'm not finished and this weekend I made some major changes to the euro-brace. You can follow the progress at the following link. If you would like to follow the progress of converting from a center brace to a euro-brace you can click on the link below: http://reefcentral.com/forums/showth...ferrerid=42160
__________________
"It's the magic of risking everything for a dream that nobody sees but you." "Every day passes whether you participate or not. " Current Tank Info: 120 gal, 48x24x24 euro rim. Mostly Acros and Montipora Chalice, a couple of Acans I could not resist, 5 small fish. |
|
|
|
|
|
03/13/2006, 07:52 PM
|
#83 |
|
Registered Member
Join Date: Nov 2003
Location: Boynton Beach, FL.
Posts: 317
|
Thanks to someones comment about an external overflow for my tank. I've been thinking and researching on the Internet, and I changed my mind again about modifications to my tank. I never did like the size of the overflows in my 120gal. all-glass aquarium. I've always been thinking of how to hide the overflows with my corals, liverock, and aquascaping. I have come up with OK stuff but nothing great. Then it hit me! The problem isnââ¬â¢t aquascaping itââ¬â¢s the overflows! So simple! There too big, there ugly, and they take up too much space! Then I found it! Many others have done it, itââ¬â¢s simple, elegant, it gets the job done and it can be done in less than half the cubic inches of the All-Glass overflows. CALFO Over flow! Yeah I didnââ¬â¢t know what it was either. So I looked it up. Fantastic! Another great idea for me to steal. LOL!
Thanks to Anthony Calfo!! Here a good series of links about it: http://reefcentral.com/forums/showt...threadid=619976 So hereââ¬â¢s my original tank:  This is the new design: 
__________________
"It's the magic of risking everything for a dream that nobody sees but you." "Every day passes whether you participate or not. " Current Tank Info: 120 gal, 48x24x24 euro rim. Mostly Acros and Montipora Chalice, a couple of Acans I could not resist, 5 small fish. |
|
|
|
|
03/13/2006, 08:37 PM
|
#84 |
|
Registered Member
Join Date: Nov 2003
Location: Boynton Beach, FL.
Posts: 317
|
Help!
Yeah, Yeah, Yeah... I know, I should have been asking this question before I did the demolition of my overflows. I have removed my overflows. When I planned it, I though the overflow wouldn't be connected in the original silicone seam on the bottom of the tank. I was wrong. Now I donââ¬â¢t want to go through all this work only to find out my tank leaks. My question: Iââ¬â¢ve heard Silicone wonââ¬â¢t stick to existing silicone. Is it sort of true? Does it work somewhat? Is there a way around it? Like paint the old silicone with something that sticks then put the new silicone over that? Prepping with acetone? Is there anything I can do? Or do I now have to remove all the silicone in the whole tank and start over? Hereââ¬â¢s my tank with overflows:  Hereââ¬â¢s my tank without overflows:  Hereââ¬â¢s a close up of one of the seams where the overflow connected with it. This picture was taken after I removed all of the silicone from the bottom and vertical surfaces. I left what was in the bottom seam. 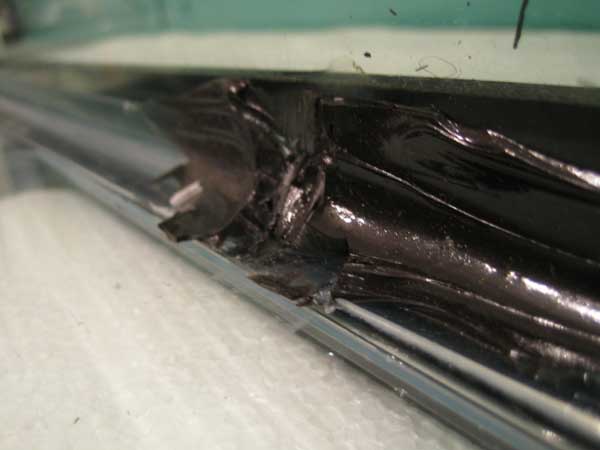
__________________
"It's the magic of risking everything for a dream that nobody sees but you." "Every day passes whether you participate or not. " Current Tank Info: 120 gal, 48x24x24 euro rim. Mostly Acros and Montipora Chalice, a couple of Acans I could not resist, 5 small fish. |
|
|
|
|
03/14/2006, 08:12 AM
|
#85 |
|
Premium Member
 Join Date: Nov 2003
Location: Harrison Twp., MI
Posts: 1,644
|
I would just silicone over the spots where the overflow met the seam, just make sure it is clean with rubbing alcohol/acetone. Reasoning:
A) The strength of the seam as well as the majority of the sealing strength comes from the silicone BETWEEN the panes of glass, i.e. the bottom sheet and the back wall. The silicone running along the corner bead is just redundancy. B) Though not quite as strong as the bond to glass, I found the sure enough silicone does bond to other silicone. C) From my AGA 120, this seems apparent in that the tank appears to be sealed and dried (w/clear silicone) before the overflows wee installed and attached (w/black silicone) which even in your photo, you can see overlaps the clear. Therefore I believe the actual tank seal (clear silicone) should still be very much intact. With that said I would clean out seams where the overflows used to be, apply a small bead of fresh silicone and let dry. Then do a wet test in the garage or something for a day or two: no leaks, you're home free. Good idea on the CALFO overflow, those are much more efficient at surface skimming, and even better.. nearly silent! Are you going to drill the back for the overflow, or atttach it to the holes already present in the bottom of the tank?
__________________
-Blair Disclaimer: No trees were harmed in the creation of this post, though a significant number of electrons may have been inconvenienced. Current Tank Info: 120 SPS reef in progress, 120 mixed reef, currently being completely rebuilt) |
|
|
|
|
03/14/2006, 10:09 AM
|
#86 | |
|
Registered Member
Join Date: Nov 2003
Location: Boynton Beach, FL.
Posts: 317
|
Quote:
Yes, I am going to drill the back for the overflow. I am going to try using 1 1/4in. bulkheads and build Durso style plumbing. Hopefully I can do this without building a box on the back of the tank. The holes in the bottom I am going to use for circulation pumps in and out. I was going to do this originally anyway. I was just going to drill the back. Now I don't have to make those holes. I guess it's just a wash. Thanks again.
__________________
"It's the magic of risking everything for a dream that nobody sees but you." "Every day passes whether you participate or not. " Current Tank Info: 120 gal, 48x24x24 euro rim. Mostly Acros and Montipora Chalice, a couple of Acans I could not resist, 5 small fish. |
|
|
|
|
|
03/19/2006, 08:59 AM
|
#87 |
|
Registered Member
Join Date: Nov 2003
Location: Boynton Beach, FL.
Posts: 317
|
The AC panel
I am doing 2 AC panels, one at each end. I am doing this on two separate circuits. With the total current draw of everything for the tank there will just about max out a 20 amp circuit. By separating this will share a lighter load on each of the two circuits. Panels:  AC cord: I found it was actually cheaper to buy a 25 foot 12 gage extension cord and cut it than it was to purchase good quality plugs and raw wire.  Outlets:  Switches and Timers:  Testing the outlets and switches: The timers are made by Intermatic called Digital Auto-adjusting Timer model SS8C. One big problem I ran into with testing the Timers (this could potentially break your ballasts, lights, or any other gear) is that if you pull out the battery pack for the timer while in timer or auto mode, then you replace the battery. The timer goes crazy! It starts in rapid succession turning off and on, and wonââ¬â¢t stop until you unplug the AC supply. Wow! I can see it now broken gear everywhere. If you pull the batter and replace it still continues! Some sort of software glitch I guess. The solution seems to be to program everything before you plug in your gear. Then, put the switch in Manual mode before you pull the battery. This works every time, no problems. I would never pull the battery or put the battery in for the first time with gear plugged in while in anything other than manual mode!!! 
__________________
"It's the magic of risking everything for a dream that nobody sees but you." "Every day passes whether you participate or not. " Current Tank Info: 120 gal, 48x24x24 euro rim. Mostly Acros and Montipora Chalice, a couple of Acans I could not resist, 5 small fish. |
|
|
|
|
03/19/2006, 09:07 AM
|
#88 |
|
Moved On
Join Date: Sep 2004
Location: kc
Posts: 2,763
|
For your euro bracing I suppose your going to use peices of glass?
|
|
|
|
|
03/19/2006, 10:52 AM
|
#89 | |
|
Registered Member
Join Date: Nov 2003
Location: Boynton Beach, FL.
Posts: 317
|
Quote:
Yes. I had a hard time finding information about removing the center brace and installing a euro-brace. I thought others might find the same problem so I created a separate thread. If you would like to follow the progress of converting from a center brace to a euro-brace you can click on the link below: http://reefcentral.com/forums/showth...ferrerid=42160
__________________
"It's the magic of risking everything for a dream that nobody sees but you." "Every day passes whether you participate or not. " Current Tank Info: 120 gal, 48x24x24 euro rim. Mostly Acros and Montipora Chalice, a couple of Acans I could not resist, 5 small fish. |
|
|
|
|
|
03/22/2006, 03:23 PM
|
#90 |
|
Registered Member
Join Date: Dec 2004
Location: Ft. Lauderdale, Florida
Posts: 30
|
I love the progress!!! keep'em coming!
__________________
Pedro S. "Desperately trying to say absolutely nothing, but very loudly!!" -- Dave Matthews Current Tank Info: Plans are in place for a 90g Reef but for now all I have is a 90g and 75g African Cichlid tanks for now. |
|
|
|
|
03/22/2006, 03:36 PM
|
#91 |
|
Registered Member
Join Date: Feb 2004
Location: So Cal
Posts: 659
|
Gmatt its really coming along beautiful.
Do you have any sketches for your plugs and switches? Or any pics of the wireing for them.I just bought a book about basic house wiring, but I would really love to see how you hooked all this together. PM me if you want to talk that way... Thanks, Friend |
|
|
|
 |
|
|


