
|
|
 04/16/2006, 11:18 AM
|
#1 |
|
Registered Member
Join Date: Nov 2001
Location: Glendale, So. Cal.
Posts: 2,425
|
Extreme Makeover: Sump Edition
I thought I would share the revamping of my sump area, since I have gotten many great ideas from this site over the years. Comments/suggestions are welcomed....thanks for looking!
This is my current sump area which has been running since the tank been setup almost eight years ago. Basically it is two Rubbermaid totes plumbed together with ABS pipe fittings.....  This is the right side where the tank drains into... has a five gallon bucket fuge dropped in, lit with a LOA fluorescent bulb.... 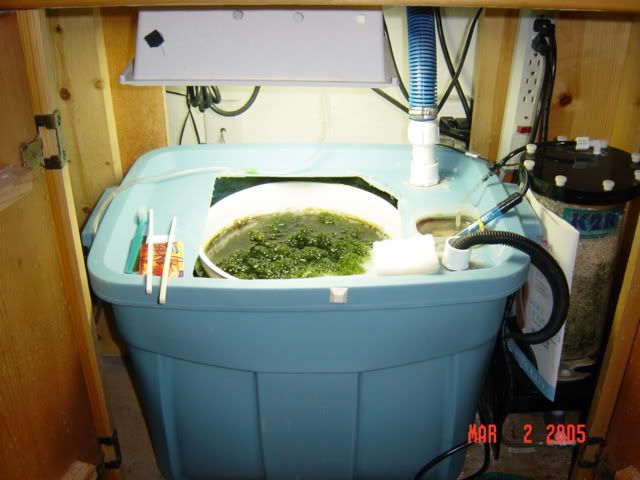 This little cut out with the Tupperware is for my CA reactor effluent and pH probe connected to a controller. It drips back into the drain area....  Left side is the return area with the skimmer and also has a kent float valve within for a gravity fed auto top off. 
|

|

|
|
04/16/2006, 11:22 AM
|
#2 |
|
Registered Member
Join Date: Nov 2001
Location: Glendale, So. Cal.
Posts: 2,425
|
My reasons for redoing the sump are thisââ¬Â¦.
After eight years, I was concerned that the Rubbermaid Totes would become brittle and crack. I wanted the skimmer in the drain area so that it would skim ââ¬Årawerââ¬Â water. I wanted more room underneath the tank to make maintenance and placement of equipment more efficient. More to come.... |
|
|
|
|
04/16/2006, 11:39 AM
|
#3 |
|
Premium Member
 Join Date: Aug 2003
Location: West Palm Beach, FL
Posts: 540
|
cool cant wiat to see what it looks like
|
|
|
|
|
04/16/2006, 11:50 AM
|
#4 |
|
Resident Ninja
Join Date: Mar 2006
Location: Oshkosh, WI
Posts: 560
|
What are your plans with it...?
__________________
- SCOTT. Check out my homepage to see my build! Current Tank Info: 40B / Super Reef Octopus SRO2000INT / 35-gal. acrylic sump+refuge / 120W LED lighting / Water Blaster 3000 Return... IN PROGRESS! |
|
|
|
|
04/16/2006, 11:55 AM
|
#5 | |
|
Registered Member
Join Date: Nov 2001
Location: Glendale, So. Cal.
Posts: 2,425
|
Quote:
|
|
|
|
|
|
04/16/2006, 02:00 PM
|
#6 |
|
Registered Member
Join Date: Sep 2005
Location: Pittsburgh, PA
Posts: 1,066
|
what size tank is this for, the 125 in your sig?
|
|
|
|
|
04/16/2006, 11:04 PM
|
#7 | |
|
Registered Member
Join Date: Nov 2001
Location: Glendale, So. Cal.
Posts: 2,425
|
Quote:
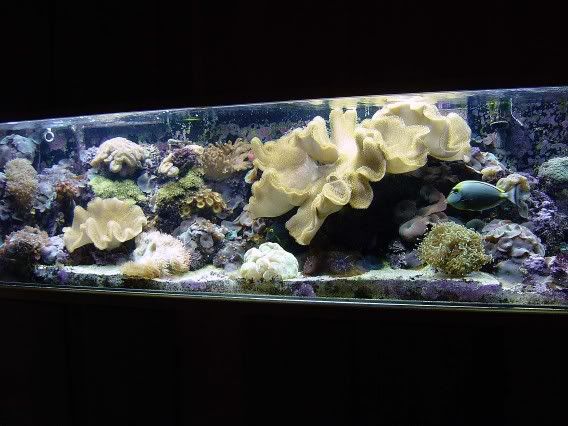 Over the past year, I've been slowly converting over to primarily SPS. Here's the tank in its current state.... 
|
|
|
|
|
|
04/17/2006, 09:56 AM
|
#8 |
|
Registered Member
Join Date: Nov 2001
Location: Glendale, So. Cal.
Posts: 2,425
|
Here is the tank I'm converting to the sump after I made the first cut to remove the top. It's an old 4 foot 55 gallon I got from someone tearing down their FW tank. As you can see it was in pretty bad shape (they had cut the top bracing off and tried to repair it.)
 Another angle... 
|
|
|
|
|
04/17/2006, 09:59 AM
|
#9 |
|
Registered Member
Join Date: Nov 2001
Location: Glendale, So. Cal.
Posts: 2,425
|
I cut the top off using a router with a straight bit. I used double stick tape to attach a straight edge on the tank to use as a guide for the router. This is my first time working with acrylic so I'm learning as I'm going.....

|
|
|
|
|
04/17/2006, 12:00 PM
|
#10 |
|
Registered Member
Join Date: Nov 2001
Location: Glendale, So. Cal.
Posts: 2,425
|
Okay, here's a top view schematic of the planned sump...Don't laugh at my feeble attempt at MS paint.
 
|
|
|
|
|
04/17/2006, 12:24 PM
|
#11 |
|
Registered Member
Join Date: Jan 2006
Location: valdosta, ga
Posts: 3,707
|
I'm a little confused. It looks to me like you just cut the top supports out of the tank. Is that right? Another thing I am curious about is: How do you plan on getting the new sump under the stand? It looks like the center brace is going to be in the way.
__________________
400gals of various tanks in the same system. Current Tank Info: 2 175w MH, 2 VH0 Actinics, Lots of Live Rock, tons of copepods, a Fat Mandarin Goby, Niger Trigger, Yellow Tang, Falco Hawkfish, Bi-Color Pseudo, numerous soft, SPS and LPS Corals |
|
|
|
|
04/17/2006, 12:33 PM
|
#12 | |
|
Registered Member
Join Date: Nov 2001
Location: Glendale, So. Cal.
Posts: 2,425
|
Quote:
I'm planning to cut a hole on the end of the stand and slide the sump in from the end. Then replace the cut piece along with some moulding trim. I also considered cutting out the center brace and bracing the stand temporarily with some 2x4's while I put the sump in, but I'm not sure I want to chance it. |
|
|
|
|
|
04/22/2006, 10:01 PM
|
#13 |
|
Registered Member
Join Date: Nov 2001
Location: Glendale, So. Cal.
Posts: 2,425
|
Much of the inspirtation and ideas for this sump came from www.melevsreef.com. It is a great source of information!
Here's some sump assembly shots. I used 1/4 inch acrylic from lowes. The pieces were cut on a table saw using a 80 tooth blade. Weldon 4 and weldon 16 were used to bond the pieces into the tank. The main problem I had was the extreme warping and bowing of the tank after cutting the top bracing off. I used weight plates and dumbells to flatten the tank out and get a tight fit while bonding the pieces in. I also clamped pieces of wood to the sides to flatten them. Here's a shot of the baffles being bonded in....  After the baffle cured, I flipped the sump over and attached to bubble tower to the back corner. Again the need for weights and clamps... 
|
|
|
|
|
04/22/2006, 10:07 PM
|
#14 |
|
Registered Member
Join Date: Nov 2001
Location: Glendale, So. Cal.
Posts: 2,425
|
Again after the appropriate curing time, I attached the sides for the internal refugium...

|
|
|
|
|
04/23/2006, 04:11 PM
|
#15 |
|
Registered Member
Join Date: Nov 2001
Location: Glendale, So. Cal.
Posts: 2,425
|
Sump finally done! Top bracing, internal baffles, and refuge walls have corrected the bowing of the tank.

|
|
|
|
|
04/23/2006, 04:33 PM
|
#16 |
|
Registered Member
Join Date: Jan 2006
Location: maryland
Posts: 6,923
|
Looks to me like you are going to be mighty happy with the new setup. Looks like its coming together nicely.
__________________
I found a way to make a small fortune running a reef tank. Start with a large fortune. Unofficial President of the SEACLONE haters club Current Tank Info: 125 mixed reef 110 lbs LR, 1x250watt XM 20K MH 2x175watt XM 20K MH on Magetics 2X96 watt actinic PC, 220 watt VHO actinic, 30 gallon refugium, closed loop system powered by Sequence Dart MSX 200 skimmer 38 gallon sump, Oceansmotions squirt |
|
|
|
|
04/23/2006, 09:06 PM
|
#17 |
|
Registered Member
Join Date: Nov 2001
Location: Glendale, So. Cal.
Posts: 2,425
|
Thanks mg426...I pretty happy with the results so far considering this was the first time working with acrylic. The holes for the bulkhead and float valve still needs to be drilled.
|
|
|
|
|
04/28/2006, 12:53 AM
|
#18 |
|
Registered Member
Join Date: Nov 2001
Location: Glendale, So. Cal.
Posts: 2,425
|
Water testing....had a small leak in the refuge...Grrr..... patched with bead of weldon 16.
 
|
|
|
|
|
04/28/2006, 07:09 AM
|
#19 |
|
Premium Member
Join Date: May 2002
Location: NJ
Posts: 1,355
|
nice work. Good luck with it.
|
|
|
|
|
04/28/2006, 11:31 PM
|
#20 | |
|
Registered Member
Join Date: Nov 2001
Location: Glendale, So. Cal.
Posts: 2,425
|
Quote:
Here's a shot of the hole I cut in the end of the stand to slide the sump in....I didn't want to mess with the center brace of the stand. The sump is plumbed and running  Covered the hole with the cut out piece trimmed with molding 
|
|
|
|
|
|
04/29/2006, 02:45 PM
|
#21 |
|
Registered Member
Join Date: Nov 2001
Location: Glendale, So. Cal.
Posts: 2,425
|
The new sump is up and running!
Before: After: 
|
|
|
|
|
04/29/2006, 02:47 PM
|
#22 |
|
Registered Member
Join Date: Nov 2001
Location: Glendale, So. Cal.
Posts: 2,425
|
Right side before:
Right side after: 
|
|
|
|
|
04/29/2006, 02:49 PM
|
#23 |
|
Registered Member
Join Date: Nov 2001
Location: Glendale, So. Cal.
Posts: 2,425
|
Left side before:
Left side after:  Enjoy!! |
|
|
|
|
04/29/2006, 03:15 PM
|
#24 |
|
Registered Member
Join Date: Sep 2005
Location: naperville, IL
Posts: 729
|
very nice
|
|
|
|
|
04/29/2006, 04:22 PM
|
#25 |
|
Registered Member
Join Date: Jan 2004
Location: Canada
Posts: 548
|
looks way more clean, nice job.
can you explain why you have the pinpoint monitor in that little pool of water and not just in the main area? |
|
|
|
 |
|
|


