


|
 |
|
|
#1 |
|
Registered Member
Join Date: Dec 2007
Location: East Moline, IL
Posts: 140
|
DIY High Power LED Lights
I'm just curious if anybody has done a DIY lighting project using lumileds products like the Solaris LED hood. I looked over the prices of the high output leds and I'm pretty sure I could build their $1300 hood for about $300.
They describe their 12" section as follows: 6 Actinic Blue Daylight 9 Full Spectrum White 6 Actinic Blue Night Light 4 Full Spectrum White Night So double that number for the 24". The full spectrum whites look like they're $10 a piece on the web and the blues are a little cheaper. I'm assuming the "Night Lights" are just standard dime a dozen leds. What do you guys think? |
|
|

|
|
|
#2 |
|
Registered Member
Join Date: Aug 2006
Location: Wilmington
Posts: 472
|
Are you including the cost of a power supply in the $300?
If I'm looking @ the same thing you are, these puppies draw about 350mA @ about 3.5VDC. So rough numbers, you're looking @ a little over 5A @ 3.5VDC. Not saying it can't be done, but you might be stretching the $300 budget. $0.02
__________________
delreefclub.org |
|
|

|
|
|
#3 |
|
Registered Member
Join Date: Sep 2005
Location: Arkansas
Posts: 1,603
|
You can get a laptop computer power supply that will run at 5A @ 3.5 VDC for about $50. As long as amps are not over ran on the power supply should last along time.
|
|
|

|
|
|
#4 |
|
Registered Member
Join Date: Sep 2005
Location: Arkansas
Posts: 1,603
|
Keep us posted this is intriguing.
|
|
|

|
|
|
#5 |
|
Registered Member
Join Date: Aug 2007
Posts: 14
|
I'm not quite sure the draw of LEDs... they're not very efficient, and relatively complicated to construct... I've done quite a write up...
http://www.hidplanet.com/forums/viewtopic.php?t=26376 I count 25 LEDs, assuming .33 amps (roughly) that's 8 amps... blue + white LEDs are roughly 4.5v at 350mA so count on 25*4.5v = 112.5 forward voltage drop... If you did 15 blues in 2 chains of 8 = 16 *4.5v drop = 36v drop and the white chains would have two chains of 5... get a 48v DC power supply rated for 8 amps or 2 x 4 amps, and get a couple of the constant current switching regulators from ledsupply.com and you're good to go... Still, the benefits for lighting an aquarium to me seem poor at best... I haven't seen any PAR numbers, but I would doubt they are very good. Efficiency is barely above halogen light sources, so expect a ton of heat for very little light. each 1 watt LED = ~30-50 lumens, so * 25 = 1250 lumens... that's like a 26w florescent bulb... for 300$ ? doesn't sound like a good source of light to me. |
|
|

|
|
|
#6 |
|
Registered Member
Join Date: Aug 2007
Posts: 14
|
Here's my post since I forgot you had to be a member to see the post. I am a mod on that site.
Introduction to High Brightness LEDs, Driving and Thermal Management I wanted to do a little introduction for people to get acquainted with High Brightness LEDs. There are a million things out there, and they're hella confusing. Really it's not so bad, I've separated it into 3 sections with an example. First - the Types, who the players are, and what products they offer. Two - Driving them, they take special consideration, and I'll show you how. Three - Thermal Management and Electrical Isolation, they require special love, but it's fun and you get dirty! If you've ever wanted to get into SUPER LEDs, now is the time, go wild, just don't stare straight into them! This is the Good $hit that I've been racking my head over for the past month, and wanted to give just the goodies back for people to get on the bandwagon with me. If anyone sees any discrepancies etc... drop me a line, or mention something, as you can see this was a large undertaking, and I probably omitted or made some errors. I want this to be a living document with updated info, so all please contribute. AzDave, mods, et. all feel free to modify as you see fit, if you would just let me know for my personal knowledge as to what's been changed. Thanks, Oce _________________________________________________________ Brands of LEDS Luxeon I, III, V http://www.lumileds.com/products/line.cfm?lineId=1 Pretty much as stated, generally 1 watt, 3 watt, and 5 watt. These are the originals. They are packaged as an "emitter, with a metal slug underneath which is attached to the cathode (negative) die of the LED. You need to get the heat away from this source or the LED will fall into thermal runaway and destroy it's self. These are available in a myriad of different PCB mounts, which serve to help you the end user mount these on a heatsink, and make electrical connections. They also come in side emitting (for use in reflectors), and with various optics which glue on top to narrow their beam patterns. ALL of the PCBs they come on are electrically connected to the cathode of the LED, and MUST be electrically isolated for most uses. You can buy the emitters separately fairly cheap ~3$ Available in All Colors (blue, white, orange (amber), green). 8-10$ for a PCB based board. Luxeons are "binned" meaning different batches come out a tad different. If you really want to know how to get the absolute best, see this: http://www.lumileds.com/pdfs/AB21.pdf 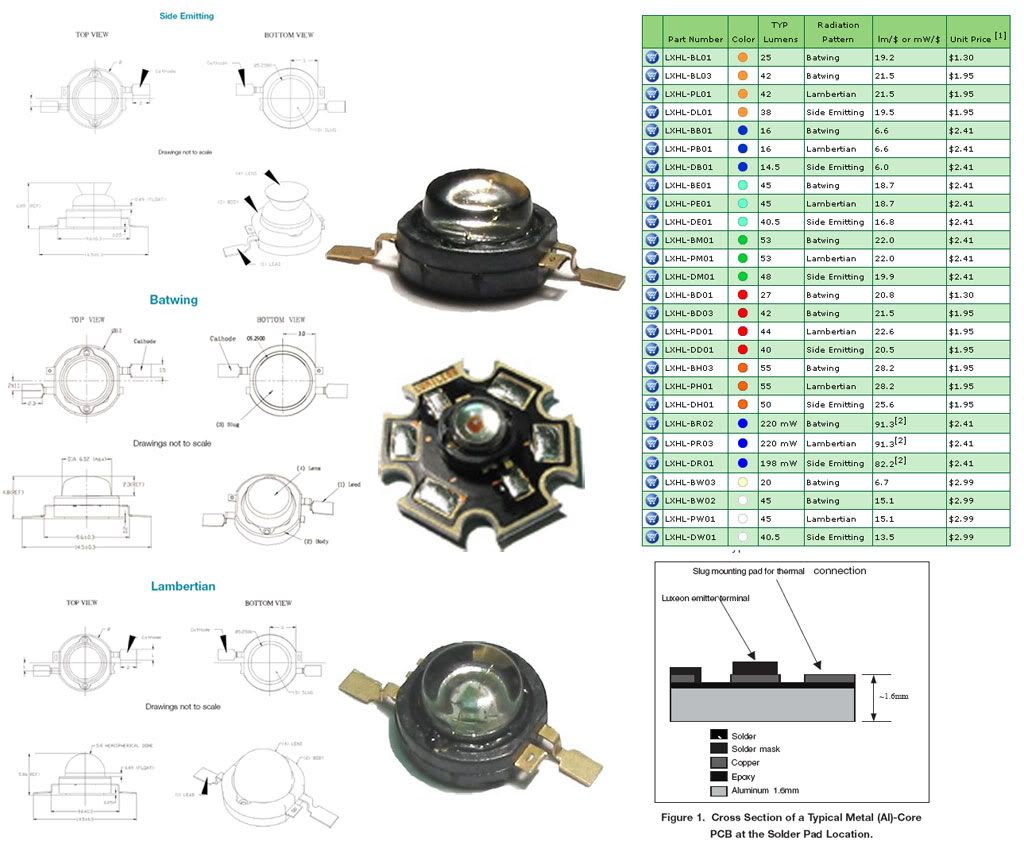 Luxeon K2 http://www.lumileds.com/products/line.cfm?lineId=18 Available in 1-5 watt types, these are the 2nd generation of LEDs from Lumileds, a division of Phillips. The great thing about the K2 series, is that a tier 2 company called Luxdrive produces a PCB which is electrically insulated, but also a thermal conductor. This may not seem like a big deal at this point, but shortly it will become very apparent why. produces up to 150 lumens with the 1.5Amp White LED. Available in limited Colors. Slugs are available in all colors, but not yet available individually, expect ~5$ a piece when released, PCB based boards are about 9-15$ a piece depending on current rating, 9$ for the 1watt to 15$ for the 5 watt. 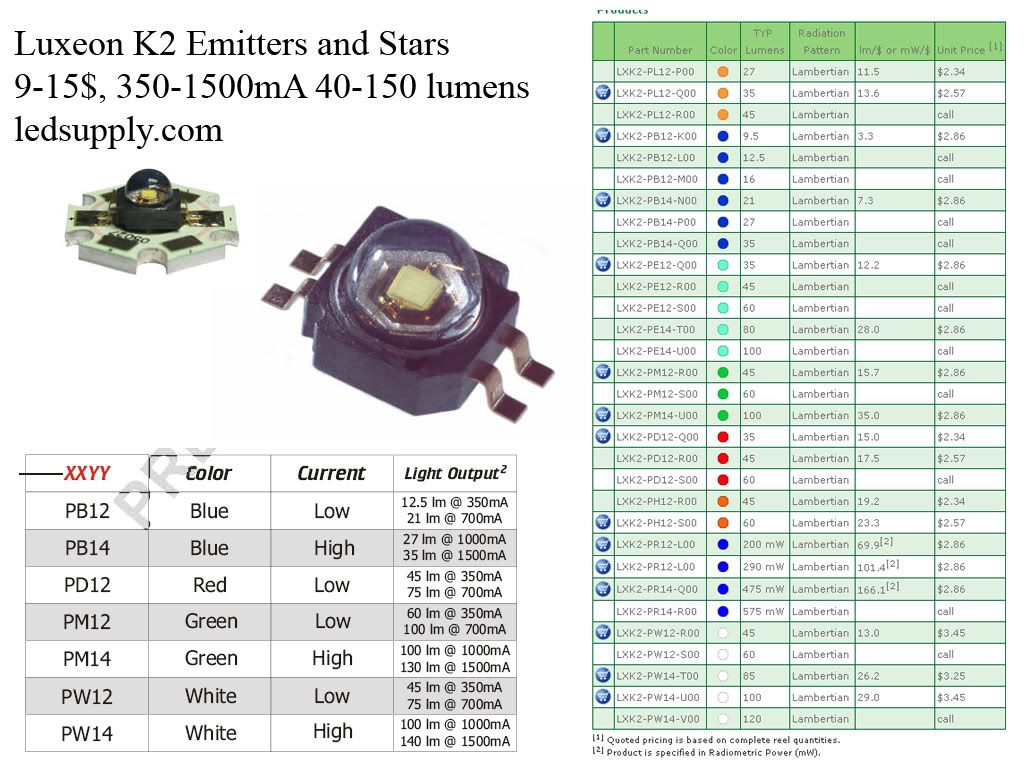 Cree X-lamp http://www.cree.com/products/xlamp.asp Cree is another producer like Lumileds, Phillips, Ranging from 200-700mA Lumileds. Up to 80 lumens per watt pulsed out of a 350mA Xlamp. Luxdrive produces a PCB mounted version of this chip. ~7.50$ a piece. Electrically Isolated PCB suspected but not tested. Similar output to K2 theoretically... 1x1" PCB 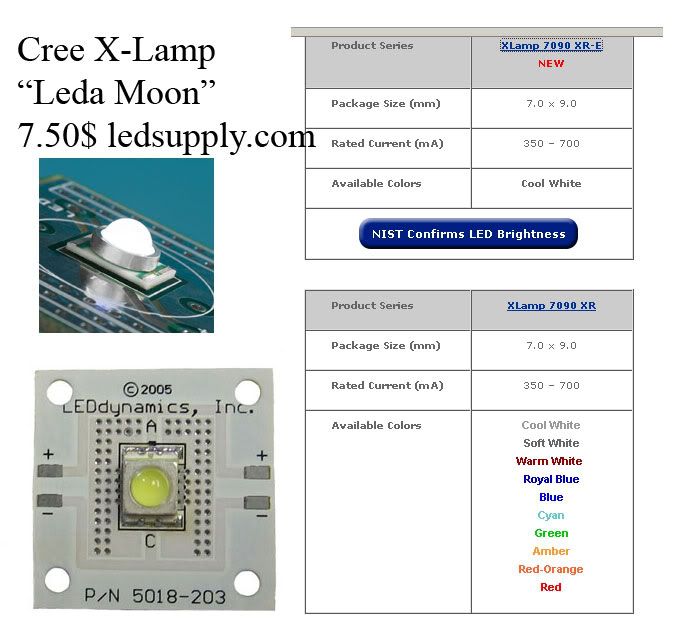 Nichia Jupiter and Rigel series LEDS Nichia was the original Blue LED manufacturer, which they had contentious lawsuits with the discoverer for years after... Their Jupiter series LEDs come on a Electrically Isolated PCB from Luxdrive 1x1" for about 7$ a piece, can take 500mA of current in 35 and 70* radiation patterns. No additional heatsinking necessary if PCB is left to open air and run at 350mA. Rigel series are similar to the Suprflux, around 120mA of current, and ~5$ a piece but come on a thermal PCB. http://www.leddynamics.com/LuxDrive/...20-Io-Moon.pdf 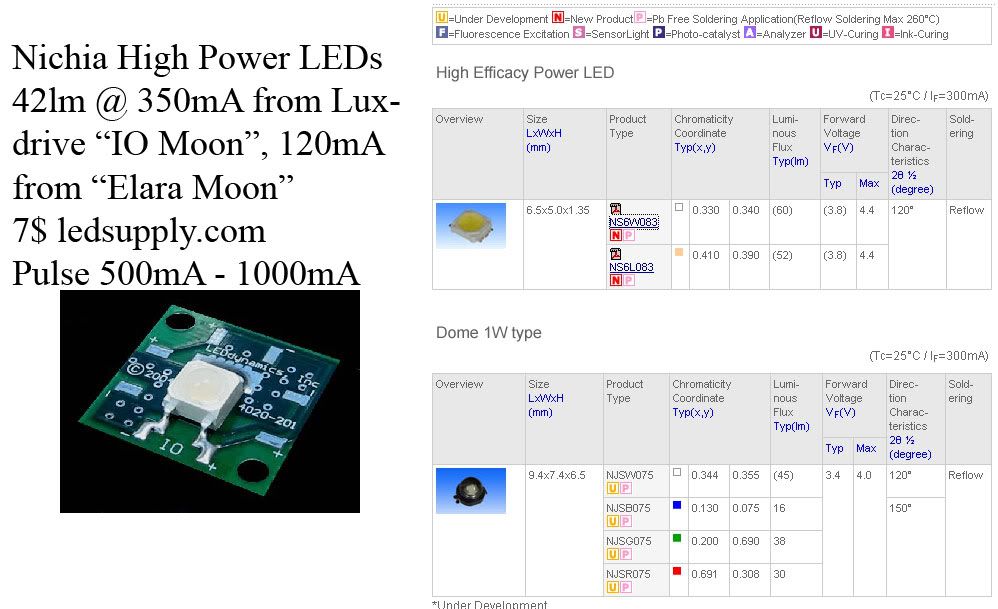 SunLED Apollo, aka UFO etc... a PLCC-4 SMD chip, with dual leads similar to the Superflux series, but looks like well, a PLCC SMD chip on steroids. It is 1cm x 1cm square and do not come with any PCB or methods for mounting. fairly cheap, 3$ a piece, and 40-50 lumens at 350mA peak pulse 500mA. 120* radiation pattern. http://www.us.sunled.com/News/NewPro...?ID=4&Tab=SPEC 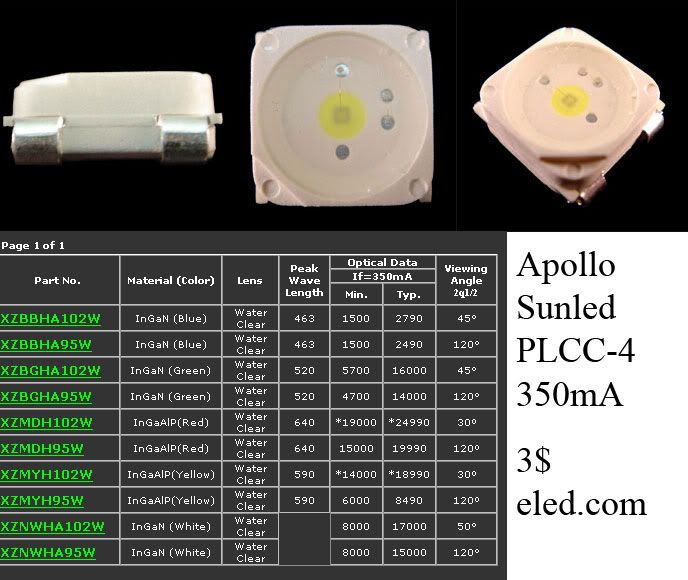 One more addition, not really a producer, but not really level 2 either... Lamina ceramics produces some very tightly integrated chips with 7 LEDs on a 1/2" square ceramic plate... they also have BL-3000 series with 39 LEDs in a die. The BL-2000 series is what is listed below, and is about 20$ a piece. Which for the whites isn't a very good bargain for the amount of light, but for the red and amber, is an incredibly good deal, putting out 270-290 lumens in a 1/2" square area is awesome! 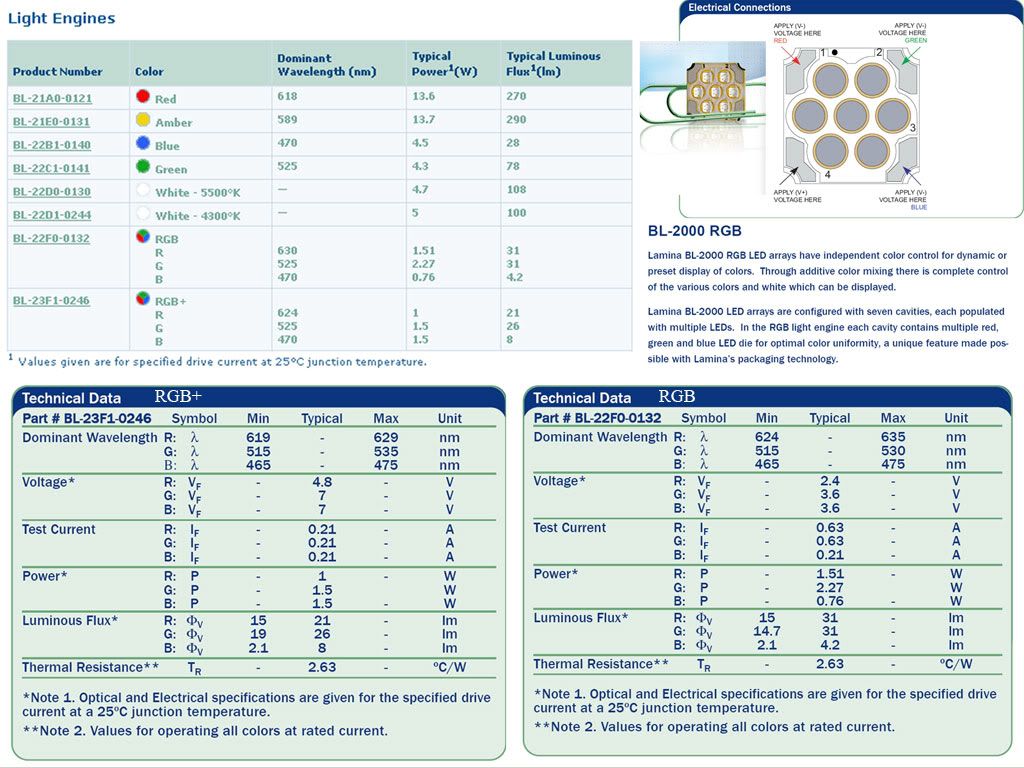 _______________________________________________________ Methods of Driving LEDS Linear, Resistor, Switching, Constant Current First of all, LEDs are like transistors, they are inherently a current device, not a voltage one. Ideally you maintain the current through them at a steady pace, remember current is like volume of water through a tube, volts are like the height that the water drops off a waterfall, Resistance is your little brother getting stuck on the slip and slide at the bottom hogging all the water. We'll go worst to best scenarios. The way we probably all got started is the resistor in series with the LED... this is the most basic of current limiting devices... it's like putting a kink in a hose, it generally lets your little brother suck on the hose without hurting himself... but as the pressure increases your kink doesn't really hold and all of a sudden your brother is chugging water like it's natty light at a super bowl party. Same damage that Natty does will kill your 10$ a pop LEDs. Resistors are not an option. Linear, aka voltage regulator. Probably an ok solution, uses a transistor to measure the volts and basically exhaust them through it's fins of it's tab... this is ok as long as your total forward voltage drop (add up all your LEDs' vF in series) is close to your LED. If you run 350mA and are only running 1 single red LED which has a vF (Forward voltage drop) of 2.5 (typical of 350mA LEDs) you have to then dissipate what is left of the 12volts through that little TO220 chip... that's .350 (Amps) x (12-2.5 = 9.5) = 3.325 watts # 3 watts of heat is a lot... too much for basic heatsinking. # remember Current in Amps times Volts = watts # Constant Current is literally providing 350mA or whatever to the LEDs at all times. This is ideal. We can manipulate a simple LM317 adjustable voltage regulator that we were using for above, to a certain programmed current: http://led.linear1.org/a-cheap-curre...iver-design/1/ Simply pick your Current, and you can make sure your LEDs are getting exactly what they need. If you run out of volts, and the LM317 takes 3 of them, you can do multiple strings in parallel. When you do a parallel string, just multiply your current by the number of parallel strings. For example here in "A" we have 3 strings of 3 in series, so if you wanted 320mA to each LED, you would have 320mA x 3 or 960mA... 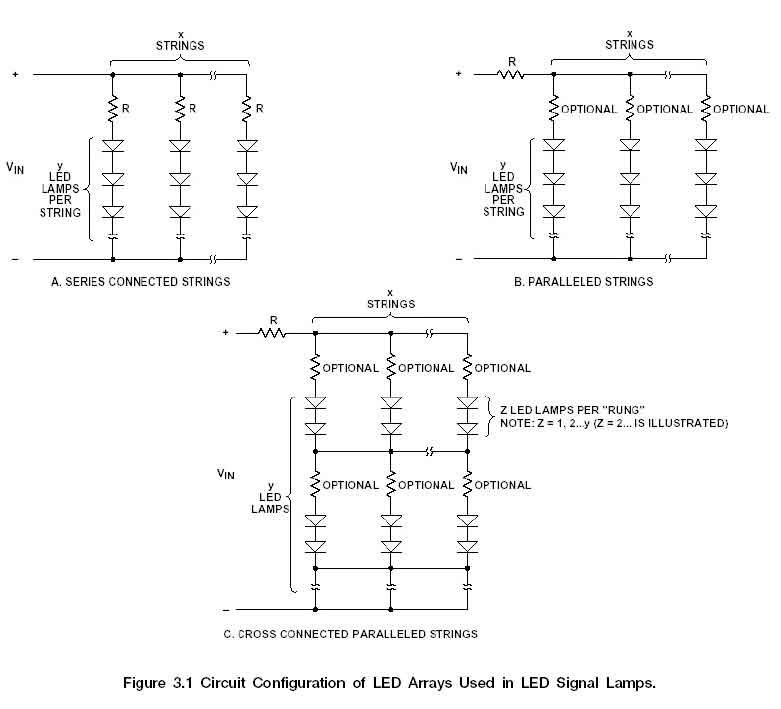 To Calculate the resistance needed, see above link, or see this chart, also helpful numbers for figuring out your actual current with a .2ohm resistor. 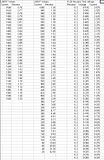 Same problem with Constant Current with a linear voltage regulator applies, you run out of volts, and it's very wasteful and hard to heatsink... All of this is fixed by switching regulators. Switching regulators rely on an inductor and capacitor pair to basically turn on and off rapidly, somewhat similar to pulse width Modulation, in order to raise or lower the voltage, yes, it can raise the voltage! Because a transistor is turning on and off so rapidly, when it's off, it doesn't use any power, so it is extremely efficient, in the 70-90% range... No more Heatsinking! Switch Mode Power Supplies (SMPS) is your computer power supply, and most wall chargers etc... Think of it as keeping a balloon in the air, blowing up to keep it up, but only when needed. You can scratch your *** while it hovers for a while until it starts to fall again, then you blow it again... same principle only with transistors turning on, and the inductor/capacitor pair holding the charge. Switching can either regulate voltage or current, both work basically the same way with a feedback resistor, although most switching components are too small to hand solder, and also the lengths of wire (now traces on a PCB) are important, so usually you can't do this on your own. Fortunately there are relatively inexpensive drivers already made by our friends at Luxdrive. We have basically a couple models, all available from LEDsupply, but also on the luxdrive.com website. The can be divided into two categories, first boost, second buck. Like the name, boost takes a voltage below your total forward voltage drop of your LEDs, and raises it as necessary. Buck on the other hand takes the voltage and drops it appropriately. For Boost, you MUST have 3 volts more LEDs than you do supply volts... Buck you have to have usually 2 volts Less LEDs than supply volts. You can run with some up to 12 LEDs in series, no matter their voltage drop (assuming they're equal) and have as low of a voltage as 5volts (5v is a standard minimum). Bucks are cheaper than boosts because obviously you can run more with a boost than a buck... Bucks are around 10$, Boosts are 15-20$. They come in a variety of currents from 350mA to 1000mA and MOST of the larger ones have a variable output, meaning you can dim them with a simple potentiometer or resistor (great for brake lights!). A note on PWM. PWM is most successful with large groups of LEDs, in the 10+ range. Often with High Brightness LEDs, you can't fit or heatsink that many in one spot. For Superflux, PWM is a must, but for High Brightness LEDs, usually you have tighter standards, and you can run a few in parallel without any trouble. A constant Current regulator is preferred here. If you need multiple brightnesses, simply use two constant current regulators at two different drive levels. See my example, but basically if you wanted a 350mA LED at two brightnesses, use one constant current at 150mA and then another at 200mA... Just diode isolate both constant current sources for good measure, and you're fine. When it comes to low current applications, PWM may be a better solution, but once you get these LEDs pumping, they're fairly consistent with color. So if it's 10+ LEDs or very low current, PWM is the answer. If you just need various drive currents, either multiple LM317s, or most of the boost/buck drivers from Luxdrive have externally adjustable currents. PWM is just another step and box, and you can do it simpler without it, although it does have it's benefits in certain circumstances. _______________________________________________________________________ |
|
|

|
|
|
#7 |
|
Registered Member
Join Date: Aug 2007
Posts: 14
|
Thermal Management and Electrical Isolation
So you have these SUPER LEDs, great... but they aren't very efficient remember, 20-60 lumens per watt, and they rely on heatsinks to dissipate the heat. You can exceed these recommended specifications by a tad, but at the cost of lower life span, which in the 20,000 hours, isn't a huge deal. There are two main ways you get the LEDs, either in Slug form, or on a PCB. The PCBs are a very special kind of PCB which have a large amount of usually aluminum inside them to allow greater dissipation of heat. Some are electrically isolated (more on that in a second) and some are not. The Luxdrive K2s, IO-Moons, and Cree-Xlamp (on the Luxdrive PCB) are all electrically isolated which makes them very tempting. The Luxeon stars are not electrically isolated. This special PCB is called a MCPCB, Metal Core Printed Circuit Board. In the isolating versions, a very thin layer of silicon physically separates the back Aluminum from the slug. On the Luxeon versions, it is directly connected to the slug underneath the LED, and usually is connected to the cathode (negative). However you should never use this back plane as an electrical conductor because Luxeon says so. The Luxeon Emitters, K2 emitters, and SunLED Apollos are all available just by themselves, and usually you have to create a big solder pad under the cathode, anode, and slug (if applicable) and then isolate those electrically, but thermally they need to be heatsinked. Now for an example of how I heatsinked and electrically Isolated 8, Apollo LEDs. First you see the LEDs themselves, the cathode and anode (2 connections per side) are mounted to copper slugs. I made the copper slugs out of copper pipe which I smashed, cut into pieces, and sanded smooth. You can see it's not an exact science, you don't want to get the LEDs too hot otherwise they will burn out before you even get started. ALWAYS tin both mounts BEFORE you start to heat them with a soldering iron. Heat the LED Last, or better yet, never physically heat the LED, just push the pretinned LED leads into the molten Solder on the copper slug. The reason I used copper, is because you can solder copper. A lot of heatsinks are aluminum, and you can not solder to them directly.   Next how to isolate the copper slugs electrically from the aluminum heatsink. We use "Sil-pads" or Silicon Pads, usually pink or grey. IN the old days we would use literally small sheets of mica. Be careful the pink and Grey silpads are convenient, but they are apt to cut through from burrs in the heatsink. So always make sure to sand down your heatsinks carefully to avoid burrs. Also test for continuity from the copper pad to your aluminum heatsink before turning anything on. Here's one heatsink you can find easily which is good for 1-2 watts MAX.  Here are some various sil-pads in the TO220 size:  Here's an old Mica pad for reference (not used)  This little guy is to isolate the screw which attaches the copper pad to the aluminum block. The screw it's self is not isolated, but the lip of the plastic washer extends down into the copper slug so that it does not touch.  Heatsink Grease, this kind I got at radio shack for a few bucks. Silicon grease, carbon grease is the white kind, and electrically non-conductive. You cover all parts which need to conduct heat with this stuff, only a little bit, too much and it acts as an insulator. There are fancy silver versions for "super heat transfer" which is fine and good, but on the grand scheme, won't make much of a difference. Use the cheap stuff, it works fine. Now there are also permanent type adhesive thermal conductors... which you can use if you for some reason wanted to say mount 5 K2 stars (electrically isolated) to a common heatsink.  Here's a bag with a pack of heatsink material, screw, bolt, locking washer, mica pad, and isolating ring/washer. 
|
|
|

|
|
|
#8 |
|
Registered Member
Join Date: Aug 2007
Posts: 14
|
Here's all of my copper slugs soldered together, and isolated and greased ready to go:
 Now if you're astute, you're wondering how I managed to drill the aluminum block, tap it (provide screw hole grabs?), and then solder all of the LEDs in the exact spots... because if you were to try it with the heatsink thermally insulating things in place, there would be NO WAY you could heat up the copper pads. All your heat would instantly dissipate into the heatsink fins. Here's the trick, I drilled and tapped the block, put the copper slugs on, and then screwed them on lightly. Then I used a piece of paper to thermally isolate the copper slugs from the big heatsink. I could then attach the LEDS, one at a time onto the copper slugs. Then solder wires etc... Once all of that was done, I removed it, lubed it, put the sil-pad on, and then reattached it. At this time I had to really make sure I was totally electrically isolated from the LEDs to the heatsink block. It took a couple of tries, but just don't screw the slabs down too tight, and make sure you have no burrs under the sil-pads to cut through.  Here you can see I am now running another LED in parallel, with large copper wire to move the heat to the copper slugs.    This is the final product:  You can see I put the Constant Current LM317 regulator on the block as well, electrically isolated. I ended up needing a fan because they got too how, as I am running them at ~500mA per LED when the brakes turn on, and 250mA when they are just on parking lights.  Here is the schematic for my brake lights:  The final resistors are different, actually using 2, 3.9ohm resistors in series, for a 1.95ohm = 640mA for brake lights, and normally they run at 2.2 ohms, or 560mA, so when they are cranking, usually for just a few seconds at a time, they are at like 600mA per LED... over spec, but they don't get very hot. The key is heat, if they get too hot to touch for more than a few seconds, the LEDs can be damaged... and at 3-10$ a piece, you can't afford to do that too many times. I hope this helps some people get started using some high power LEDs, they're a ton of light in a small package, and lots of fun. The main distributors to check out are basically ledsupply.com and luxdrive.com (don't sell directly), eled.com sells the Apollo SunLEDs for 2.50$ a piece right now promotionally... although you've seen how difficult it is to mount them. Oce Out. |
|
|

|
|
|
#9 |
|
Registered Member
Join Date: Nov 2007
Location: a/s/l
Posts: 230
|
show that thing lit up. these are cool
|
|
|

|
|
|
#10 |
|
Moved On
Join Date: Nov 2007
Posts: 1,749
|
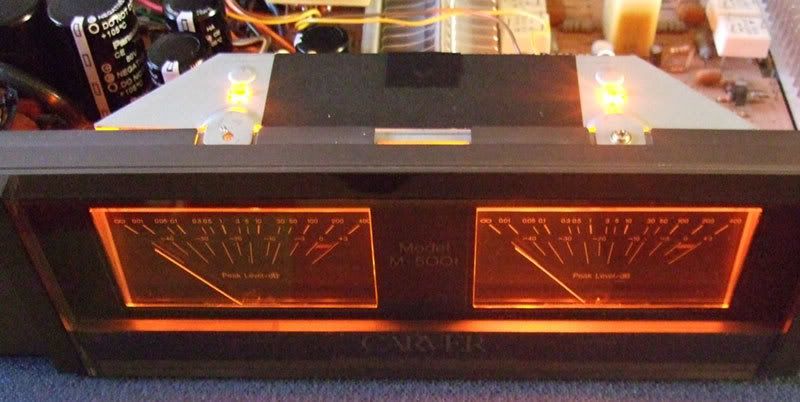
i've used the Lumileds on other (non-fish) projects where I've had to design a PSU from scratch. specifically, i used them to replace the obsolete 1/4 amp, 8 VAC japanese bulbs that were used for meter lights in stereo gear back in the 1980s.
designing a PSU for them is relatively easy. i designed a regulation circuit for the Lumileds using an LM317 voltage regulator that was wired up as a current regulator with an adjustable control. this allowed dimming of the LEDs over their 300-500mA operating range. the entire PSU cost me all of about $12 bucks in parts. |
|
|

|
|
|
#11 |
|
Moved On
Join Date: Nov 2007
Posts: 1,749
|
|
|
|

|
|
|
#12 |
|
Registered Member
Join Date: Aug 2006
Location: Gilbert, AZ
Posts: 325
|
Nice writeup OcelarisO3...
I had read about these a while back and still had a few links to some people that had tried it. hope they help http://reefcentral.com/forums/showth...hreadid=979567 http://www.atlantareefclub.org/forum...read.php?t=897 |
|
|

|
 |
|
|