
|
|
 04/29/2008, 06:34 PM
|
#1 |
|
Registered Member

Join Date: Oct 2007
Location: Calgary, Alberta
Posts: 18
|
Hi
After several years of reading about reef tanks I'm finally in a position to start putting together a system. The only problem is that the plumbing aspect of the hobby is very intimidating for me. I know zip about plumbing and despite all the information I have read I'm still very confused about how to go about setting up an overflow and sump. I know the general concepts but I'm very fuzzy on the details of what goes where and how. I have a local fish store that can custom drill the tank I buy but I'm not sure how to proceed. Can anyone recommend any websites or books about this? Heidi PS I've already read the Reefkeeping articles recommended in this forum 
|

|

|
|
04/29/2008, 06:40 PM
|
#2 |
|
Registered Member
Join Date: Nov 2005
Location: Amishville, USA
Posts: 2,047
|
You can try melevsreef.com,
I don't know of any books that outline it well. Tswifty, a member of RC, has some pretty detailed pictures of his sump. I also know if you ask anyone on RC who has a sump to show you pictures of their sump and expalin how it works they'd probably have no problem with it (I unfortunately don't).
__________________
Nature V.S. Nurture: Nature Always Wins. Current Tank Info: 12 gallon Aquapod reef with LED's, multiple nano's at work. |
|
|
|
|
04/29/2008, 06:44 PM
|
#3 |
|
Registered Member
Join Date: Nov 2007
Location: miami fl
Posts: 2,088
|
 To Reef Central |
|
|
|
|
04/29/2008, 06:52 PM
|
#4 |
|
Premium Member
 Join Date: May 2007
Location: Youngstown, Ohio
Posts: 127
|
WELCOME!
I have only done a couple plumbing projects around the house myself. I was intimidated to untill I thought about the cost of a plumber. It is alot easier than you think. It's all PVC mainly so what I do is take the piece that I have to Home Depot and just ask the guys in the plumbing department what piece or seal or whatever would I need to do so and so. So far they have been spot on most of the time. If you are worried that you are going to use something harmful to the tank just ask here before you use it and see if it is safe to use. If everyone seems to agree that it is safe go for it! If it isn't, no big deal just return it and get what they do recomend.
The only book that I have that I know has any plumbing info in it is the Home Depot 1-2-3 book. I have never even used the book yet! As far as how to actually plumb your system just look at the pics and diagrams here on the RC forums to get some ideas. Thats what I'm doing anyway. Hope that is some what helpful! -neotracer |
|
|
|
|
04/29/2008, 07:27 PM
|
#5 |
|
Registered Member
Join Date: Feb 2008
Location: Iowa
Posts: 102
|
as cheap as PVC is, you could buy some and just practice making things without attaching it to your tank. once you've learned how to work with it, it should be fairly easy to replicate some of the simpler techniques out there. no risks
__________________
"Ignorance, the root and stem of all evil." -Plato Go Hawks! Current Tank Info: 10 gal nano (2 Purple Firefish, Cleaner Shrimp, & Hermits) 7 gal DIY fuge/sump housing a baby reef angler at the moment |
|
|
|
|
04/29/2008, 07:39 PM
|
#6 |
|
Registered Member
Join Date: Oct 2007
Location: Calgary, Alberta
Posts: 18
|
Thanks for the site recommendation It actually helped clear some of the confusion I had.
Its not the actual plumbing that scares me but making sure my plan for my tank is complete and that it works well. I had a couple of questions I want to ask: What exactly is a bulkhead? The tank I would like to get is 72 gallons (48L-18W-20H ) with a 20 gallon sump. Does it matter the size of the holes I have drilled for the overflow and return. 1.5"or 2" is recommended but is their any difference in performance between these two? Thanks for the quick responses |
|
|
|
|
04/29/2008, 07:53 PM
|
#7 |
|
Moved On
Join Date: Jun 2007
Location: Laguna Niguel, CA
Posts: 7,497
|
Check out this old house video will give you basic pvc working info. http://www.thisoldhouse.com/toh/vide...051881,00.html
Then Melevs.com has a great website all about sumps and how to's and things of that nature. |
|
|
|
|
04/29/2008, 07:59 PM
|
#8 |
|
Premium Member
Join Date: Nov 2003
Location: Orlando, FL
Posts: 484
|
PVC is cheap, if your design doesn't work out quite as well as you would have liked just replumb. Nothing lost but a Saturday afternoon and a six pack.
Scott |
|
|
|
|
04/29/2008, 08:00 PM
|
#9 |
|
Moved On
Join Date: Jul 2006
Location: el paso tx
Posts: 7,634
|
Taking on to much can seem overwhelming and can cause un needed complications. You can start a tank without plumbing a fuge or sump.
Just go step by step and get your main tank up and running and readings stable then consider your addon. This may help. http://www.amazon.com/New-Marine-Aqu...5050392&sr=1-1 |
|
|
|
|
04/29/2008, 08:41 PM
|
#10 |
|
Registered Member
Join Date: Nov 2005
Location: Amishville, USA
Posts: 2,047
|
a bulkhead is a piece of hard plastic tubing that goes in the hole of the overflow and is threaded so you can attach pvc parts to it. Otherwise there would be nothing to attach hose to. The size of the hole makes a big difference, even just a half inch can be a difference of a couple hundred gallons per hour of water movement.
__________________
Nature V.S. Nurture: Nature Always Wins. Current Tank Info: 12 gallon Aquapod reef with LED's, multiple nano's at work. |
|
|
|
|
04/29/2008, 08:51 PM
|
#11 |
|
Registered Member
Join Date: Dec 2007
Location: Niantic, CT
Posts: 425
|
Get a HOB fuge. Simple, easy to set up, and works just fine.
__________________
Justin |
|
|
|
|
04/29/2008, 09:34 PM
|
#12 |
|
Registered Member
Join Date: Oct 2007
Location: Calgary, Alberta
Posts: 18
|
Just when I think I'm getting my head wrapped around the idea five new questions pop up in my head.
 Thanks for the answers D to the P. Is their an ideal rate of water flow for a sump or is it personal preference. And how do you figure out the gph in relation to you overflow size? demonsp's idea is a really good one too. Is their a way for me to get my tank drilled and just cap off the overflow in a way that allows me to set up a sump when I ready without tearing my tank apart? Thanks for the book recommendation I actually own that book along with the Conscientious Marine Aquarist. Both excellent reads and worth every penny. 
|
|
|
|
|
04/29/2008, 09:37 PM
|
#13 |
|
Moved On
Join Date: Jul 2006
Location: el paso tx
Posts: 7,634
|
Im sure you can purchase a plug.google that question.
|
|
|
|
|
04/29/2008, 10:36 PM
|
#14 |
|
CORA
Join Date: Mar 2008
Location: North of Columbus
Posts: 514
|
there are pvc caps. I am setting up my first tank and plan to drill now and add sump later.
|
|
|
|
|
04/29/2008, 10:49 PM
|
#15 |
|
Registered Member
Join Date: Feb 2008
Location: Sacramento CA
Posts: 510
|
If you are still shopping tanks, I would recommend an AGA with overflows built in. The overflow kits work pretty well and are easy to put together.
Do you know what kind of sump you want? What about filtration? This is gonna affect how you plumb the system. Also keep in mind that with PVC, you won't be able to shift anything around once you have it setup. I wanted to do mine with PVC and decided just to use flex tubing. It may not look as nice but it gets the job done.
__________________
Pour me something tall and strong, make it a hurricane before I go insane. It's only half past twelve but I don't care. It's 5 O'Clock Somewhere Current Tank Info: 120 Gallon Tank soon to be reef tank & 34 Gallon Reef Tank |
|
|
|
|
04/29/2008, 11:32 PM
|
#16 |
|
Moved On
Join Date: Jun 2007
Location: Laguna Niguel, CA
Posts: 7,497
|
I agree with JBuffet. I made a manifold out of PVC for the pump and the back of my tank and then I connected the pump and drain lines with double braided PVC tubing. It provides more flexibility and also allows you to see inside of the tubing so you can tell what's going on in there. It works like a champ. I also would be trying to connect with a local club, local hobbyist, or a local fish store that might be able to help you get the thing plumbed properly. There should be plenty of people around that would be willing to give you a hand. It's really a piece of cake. That way you don't have to cut corners because your scared of flooding your house.
Maybe you could trade some of your Bakerywench services for some HandyPlumber service. 
|
|
|
|
|
04/30/2008, 12:32 AM
|
#17 |
|
Registered Member
Join Date: Apr 2008
Location: Middletown, Ohio
Posts: 44
|
Bakerywench,
I just finished the plumbing for my 135 gal tank, so maybe I can share a few thoughts, pitfalls etc. First, do the math backwards, that is calculate your flow rate based on your tank size, not the sump size. Figure turning over the volume of the tank about 8-10 times/hr through the sump/filter. You can add powerheads later to increase your total turnover another 5-10 times/hr. For your 72 gal tank this would be around 600-700 gal/hr. Now go get the pump of your choice that will put out this volume. Remember to figure in the rise (height that the pump will have to lift the water to get it in your tank - most pumps will come with a chart that shows the gph for various heights. The number advertised on the outside of the box usually assumes no rise.) Now take a look at the size of the fittings on the pump. If the manufactuer has put 3/4" fittings on his pump, use this size for all your return lines. My LFS tried to sell me on the idea of flex tubing but my obsession for neatness just wouldn't allow it! PVC is really easy to work with and much neater. Get the white kind, you don't need the temp./pressure specs. of the more expensive beige tubing. Take some rough measurements and buy extra lengths. Again, it really is inexpensive. Get a bag of 90 elbows and 45 elbows. Get a can of cleaner (purple) and cement (clear). You will actually "solvent weld" your fittings together. More on that later. ANYTIME you are going to run a pipe to a piece of equipment that you may need to remove for service (ie pump, top of your sump) put in a "union". This will allow you to simply unscrew the union, remove the item for cleaning etc., and replace it in a matter of a few minutes. It helps to draw a schematic on paper first to calculate which fittings you wil need. PUT A CHECK VALVE IN YOUR OUTPUT LINE FROM THE PUMP TO THE TANK! This will prevent backflow from the tank to the sump through the pump in the event of a power failure. If you don't do this, water will siphon out of the tank to the sump until the level reaches your discharge outlets in the tank and your sump may not be able to hold it all! It's not a bad idea to split the output from the pump to 2 discharges, one on each side of the tank. BTW, if you are using an acrylic tank, you really don't need the LFS to drill it. They are very easy to drill with typical woodworking tools. If it is a glass tank, don't even THINK about trying to drill it yourself. Put a shutoff valve on both the inlet and outlet of the pump so you can remove it without having to drain water out of your tank or sump. Obviously if you are going to submerge the pump in the sump, this will not be necessary. You will install a bulkhead anywhere you need to pass your plumbing through the wall of your tank or sump. The bulkhead comes with a rubber gasket. I've heard people advise always putting the gasket on the water side of the tank wall. THIS IS INCORRECT! The gasket MUST be placed on the side of the wall OPPOSITE the threads on the bulkhead, regardless of whether it is the water side or the dry side. There may be times when you are going to have the threads on the wet side depending on what you are installing. If you don't do this, you WILL get a leak! If you are going to put a bulkhead on anything but a flat surface (For example on a trash can for storing water) put a generous layer of silicone cement between the flat surface of the bulkhead and the curved surface of the trash can, even with the gasket. (continued on next post) |
|
|
|
|
04/30/2008, 12:58 AM
|
#18 |
|
Registered Member
Join Date: Apr 2008
Location: Middletown, Ohio
Posts: 44
|
Now for the return to the sump. Since this will be gravity feed, with no pump, a larger diameter will be required to handle the output of the pump. Remember, your return lines MUST be able to handle the full output of your pump. If they don't, the water level in your tank will just continue to rise until you either pump the sump dry or your tank overflows onto the floor! A good rule of thumb is to go up one size from your discharge line and then double it. That is, if you are using 3/4" pipe from the pump to the tank, use a pair of 1" return lines. This may be a bit of overkill, but trust me, it is better to oversize than undersize in this line. Position the overflow in the tank a bit below where you want your water level to fall, and run the return lines to the sump. Put a shutoff valve on each of the return lines as close to the sump as possible, and install a union on the bulkhead to the sump if you are using one. If you run your return line to the top of the sump, you will want to be able to remove the top easily to get at your filter. If you are using a bulkhead on the overflow from the tank (as opposed to an overflow box which can be lifted off the tank) put a union on this bulkhead also. This way, if you ever have to remove the plumbing for any reason you just unscrew the union, no cutting.
|
|
|
|
|
04/30/2008, 01:30 AM
|
#19 |
|
Registered Member
Join Date: Apr 2008
Location: Middletown, Ohio
Posts: 44
|
Now let's talk about connecting all this stuff together. Most of your connections will be made with what is called a "solvent weld". Technically this is really not "gluing", since the cement you are using will actually dissolve the the two surfaces you are joining, welding them together. There are two steps to this process. Cleaning and welding. The purple "cleaner" will clean the surface dirt away and start to soften the pipe. The cement will finish softening the surfaces and provide the weld. If you read any DIY books on plumbing, they will tell you to apply the cleaner to both surfaces. I would suggest you don't do this. Most fittings (ie elbows, valves etc.) are plenty clean already. The lengths of pipe however for some reason are always filthy. If you apply cleaner to both surfaces, as you slip the pipe into the fitting it will shear off a thin layer of plastic from the inside of the fitting. When the joint dries, this will appear as a thin web inside the fitting, decreasing the interior diameter slightly and may break off later throwing small slivers of pvc into your tank or sump. If you apply the cleaner to the PIPE ONLY, you will still get a perfectly fine joint at the pressures we are using, and eliminate this problem entirely. Do only one joint at a time, as this stuff hardens very quickly. It is a good idea to assemble the joint dry first to make sure your measurements are correct, and to get everything aligned. Take a dry erase marker and make a small line from the fitting to the pipe. This will make it super easy to get your final joint aligned quickly, as you only have a few seconds to get it right. Once you have your mark, take the pieces apart, apply cleaner to the surface of the pipe which wil go into the fitting and then quickly apply a thin layer of cement to BOTH surfaces. Now, again, quickly slide the pipe into the fitting, giving it 1/4 turn and match up your two lines. Remember to push it ALL the way in until it seats in the fitting (usually 3/4 " for small fittings like elbows, 1" for large ones like valves). If you don't get it all the way in, your measurements wil be off. Hold the joint for about 15-20 seconds and you're done. If you don't get the alignment right, just do it over, don't try to force it. The joint sets very quickly, which is why whenever it is important to get it just right, I always use the alignment mark trick.
(Continued on next post) |
|
|
|
|
04/30/2008, 02:04 AM
|
#20 |
|
Registered Member
Join Date: Apr 2008
Location: Middletown, Ohio
Posts: 44
|
If you ever need to connect a piece of tubing to your pvc, just get a hose barb, which is a fitting with a pvc connection on one side and a hose connection on the other. If you need to attach your pvc to a screw type connector, you will use an adaptor that has a solvent weld connection on one side and threads on the other. Just rember that anytime you are going to make a screw connection with pvc, unless there is a gasket in the joint like with a union, you will need to wrap the threads with teflon tape. (all this stuff is available at your local hardware store) Use two layers of teflon tape, in the direction of the thread, for smale diameter (say 1/2" or less) joints and 3 layers for larger diameter and tighten firmly with a wrench.
Once you have all your plumbing in, fill the system with fresh water to test for leaks and establish water levels. I would advise waiting at least a day before doing this however. The fumes from the solvent are quite strong and it would be best to allow them to dissipate before running water through the system and running the risk of contaminating water that may end up in contact with your reef. Fill the tank directly. When the water gets to the levelof the overflow continue filling until it flows into the sump. If you are using an overflow box, put a piece of air tubing in the siphon from the inside box to the outside box to suck out the air and start the siphon. Continue filling until the water level in the sump is where you want it. Mark the outside of the sump at this level with a sharpie type marker. This will be your reference level for evaporation. Now start your pump. The water level in the sump will drop as the pipes are filled and the water level in the tank rises into the overflow. Add water to the sump as needed to keep the level at your mark. You will reach a point where the water will flow back to the sump as fast as the pump pulls it out. When you check your tank each day for evaporation, simply confirm that the water level is at this mark, and add water to the sump if necessary. Now, and this is important. Turn your pump off. Water will siphon out of the tank until the level goes below the overflow. You want to confirm that your sump will be able to hold this volume in the event of a power failure. If it looks like it is going to overflow (it shouldn't, but in case it does) turn the pump back on immediately. This will lower the water level in the sump and allow you to drain some out without a flood. When your tank stops draining into the sump, make another mark on the sump. This is the level you will fill to if you are adding water to your tank without the pump running. I hope you find this helpful, and not insulting because some of the stuff is pretty basic, but they are all issues I came up against when planning my plumbing. It really can be kind of fun if you take your time and just enjoy the experience. Joe |
|
|
|
|
04/30/2008, 04:25 AM
|
#21 |
|
Registered Member
Join Date: Dec 2007
Location: Milwaukee, WI
Posts: 894
|
Heidi,
Everyone has great suggestions, but I don't know if anyone has really answered your question yet. It's not really the actual plumbing that's intimidating, it's the stupid questions, even after reading all the books, like, "how the heck do i put all this together?????" I know what you are going, as I struggled through the same thing myself. I think the only way you will figure it out is to get your feet wet (yes, at times, you get a flood and your feet do actually get wet). Just start putting parts together. when you get stuck, go ask your LFS (local fish store) guy, or home depot (although I prefer menards... they have better plumbing parts like bulkheads and stuff). better yet, find a local reefer in your area and just go stick your head under his/her tank. then it will all start to make sense. soon enough the setting up will be complete and you will be enjoying your reef. |
|
|
|
|
04/30/2008, 05:48 PM
|
#22 |
|
Registered Member
Join Date: Oct 2007
Location: Calgary, Alberta
Posts: 18
|
Thanks for all the great responses
jsolomito thanks for the extremely helpful posts you answered many of the questions I hadn't asked yet and some great tips. nmbeg thanks for the post its nice to see that someone gets where your coming from. The LFS I found has a Hi-Tech section for aquarium plumbing and filters I'll take the time next visit to talk to the employees and see if there's a reef club in the Calgary area and ask them stupid questions. I want a sump just to keep equipment in and to make tank maintenance easier. I plan on having a in sump skimmer. I'm trying to keep everything as simple as possible. Can anyone suggest a nice simple sump plan? Thank again for all the help Heidi |
|
|
|
|
04/30/2008, 06:15 PM
|
#23 |
|
Registered Member
Join Date: Sep 2007
Location: PA
Posts: 14,022
|
I didn't read all the long responses, but will read back through it when I get a minute.
Here is a sump in it's simplest form... Water in/skim/water out: 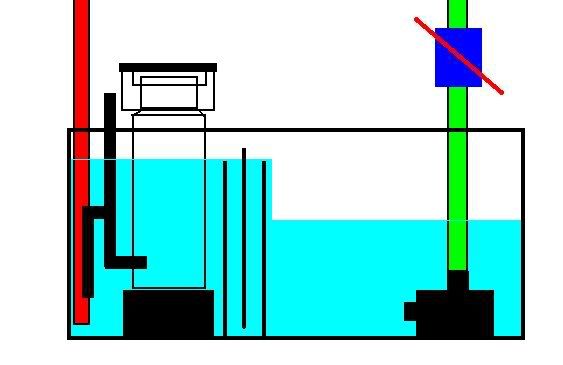 Here is a sump/fuge you can make out of a 20g long tank, I ran it under my 55g tank for a while:   Here's my thread also... I did a TON of plumbing with little to no knowledge before starting. There are also alot of sump/fuge ideas on it. http://www.reefcentral.com/forums/sh...readid=1310919 Here is the plumbing design I used. BeanAnimal has alot of pics, parts lists, and explanations on it. http://www.reefcentral.com/forums/sh...readid=1310585 Like I said, I will be able to post some better responses once I have time to sit down and read everyone's comments up to this point.
__________________
"Enough light? Heck I could go barebottom and grow SPS in the stand!" - DiscoReefRover |
|
|
|
|
04/30/2008, 06:18 PM
|
#24 |
|
Registered Member
Join Date: Nov 2005
Location: Amishville, USA
Posts: 2,047
|
There you are Tswifty. I mentioned your build earlier in this thread because it was so picture intensive.
__________________
Nature V.S. Nurture: Nature Always Wins. Current Tank Info: 12 gallon Aquapod reef with LED's, multiple nano's at work. |
|
|
|
|
04/30/2008, 06:26 PM
|
#25 | |
|
Registered Member
Join Date: Sep 2007
Location: PA
Posts: 14,022
|
Quote:
 sometimes I miss these threads when I see they already have alot of responses. everyone is always so eager to help out (which is great), sometimes it can be an overwhelming amount of info thrown at a person at once.
__________________
"Enough light? Heck I could go barebottom and grow SPS in the stand!" - DiscoReefRover |
|
|
|
|
 |
|
|


