
|
|
 07/01/2008, 07:56 PM
|
#1 |
|
Registered Member
Join Date: Jan 2004
Location: Indianapolis
Posts: 349
|
The (relatively) low cost reef project - build thread
I've had my 12g nano for about 18 months now, and it's gotten to the point that the upgrade bug has bitten me pretty hard. The hinges on the aquapod broke, and that gave me the excuse to go through with it. One small problem exists, however: we're about to have another baby, my wife's stepping down from her job to be a stay at home mom for a couple years, and we're on a pretty tight budget. After tearing down my 75 gallon a few years back, I knew I could do things differently than last time. Needless to say, she's not thrilled.
The challenge: prove to her that a reef tank could be put together and maintained without being a money pit. It may not have the best equipment, but I'm ok with that. My plan so far: return the skimmer from my nano (wasn't pulling anything out) that I got for my birthday and get a 55 gallon tank with the UB dollar a gallon sale for a mere $7 extra. Use the plywood in my garage, including an old bathroom vanity that was just torn out, as most of the wood for the stand that I'm building. Use the play sand that is compatible with a tank (is it still called old castle?) Go sumpless, I know I'd rather have one but she doesn't want to worry about plumbing. Everything in/on there will be either built, traded for, or bought at a great deal with the exception of the occasional fish. I hope to fix the hinge problem on the aquapod and trade it for a used light setup (T5 or MH with supplements), I also have a 3/4" scwd and pinpoint PH monitor (no probe) that are sitting around that I may be able to trade. Sell a couple things on craigslist to get an octopus HOB skimmer. I really want to see if it can be done, and I think it will be fun to keep a record of it. So far I have the tank and stand frame sitting in the garage, with the rest of the wood sitting there to be finished. I'll take pics tomorrow and put them up. Anyone think I'm crazy?
__________________
Insert witty or inspirational comment HERE. Current Tank Info: JBJ 30 gallon rimless |

|

|
|
07/01/2008, 09:29 PM
|
#2 |
|
Zoa Trainer
Join Date: Mar 2005
Location: U.S.A.
Posts: 585
|
No crazyness there at all. I know you can build it and maintain it. Pick up any freebies you can and pick up all the cheapy frags at any swaps you can get to. Dont go chemical crazy and keep everything as natural as possible. You'll find you may enjoy it!! Good Luck and keep us posted.
|
|
|
|
|
07/02/2008, 11:49 AM
|
#3 | |
|
Registered Member
Join Date: May 2006
Location: Indianapolis, IN
Posts: 285
|
Quote:
is this a new 55 or one of the used acrylic ones they are selling off... only reason i ask is because the used acrylic ones have build in overflow already... |
|
|
|
|
|
07/02/2008, 03:25 PM
|
#4 |
|
Registered Member
Join Date: Jan 2004
Location: Indianapolis
Posts: 349
|
New glass 55.
__________________
Insert witty or inspirational comment HERE. Current Tank Info: JBJ 30 gallon rimless |
|
|
|
|
07/02/2008, 05:18 PM
|
#5 |
|
Registered Member
Join Date: Apr 2008
Location: Columbus, IN
Posts: 1
|
This is kind of the opposite of my approach. I proved that I could spend a ton more money than I told my wife that I would in the beginning.
|
|
|
|
|
07/02/2008, 09:05 PM
|
#6 |
|
Registered Member
Join Date: Jan 2004
Location: Indianapolis
Posts: 349
|
First steps
Here's the progress so far:
I built the frame out of 2x4's that I got from local home stores, including a complete redo of the first part since I made the mistake of shopping for lumber with my 3 year old in tow. Needless to say, I didn't have time to pick out the straightest pieces. As of yesterday, I had the frame built and the tank purchased: 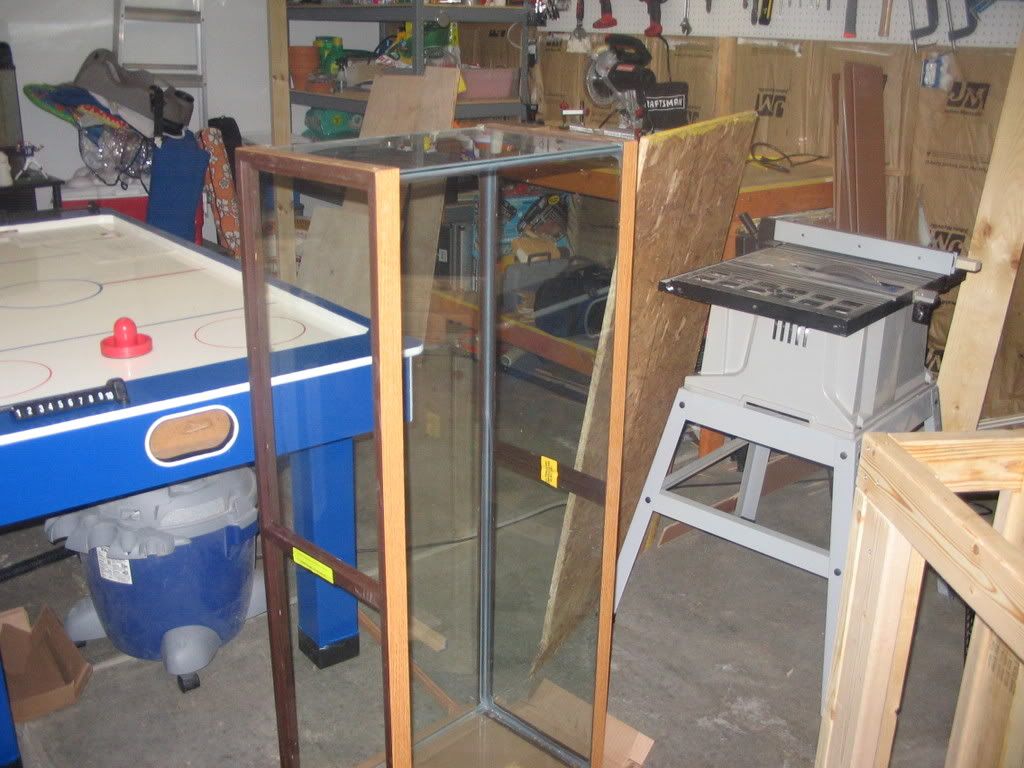 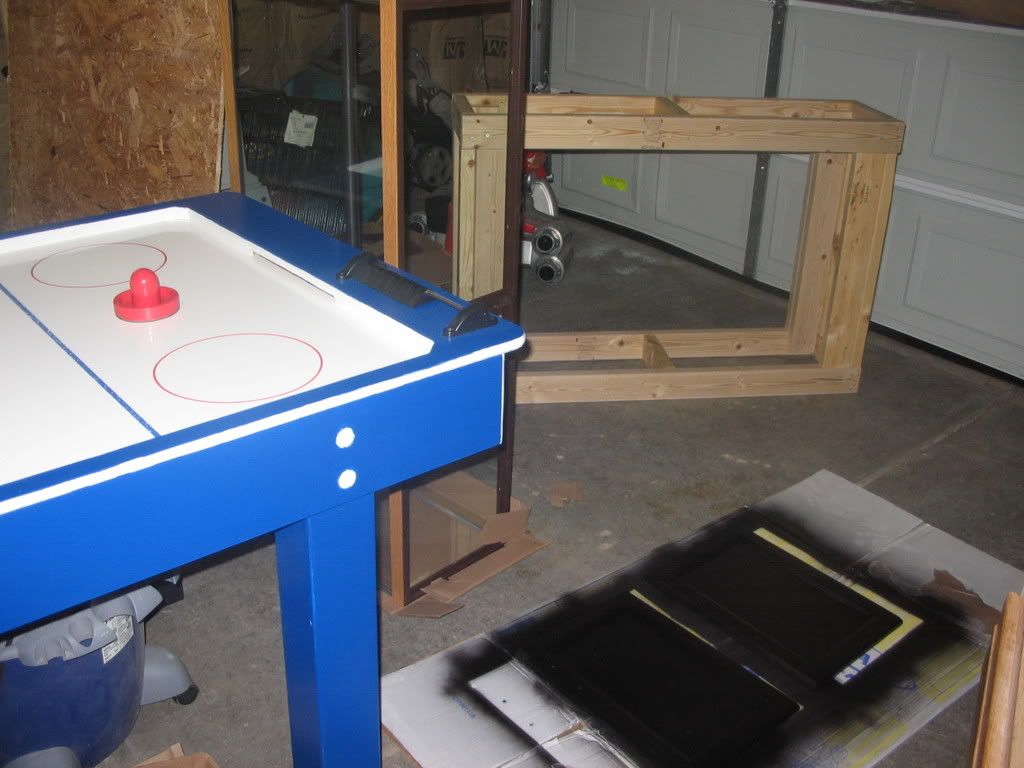 The old doors from the bathroom vanity are now painted semi-gloss black. I have the hardware for them (polished nickel finish) waiting as well. 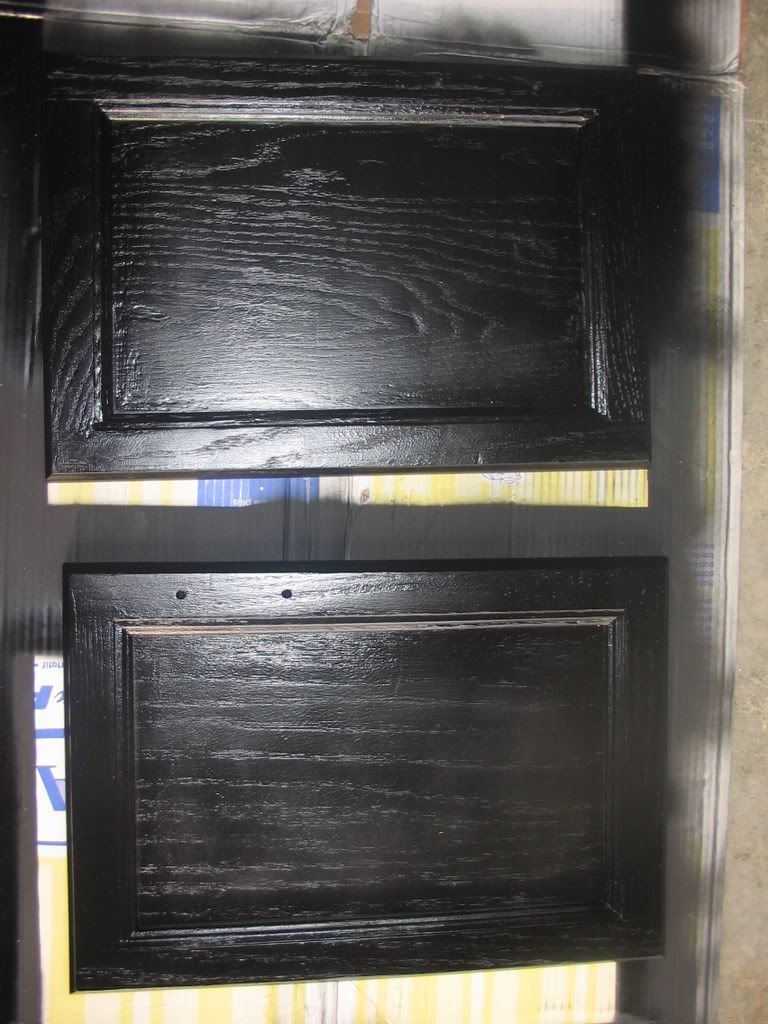 Today I had limited time to do anything, since my wife is close to giving birth and I needed to help with the 1 and 3 year olds a lot more than usual. I got the bottom board cut and glued down, but I cut it a bit too liberally so I had to use some old perimeter sealant from when I put down laminate floors to make up for it. I also glued small strips to the bottom of the frame, so the 1x6 I will run along the bottom of the stand will stick out just enough from the 3/4 plywood to match up with the outside corner molding that I will put on later as well as look like a bit of a foot. 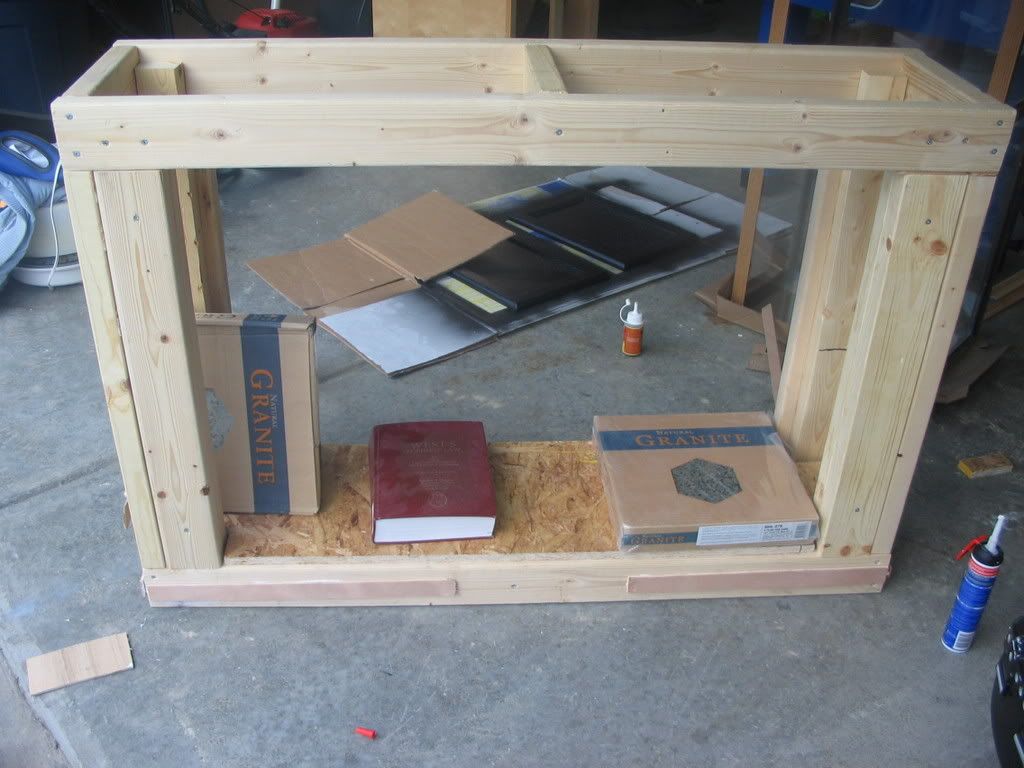 More as it comes. BTW, I really need to find a way to turn my aquapod into some lights. Anyone have ideas of the best way to go about this?
__________________
Insert witty or inspirational comment HERE. Current Tank Info: JBJ 30 gallon rimless |
|
|
|
|
07/02/2008, 10:26 PM
|
#7 |
|
Premium Member
 Join Date: Jan 2006
Location: Greenwood, IN
Posts: 662
|
didnt take you long to get started did it
what else do you still need i say we make a skimmer it would be fun |
|
|
|
|
07/03/2008, 12:22 PM
|
#8 |
|
Registered Member
Join Date: Jan 2004
Location: Indianapolis
Posts: 349
|
From talking to another guy on here who's really good with skimmers, I hear that DIY hang on skimmers are really awful. I don't know if we could make a good one. Worth a shot though. Funny enough, I made all that rock in the past and now I need some. I also would like to make a hang on refugium, probably that sits in the tank. I'll make the canopy after I figure out what kind of lights I can trade for.
__________________
Insert witty or inspirational comment HERE. Current Tank Info: JBJ 30 gallon rimless |
|
|
|
|
07/03/2008, 12:31 PM
|
#9 |
|
Premium Member
Join Date: Jan 2006
Location: Greenwood, IN
Posts: 662
|
my ecalibar hang on skimmer works great
i think we could make one that would work |
|
|
|
|
07/03/2008, 10:23 PM
|
#10 |
|
Registered Member
Join Date: Jan 2004
Location: Indianapolis
Posts: 349
|
Another update
Here's today's progress, I put the plywood skin on the front of the stand. It went surprisingly smooth. Maybe I'm getting better at woodworking.
Here it is with the first couple boards glued in place. 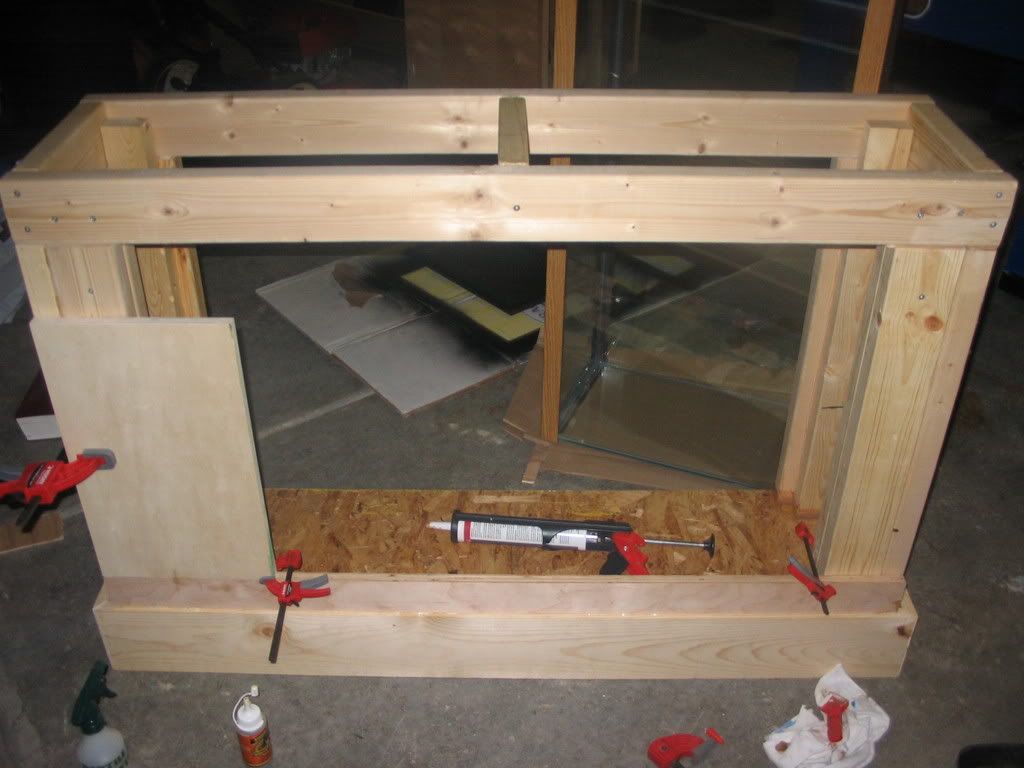 Here it is after the front is done, except for the trim and doors. The center brace is not glued in either, I'd like to find a way to keep it in tightly but be able to remove it in case I ever do add a sump in the future. 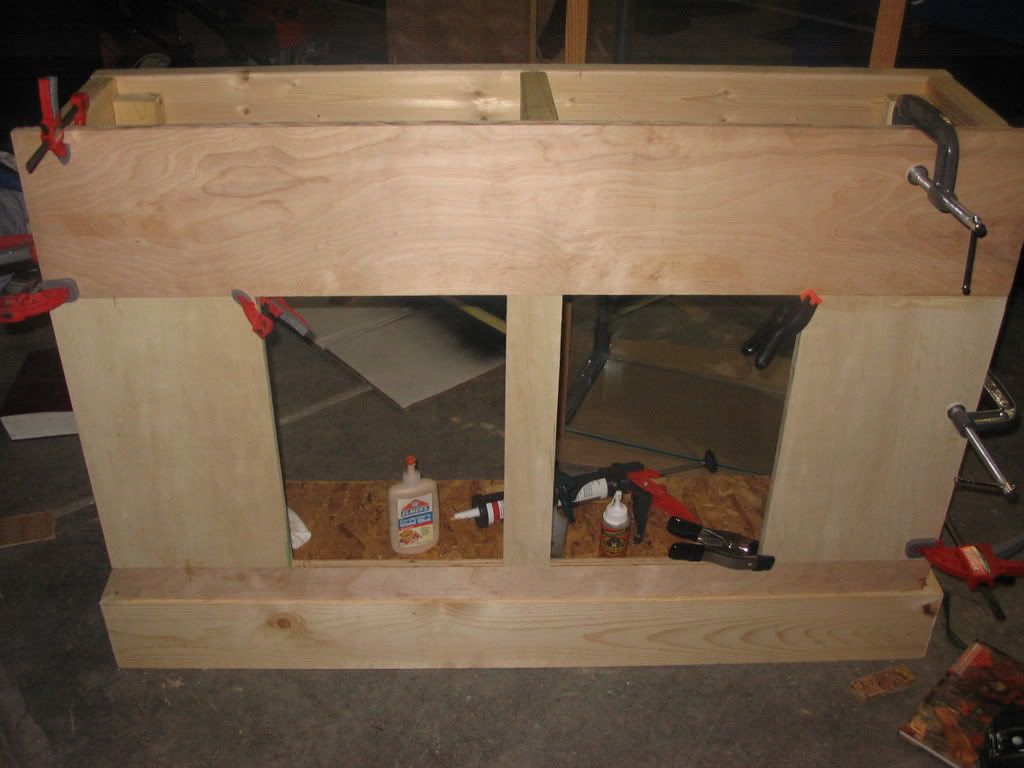 Hopefully tomorrow I can get the trim in place and start working on the sides.
__________________
Insert witty or inspirational comment HERE. Current Tank Info: JBJ 30 gallon rimless |
|
|
|
|
07/04/2008, 01:39 PM
|
#11 |
|
Zoa Trainer
Join Date: Mar 2005
Location: U.S.A.
Posts: 585
|
PANEL POP ON AND OFF
I've seen people that make there center brace, doors all one piece and it snaps on and off with like cabinet locks (inside) dont know how to describe it but it works out great. Something I will definately do on my next tank. There side panels even come off. Makes accessing everything really easy. Might be an option. Thank for the pics., its coming along nicely.
|
|
|
|
|
07/07/2008, 06:45 PM
|
#12 |
|
Registered Member
Join Date: Jan 2004
Location: Indianapolis
Posts: 349
|
more progress
Last night I got it ready to paint and sanded it down.
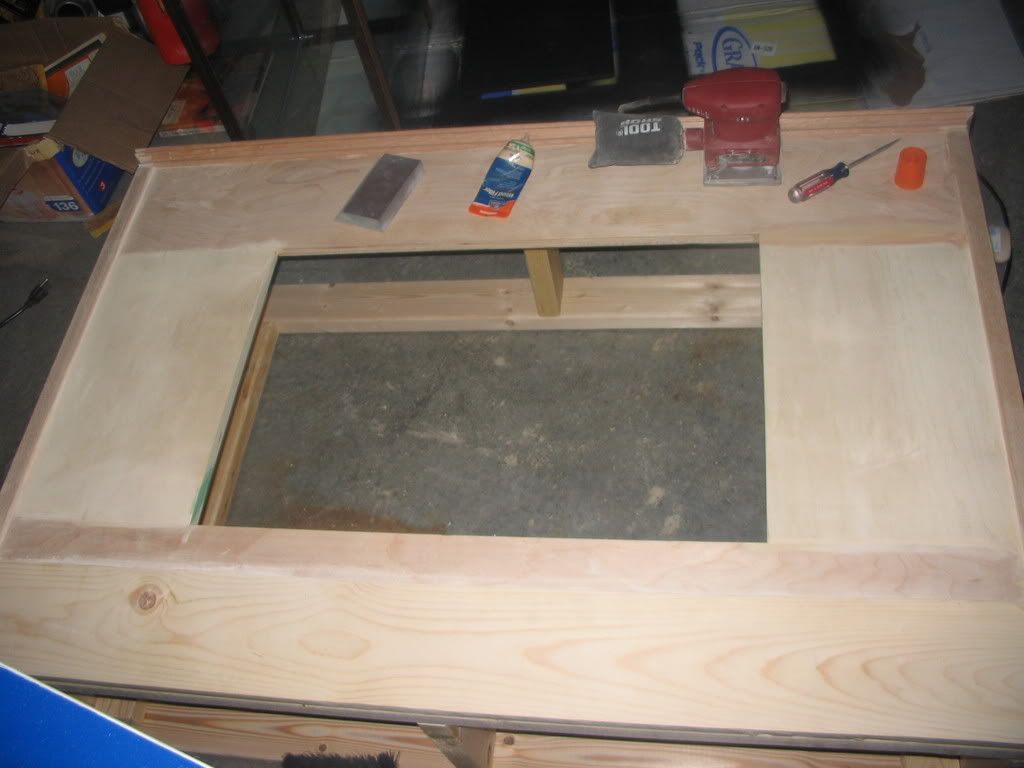  Here is how it will look when the tank is in it, but before painting. 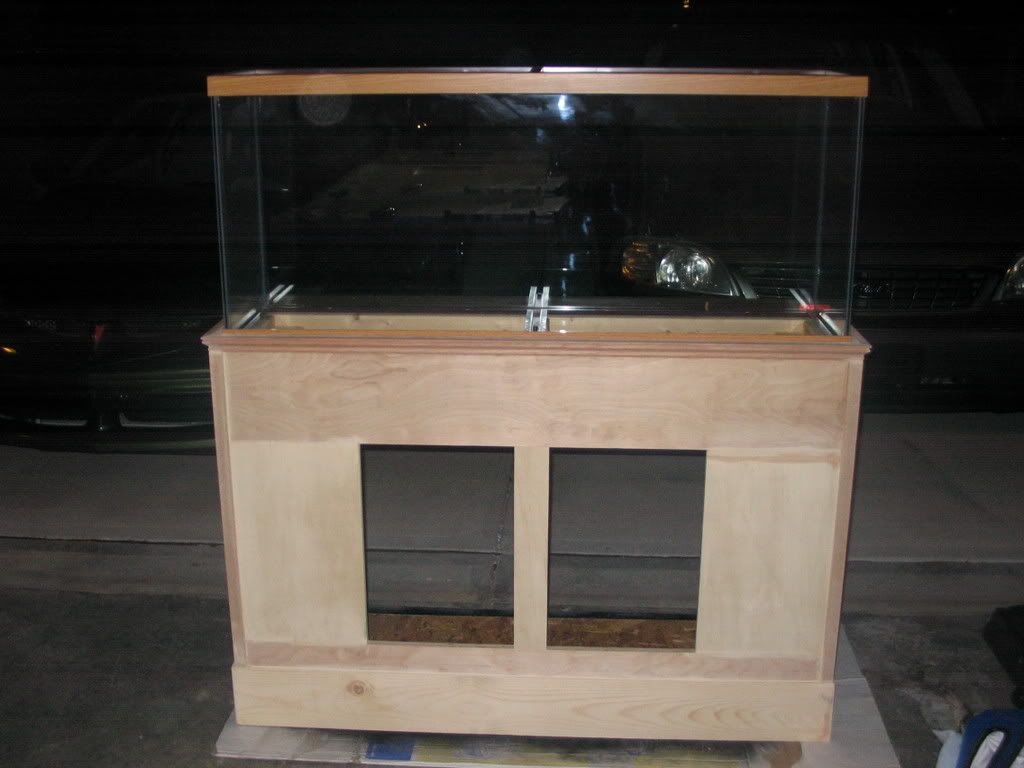 Added newspaper on 3 sides, as I'm painting the back black and the trim needs to be black too. I would've gotten a black tank if they had one, in case you're wondering, but the sale would've been over by the time they got any more in. 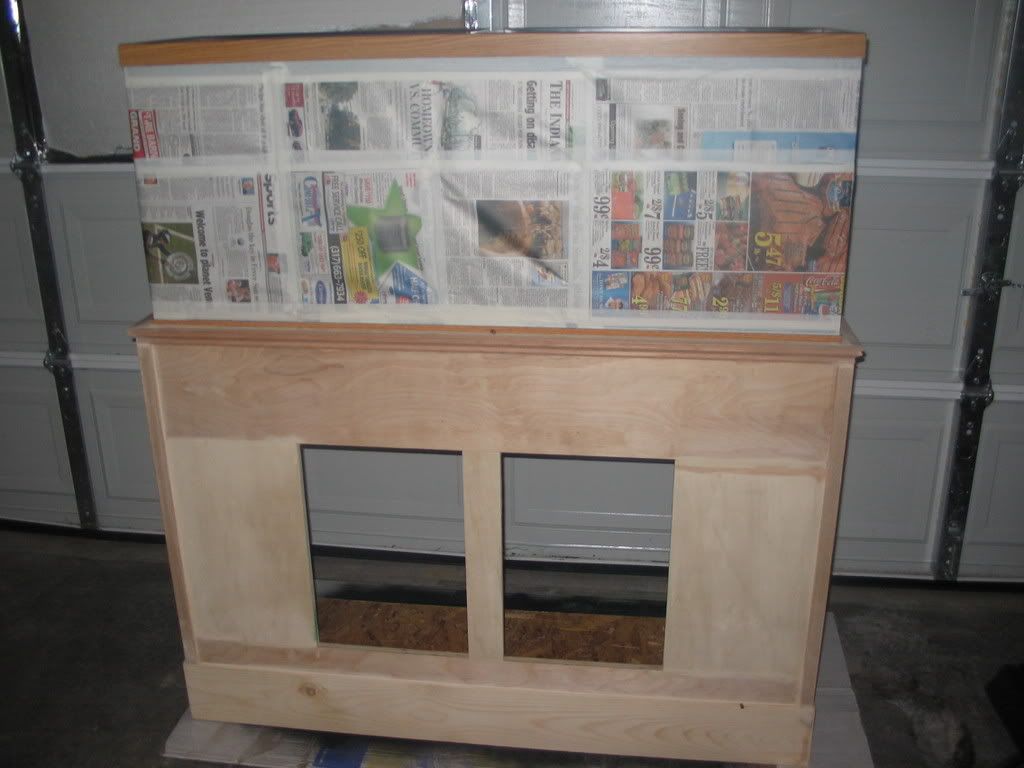 It's painted now but I haven't taken any pictures yet. I'm pretty happy with how it turned out except for where I used some caulk to fill a gap on the front. No matter how much I smoothed it and sanded it the line shows up more than I like with the semi-gloss black paint. I may end up hitting that spot with flat black primer to keep it from standing out too much.
__________________
Insert witty or inspirational comment HERE. Current Tank Info: JBJ 30 gallon rimless |
|
|
|
|
07/08/2008, 08:56 PM
|
#13 |
|
Registered Member
Join Date: Jan 2004
Location: Indianapolis
Posts: 349
|
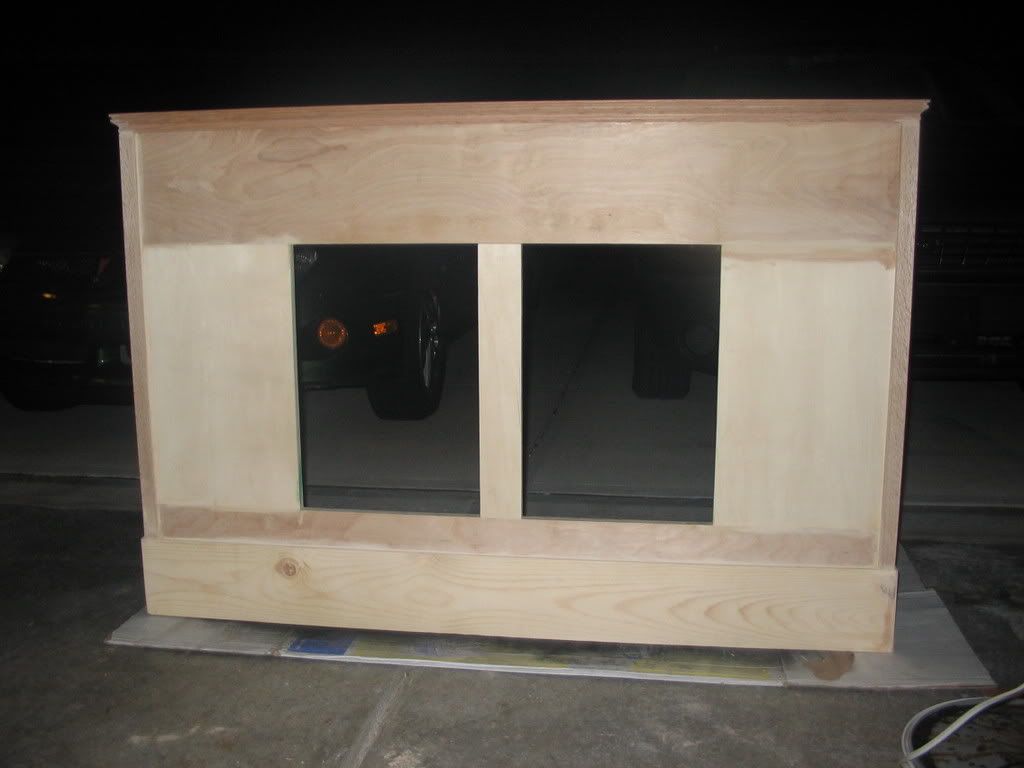
Painted and ready to go (almost)
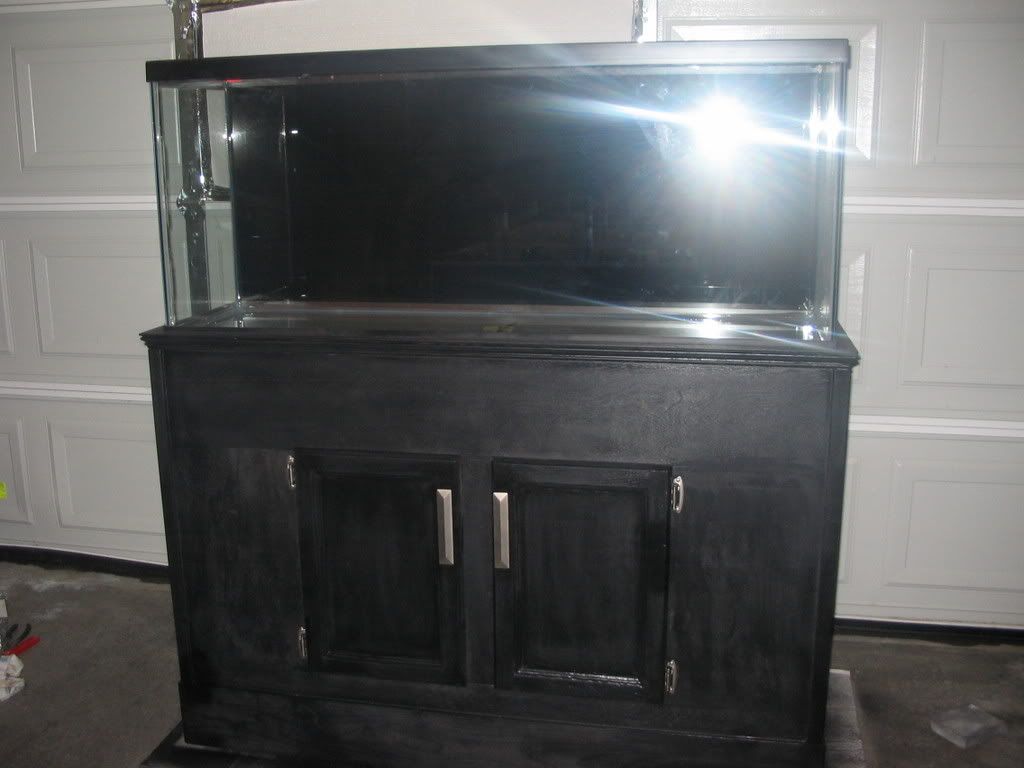
It's all painted and the doors are on there now too. I noticed that the whole front felt like sandpaper, so I used a sanding sponge to smooth it out and I actually like the resulting look a lot better. It's still rubbing black off onto my hands, but that may be because I painted it (3rd coat) 8 hours ago. I ran the vacuum over it and rubbed it down with tack cloth, and if it doesn't stop rubbing paint off I'll put on some urethane (let me know if I'm doing something wrong here...I'm not exactly a woodworking expert.) The back is painted black so that the corals will pop a bit more. When I used a paper taped onto the back of my last non-nano tank there was a lot of salt creep that got between the glass and background.
 I tried some without the flash but I couldn't make anything out of them. The black on the glass is doing it's job! I've gotten great feedback on sand and rock, I should have it up and cycling pretty soon! I'll wait until the cycle is done and I've sold enough stuff to buy the lights I want to transfer anything from the nano.
__________________
Insert witty or inspirational comment HERE. Current Tank Info: JBJ 30 gallon rimless |
|
|
|
|
07/11/2008, 08:42 PM
|
#14 |
|
Registered Member
Join Date: Jan 2004
Location: Indianapolis
Posts: 349
|
It's in the living room, ready for me to get some water in there! I will hopefully have my sand and some rock shortly, then I just have to continue to find rock and it will be able to get a cycle going. I have a few powerheads ready to go, but I'm aware I'll need more flow in a short time. The big sticking point is the lights. I found a decent priced T5 setup, but I have to sell the nano to afford it! Once I get some light it's on!

__________________
Insert witty or inspirational comment HERE. Current Tank Info: JBJ 30 gallon rimless |
|
|
|
|
07/11/2008, 08:59 PM
|
#15 |
|
Premium Member
Join Date: Jan 2006
Location: Greenwood, IN
Posts: 662
|
looks good dan
sorry about the water i checked my storage container about 5 min ago and there is ten gallons after running for about 30 hours i think its time for a new membrane |
|
|
|
|
07/12/2008, 03:44 AM
|
#16 |
|
.Registered Member

Join Date: Sep 2006
Location: Cincinnati, Ohio
Posts: 4,857
|
The typical cause of low production is low pressure caused by clogged prefilters. You might want to check that out before you go for a new membrane.
Russ |
|
|
|
|
07/13/2008, 02:13 PM
|
#17 |
|
Premium Member
Join Date: Jan 2006
Location: Greenwood, IN
Posts: 662
|
i replaced them thursday night
today i have no water coming out |
|
|
|
|
07/13/2008, 03:45 PM
|
#18 |
|
.Registered Member
Join Date: Sep 2006
Location: Cincinnati, Ohio
Posts: 4,857
|
What is your pressure?
If you have a flush valve, is it closed? |
|
|
|
|
07/13/2008, 08:56 PM
|
#19 |
|
Premium Member
Join Date: Jan 2006
Location: Greenwood, IN
Posts: 662
|
not sure what my water pressure is but it ties into my main water line only 4 ft of line between the main and THE RO UNIT
DON'T HAVE A FLUSH Falve |
|
|
|
|
07/14/2008, 04:04 AM
|
#20 |
|
.Registered Member
Join Date: Sep 2006
Location: Cincinnati, Ohio
Posts: 4,857
|
Dave - You may need a new membrane, and you should really get a pressure gauge - it may be the case that you have very low pressure.
Russ |
|
|
|
|
07/14/2008, 06:41 PM
|
#21 |
|
Registered Member
Join Date: Jan 2004
Location: Indianapolis
Posts: 349
|
today's update
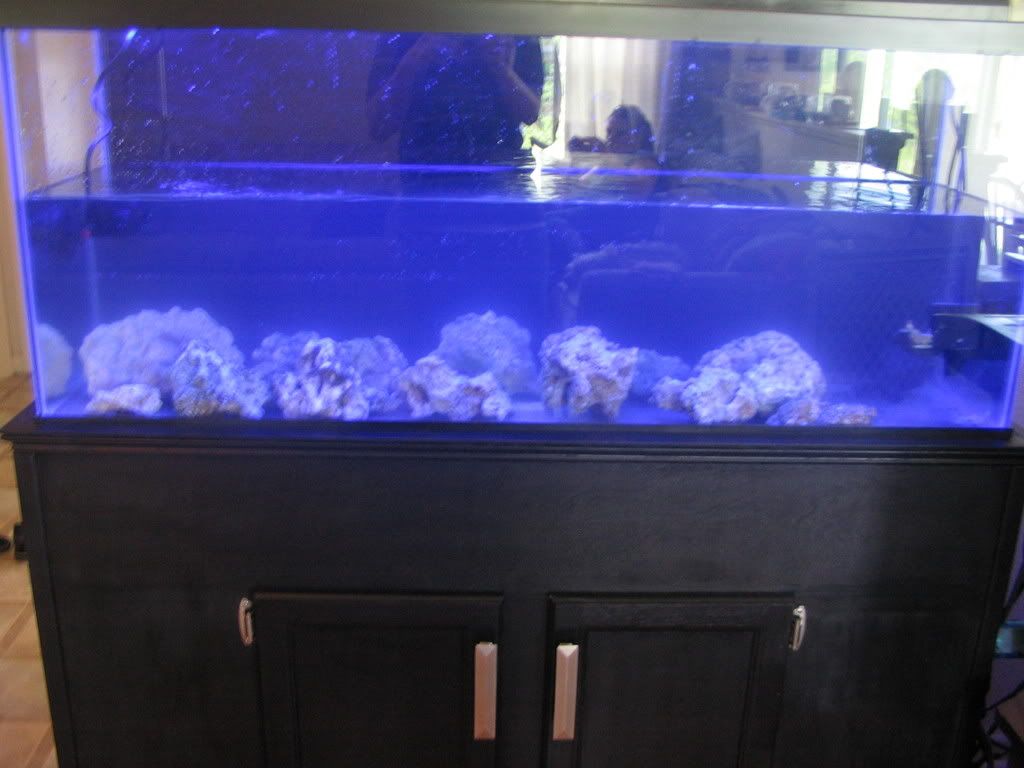
I got some base rock from Fran at indmas yesterday, and put it in the tank to get a head start on seeding from my other stuff. I put some water change water in there again as well as rubble from my nano to get things going. The tank already has that distinctive smell, I think that's a good thing. I'm picking up lots of sand and some rock tomorrow that's already in an established tank, I'm really looking forward to that. I added a Koralia 1 that I got for $16 and sold my old SCWD today too. I had an old 48" light strip in the garage that I put on the tank just to see what's going on in there while I am putting things together, and it had an actinic 03 bulb in it! I have no idea where it came from, but it looks pretty cool while it's up there.
__________________
Insert witty or inspirational comment HERE. Current Tank Info: JBJ 30 gallon rimless |
|
|
|
|
07/14/2008, 06:43 PM
|
#22 |
|
Registered Member
Join Date: Jan 2004
Location: Indianapolis
Posts: 349
|
Just noticed that my wife made it into the pic via the reflection on the glass. I'm sure she'd be THRILLED to know that one!
__________________
Insert witty or inspirational comment HERE. Current Tank Info: JBJ 30 gallon rimless |
|
|
|
|
07/14/2008, 09:47 PM
|
#23 |
|
Premium Member
Join Date: Jan 2006
Location: Greenwood, IN
Posts: 662
|
got new memebrain today everything is great now
so will have some water for you tomarrow dan |
|
|
|
|
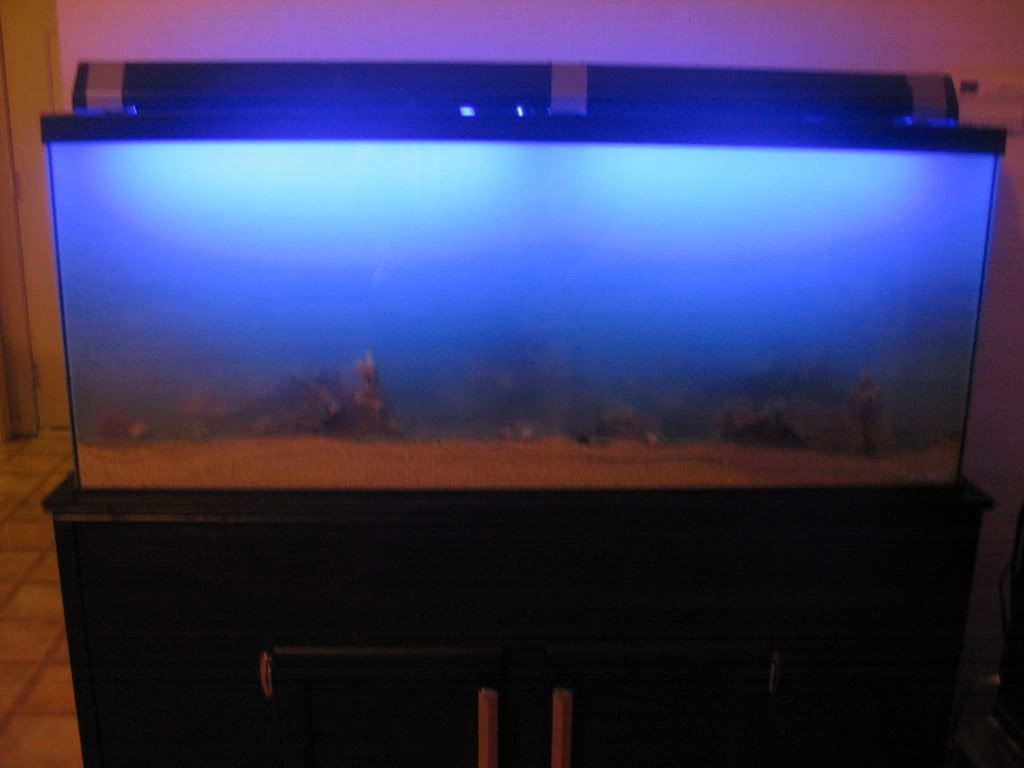
07/16/2008, 08:48 PM
|
#24 |
|
Registered Member
Join Date: Jan 2004
Location: Indianapolis
Posts: 349
|
sand!
Thanks to transmatt, I now have a DSB from a tank that was already running! He also hooked me up with some beautiful kaelini live rock for $1 per pound. I put it in there, and needless to say the water is a murky mess. The bristleworms seem to be digging in the sand just fine, hopefully they'll survive this part of the process. You can also see that there is duct tape on my light fixture now, that's because I got impatient and tried dumping sand in from a bigger container, knocking the light back and to the floor. It still works, but the plastic rivets all broke. The duct tape is the only thing holding it together.
__________________
Insert witty or inspirational comment HERE. Current Tank Info: JBJ 30 gallon rimless |
|
|
|
|
07/18/2008, 01:08 PM
|
#25 |
|
Registered Member
Join Date: Aug 2007
Location: indy
Posts: 128
|
Its looking good! Also if you need a little more rock once your sure its stable, I am sure I can pull a litte more. That way any pod die off can be replenished. When I moved the rest of the rock to my sump it looked like a POD CIRCUS!
|
|
|
|
 |
|
|


