
|
|
|
|||||||
 |
| Thread Tools |
 01/28/2009, 06:45 PM
|
#1 |
|
Registered Member
Join Date: Jan 2009
Location: Adelaide, South Australia
Posts: 153
|
Rod's Gyre flow, Natural light, SPS dominated Reef
I'm well over due to update everyone on what I have been up to and my new tank's progress!!
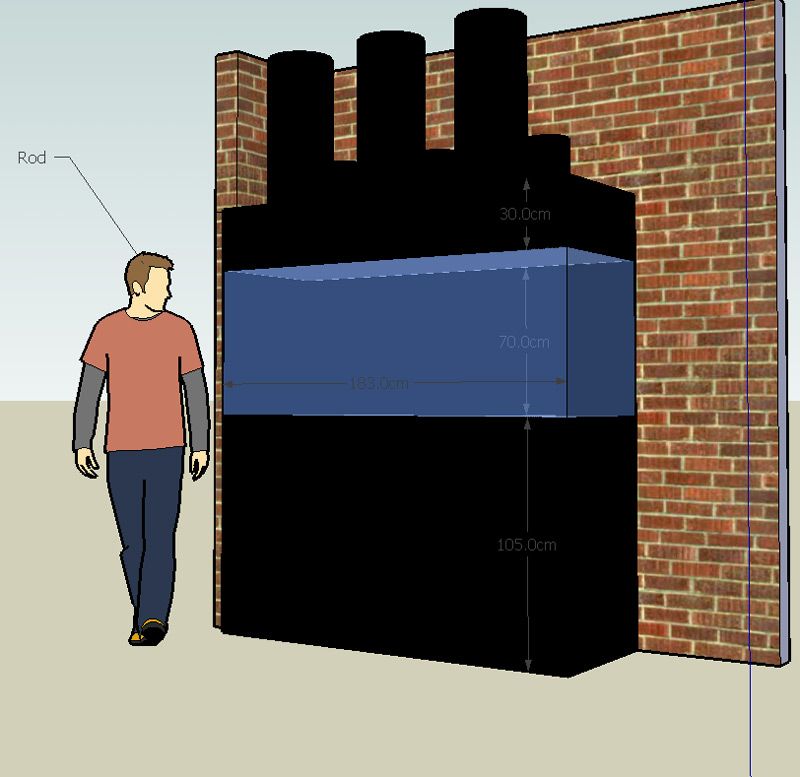
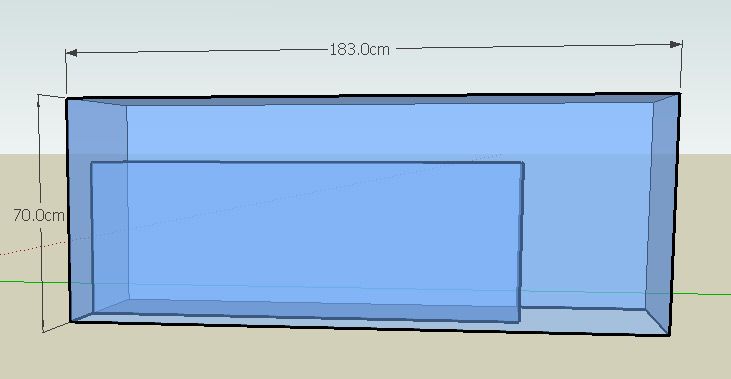
 For the back ground on where I have come from check these threads; http://www.masa.asn.au/phpBB2/viewto...ight=T&start=0 http://www.reefcentral.com/forums/sh...readid=1009270 I had been contemplating an upgrade for many months, even years. When I do something I like to get things right.  When I setup my last tank I had little to no idea where it was going to take me. I relied on my LFS to give me the information that I needed (I hadn't discovered RTAW or RC at that point!) To give them credit, they could only advise on what I gave them, which was very little. My tank had progressed and developed over the years and I wasn't happy with the way it was setup. Yes, it was pretty, but there were some fundamental problems with it and there were a few signs of age. 1. I didn't like the weir design, there was just one overflow at the bottom, if it got blocked, which it did, the tank overflowed onto the carpet.  On my new tank there is a drain and backup Durso. On my new tank there is a drain and backup Durso.2. I didn't like my sump design. It had progressed from a plastic tub to two glass tanks joined by bulkheads and flexible hose. The reason that there was two is because of the layout of the cabinet (see below) I had micro bubble issues entering the tank as there was no provision for baffles etc. Also I had problems with the float switch as the water wasn't still enough so my top off continually cut in and out as the float continually went up and down.  3. I didn't like my cabinet. It was an old antique bureau that I cut and modified to the point where if I did anything else to it I think it would have fallen over! The reason for two separate sumps was because they were in two cupboards. To put in a decent sump I would have needed to cut out centre walls of cupboards and I didn't think it would be structurally sound then. Also, with the amount of equipment I had, there simply wasnât enough room in that old cabinet! 4. Unfortunately the glass was very scratched. A few years ago I used a ânon scratchâ scourer on it and guess what? 5. The paint was peeling off the back glass. Salt was getting between the glass and the paint and it was coming off in small sheets. 6. I didnât really like the look of Tunze Nanos in my tank. In the beginning I knew I didnât want to see any equipment in the tank and unfortunately to get the flow it required, I had to have pumps in there. In my new tank flow is one thing (along with my aquascape) that I very seriously planned out for before the tank was drilled!! So, I needed a new cabinet, a new sump and a new weir. While I was at it I thought I might as well get a new tank! If I got a new tank, I might as well make it bigger, improve the flow and aquascape. Other than that I loved my old tank!! For posterity, a pic of my old tank; 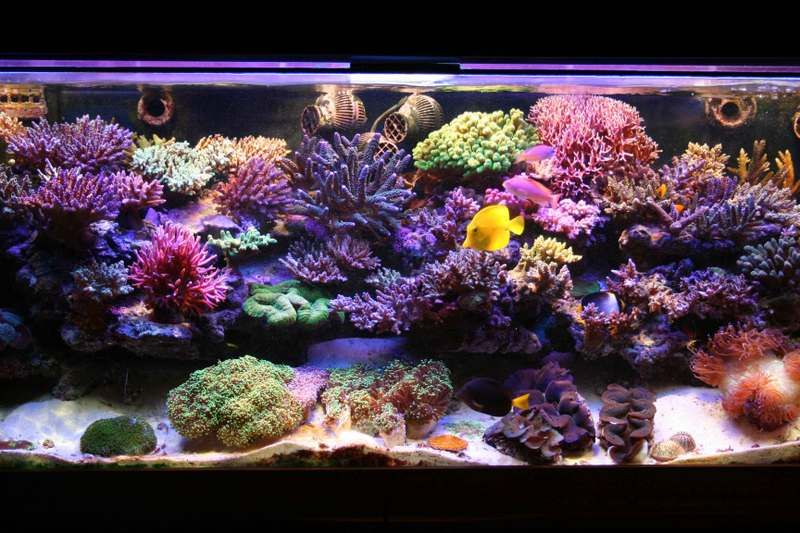 More to come...... Rod. 
__________________
Acromaniac |

|

|
|
01/28/2009, 07:11 PM
|
#2 |
|
Registered Member
Join Date: Jan 2009
Location: Adelaide, South Australia
Posts: 153
|
Let the upgrade begin!!
I re-used what gear I could. The new tank sits in the same spot in my lounge room. It is hard up against the wall at the back, due to space limitations. It is also hard up against the wall on the left hand side. It can be viewed from the front and right hand end. All closed loop holes are drilled through the bottom. Left hand rear weir. This meant that I could re-use my Sola Tubes/skylight and Mhâs. I installed one more Mh on the right hand side. The old tank was 4â 7â x 18â x 20â. The new tank is 6â x 28â x 28â. For my aqua scape I have gone back to my original plan of a main bommie on the left and an island on the right. Pic of my old tank in 2003; 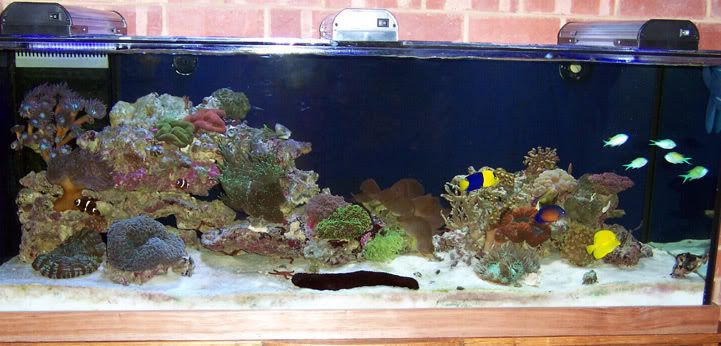 I liked the idea of lots of free swimming space and plenty of open sandy areas. I have been reducing the number of corals and species down. I have kept the rock work off of the back and sides to help flow and keep it as open as possible. Lighting I was very happy with my old setup and kept it much the same. There were 2 x 150w Mh's with Reeflux 12,000k bulbs, 3 x 250mm Solatubes and a Reef Octopus twin T5 fitting with a Giesemann Actinic+ and Korallen-Zucht Fiji Purple bulbs. Old lighting;  With the extra width of the new tank I added an additional, matching 150w Aqua One pendant light to the right hand side. 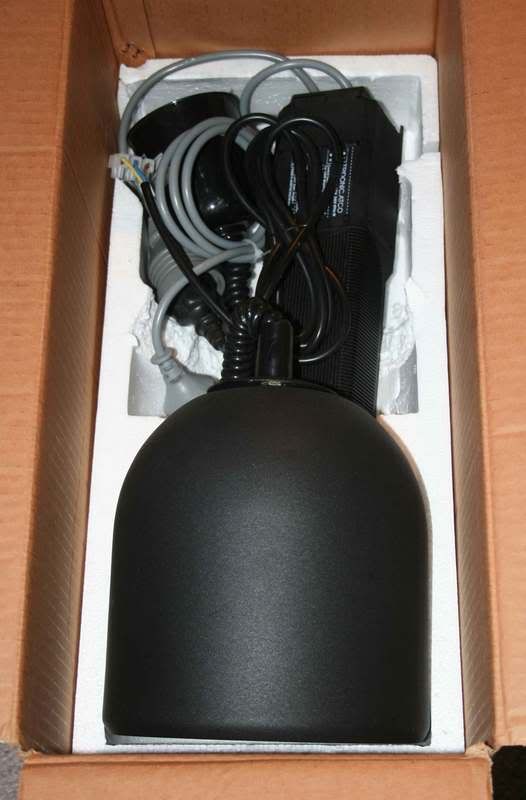 I just happened to find one my LFS was clearing out at a great price!  More to come...... Rod.
__________________
Acromaniac Last edited by Rod the Reefer; 01/28/2009 at 07:46 PM. |
|
|
|
|
01/28/2009, 07:44 PM
|
#3 |
|
Registered Member
Join Date: Jan 2009
Location: Adelaide, South Australia
Posts: 153
|
Flow
This is one area I have really improved! I didn't want to be able to see any equipment in the tank, yet I wanted exceptional flow, as I believe this to be one of the key areas for successfully keeping SPS. So the Tunzes are out of there! I have used one of them in my new sump for SPS frags and the other two I'll use in my new frag tank. (Next project after this one) I decided to base the setup on the Gyre system, where you don't just have random currents, but rather imitate tidal flows and wave action. Here is a link explaining more on this concept; http://www.advancedaquarist.com/2007/1/aafeature/view And a link to a tank design based on the Gyre method; http://www.reef-eden.net/2006_reef_9.htm I have kept the rock work off the back and side walls and created flow right around it. Here is a sketch of what I did. Pump A creates flow anti-clockwise for a given time, then pump B reverses it. I also have pumps I1 & I2 (2 x Iwakis that I have) to create additional wave action. 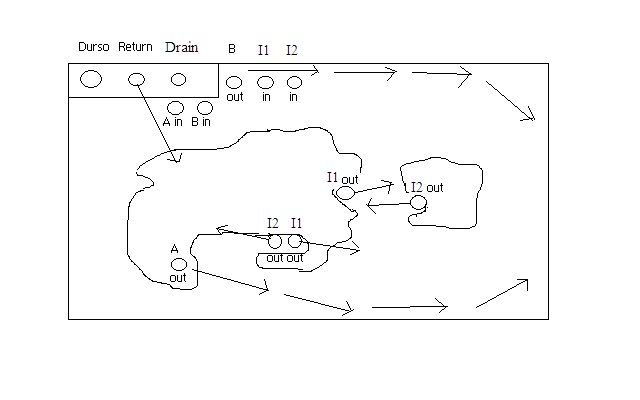 For the main two Gyre pumps I decided to go with PanWorld 150PS-MD55R pressure pumps with Penductors which gives me over 20,000lph each pump. (Only one would be on at a time)  On the Iwakis I have flow accelerators to direct the flow. All the plumbing will be hidden behind the rock work. More to come...... Rod.
__________________
Acromaniac |
|
|
|
|
01/28/2009, 07:51 PM
|
#4 |
|
Registered Member
Join Date: Jan 2009
Location: Adelaide, South Australia
Posts: 153
|
Auto Top Off
Ok, this is at the heart of my new auto top off system........... 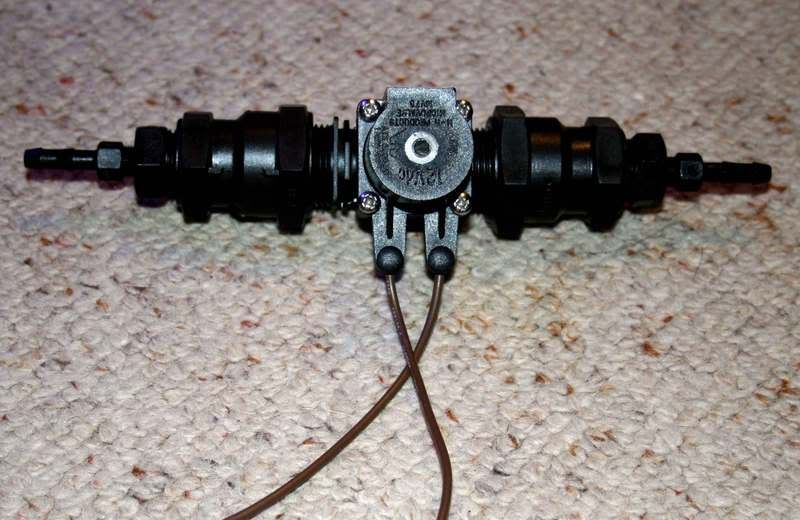 I already have the Aqua Medic Niveaumat dosing pump. I plumbed it to the outlet of my Pura Tap (rain water) in the kitchen and control it with the solenoid above. My only concern was if the solenoid failed open and water continued to pour into the reservoir, so I installed an overflow back to the kitchen waste, just in case. Rather than have a large container of kalk under the tank taking up precious space I bought a kalk stirrer. This is how it is plumbed; 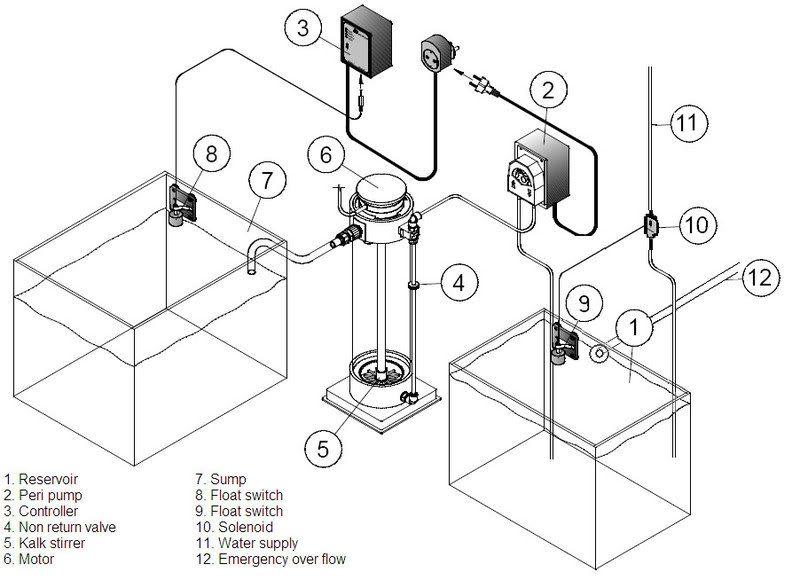 More to come..... Rod.
__________________
Acromaniac |
|
|
|
|
01/28/2009, 07:54 PM
|
#5 |
|
Registered Member
Join Date: Jan 2009
Location: Adelaide, South Australia
Posts: 153
|
Sump
DIY Acrylic Ok, this is the layout that I originally had in mind. Obviously the walls of the top off reservoir will need to be full height. Another idea I had was to incorporate an overflow from the sump into the top off reservoir just in case and then it can overflow back to the kitchen waste. 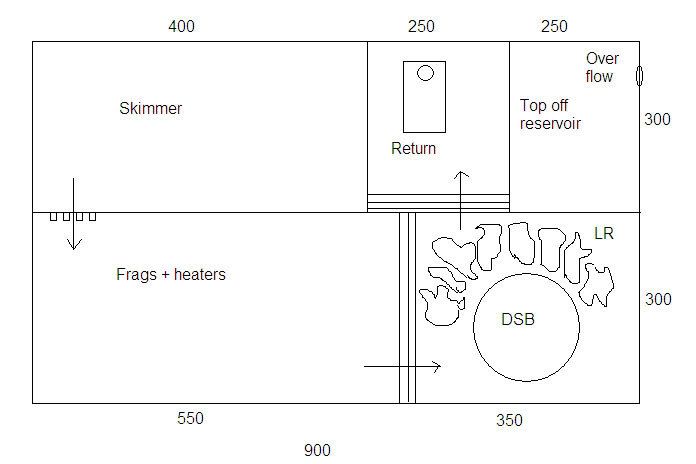 More to come..... Rod.
__________________
Acromaniac |
|
|
|
|
01/28/2009, 08:00 PM
|
#6 |
|
Registered Member
Join Date: Jan 2009
Location: Adelaide, South Australia
Posts: 153
|
Stand
Next is the stand design. I went with steel. Yes, steel rusts, but with the correct treatment it can be completely sealed. I've seen steel stands in LFS that have lasted decades. I got away with a much smaller cross section with steel than I could with timber giving me more room under the tank. I had heard of aluminium as an idea, but I believe it would corrode quicker than steel would, especially if the steel was sealed. It is powder coated in black. I was told the best results are obtained when the steel is zinc coated first. 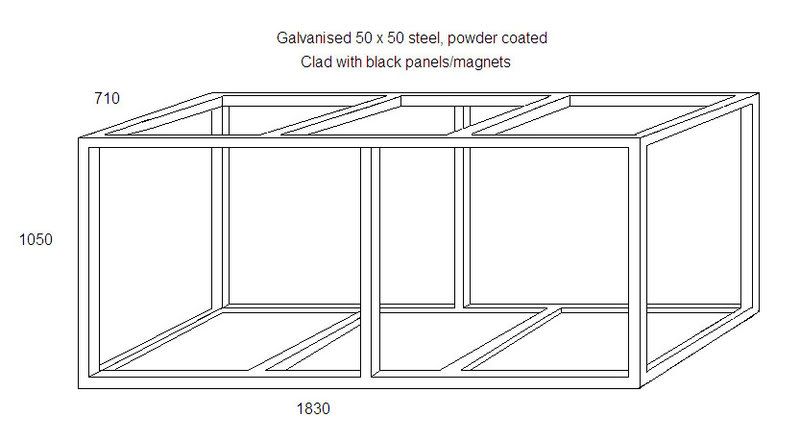 I also got a separate cabinet to house all of my electricals so there are none under the tank. More to come..... Rod.
__________________
Acromaniac |
|
|
|
|
01/28/2009, 08:03 PM
|
#7 |
|
Registered Member
Join Date: Jan 2009
Location: Adelaide, South Australia
Posts: 153
|
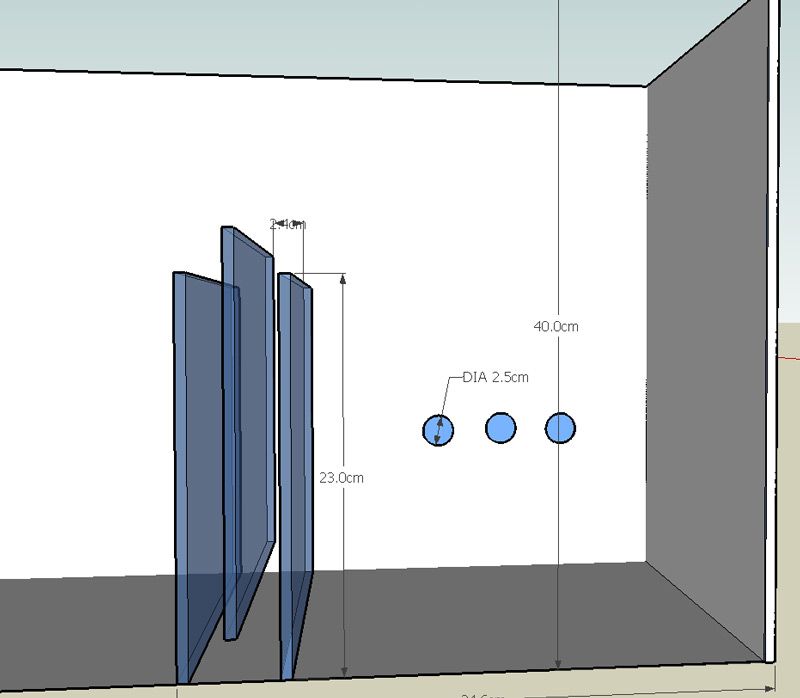
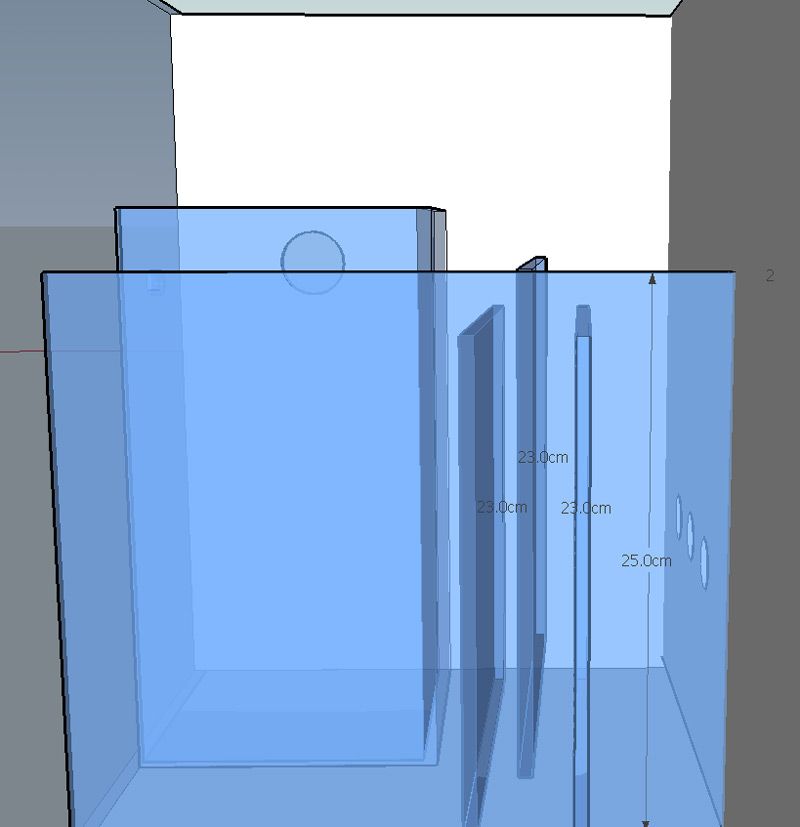
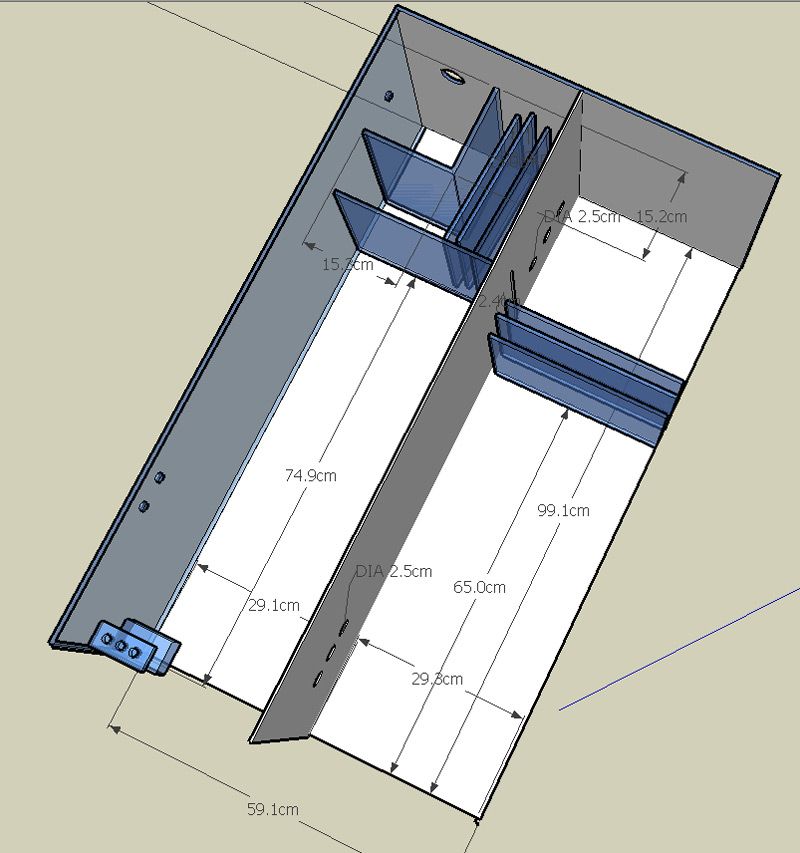
Ok, thanks to Josh (aka Majesticangelfish) here are a few drawings of the sump design;
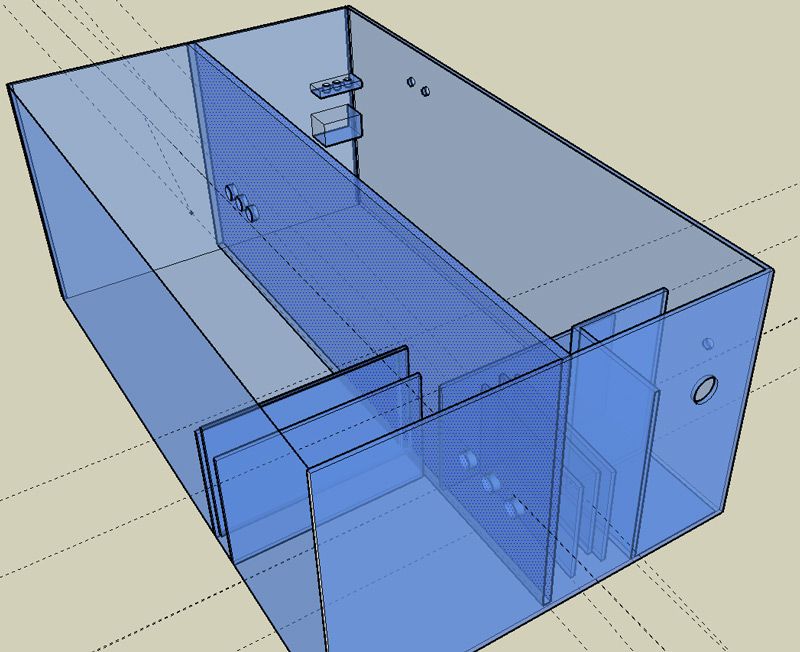 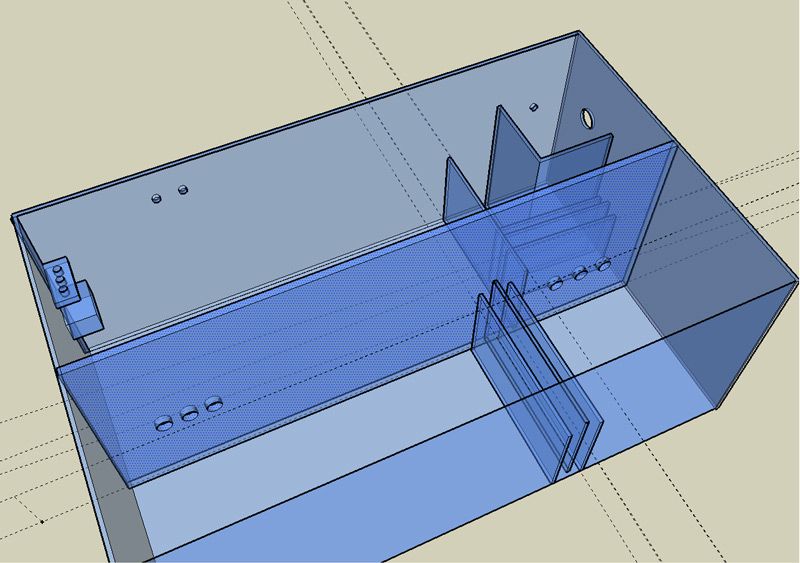 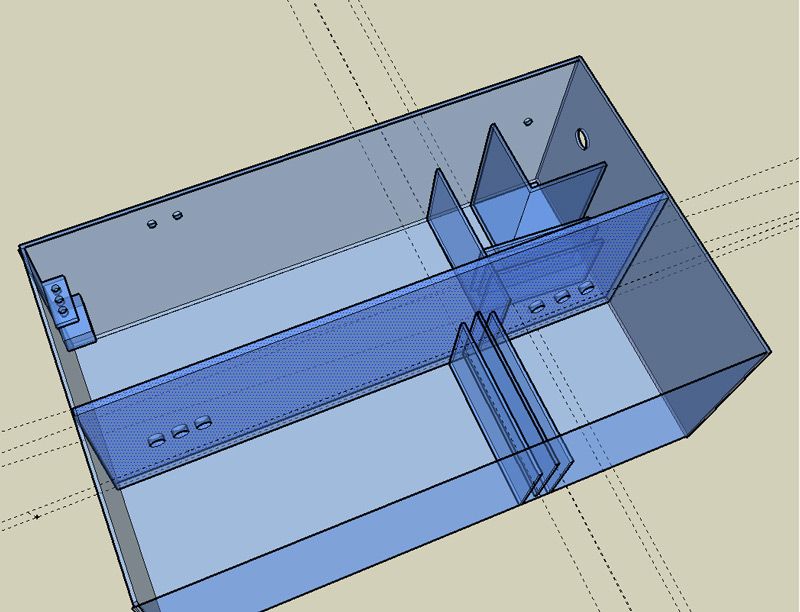 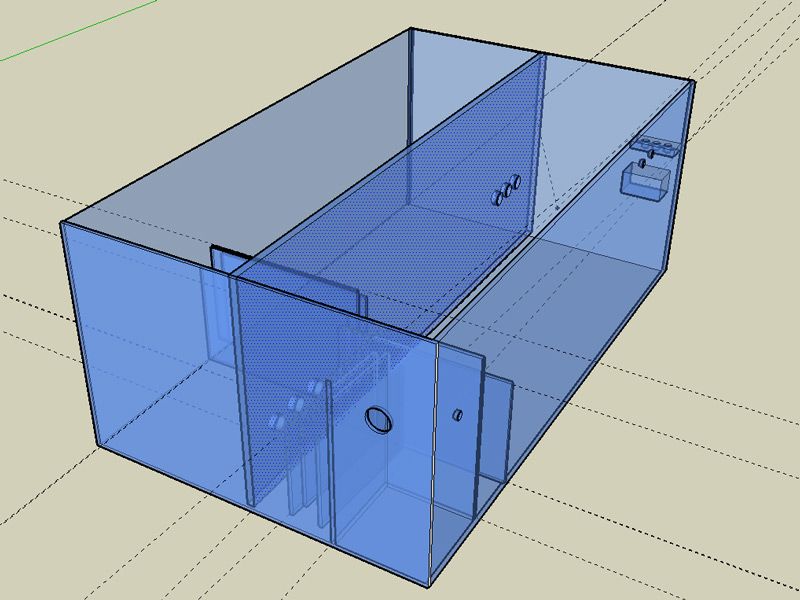 Some walls are opaque white acrylic to aid in light reflection (not clear like in the above photos): 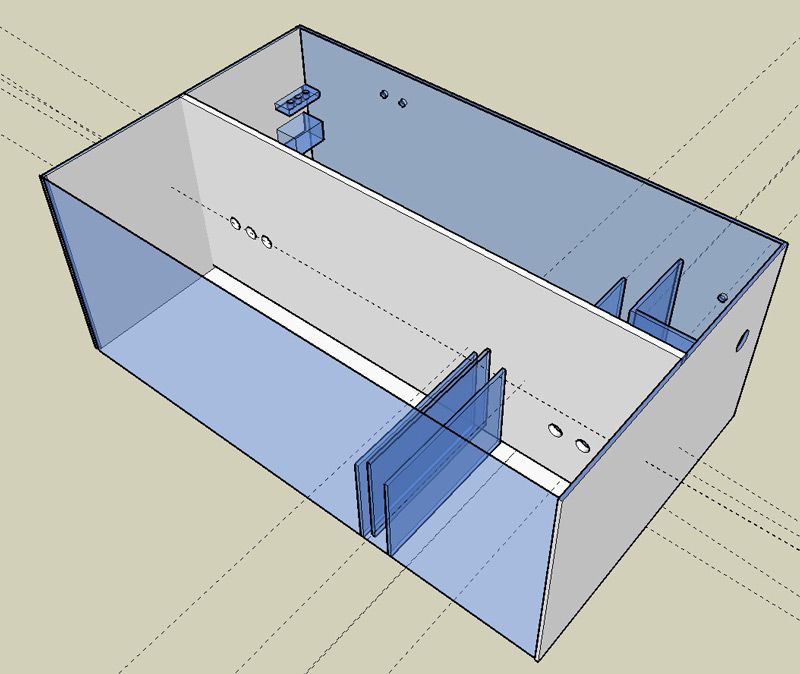
__________________
Acromaniac |
|
|
|
|
01/28/2009, 08:04 PM
|
#8 |
|
Registered Member
Join Date: Jan 2009
Location: Adelaide, South Australia
Posts: 153
|
     from the sofa 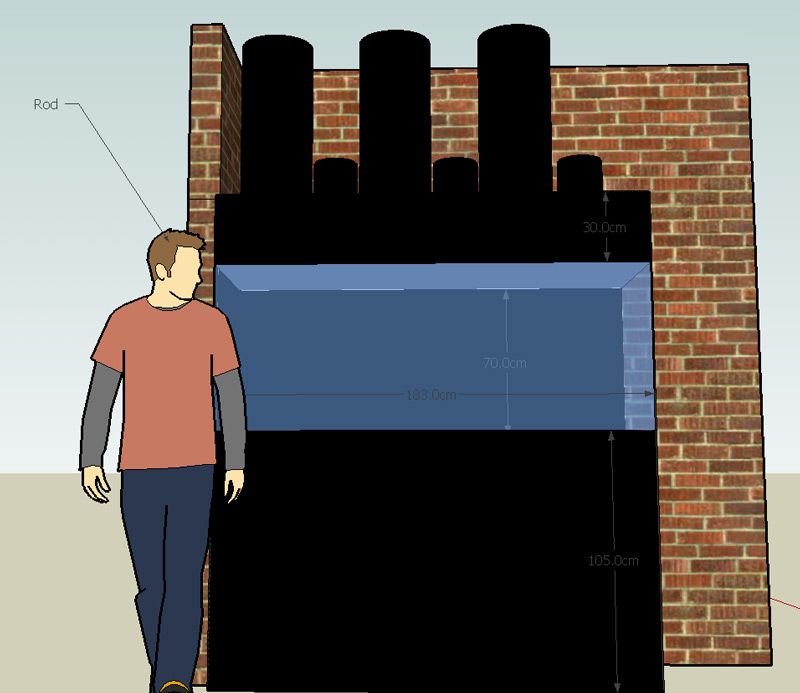
__________________
Acromaniac |
|
|
|
|
01/28/2009, 08:11 PM
|
#9 |
|
Registered Member
Join Date: Jan 2009
Location: Adelaide, South Australia
Posts: 153
|
Old tank inside new tank:
 Old vs New 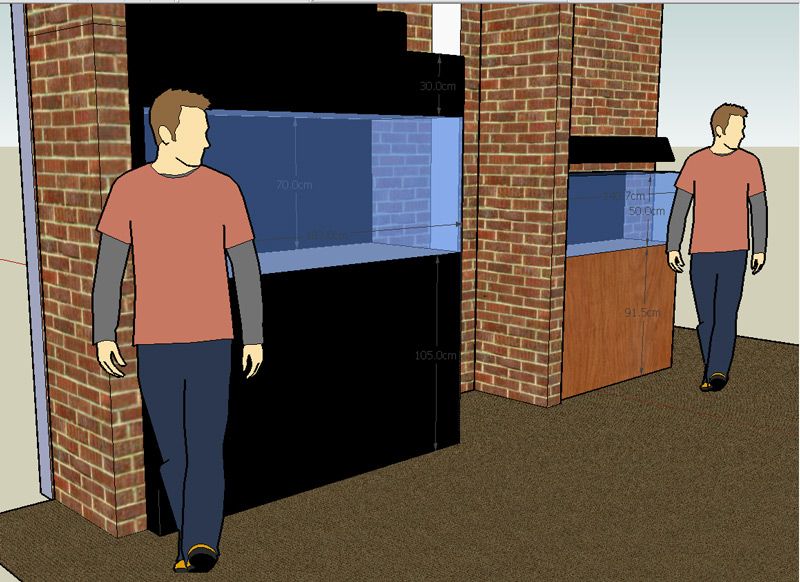 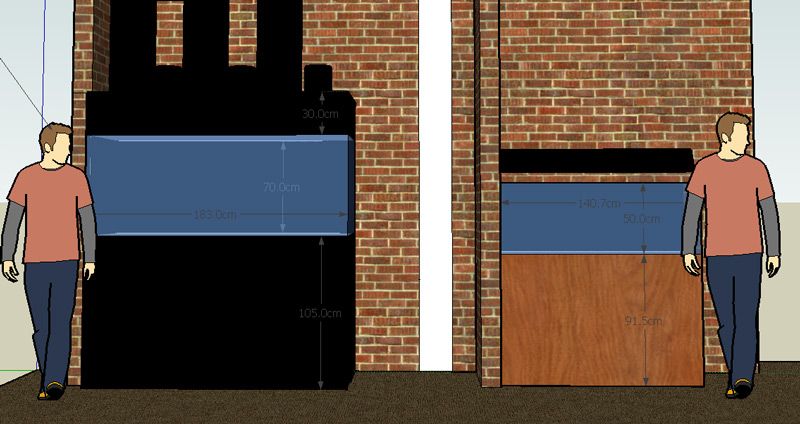  Note the gap between the wall with the old tank: 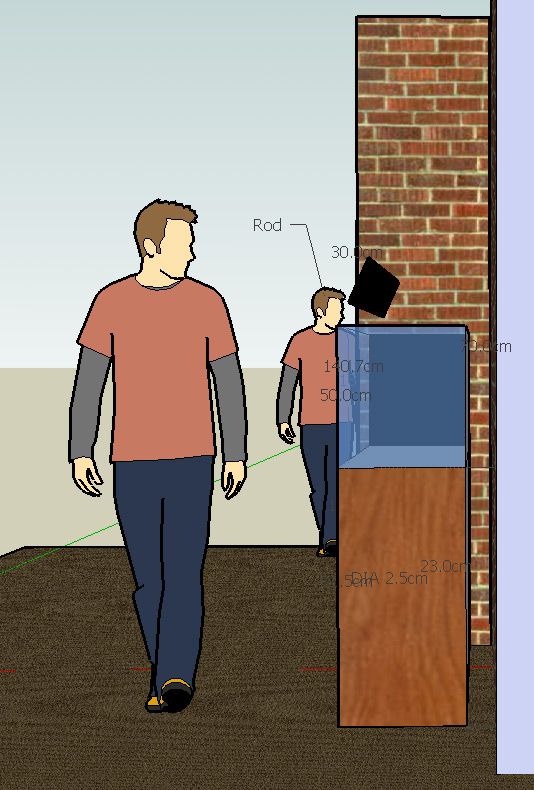 ...The new tank is flush with the wall due to the lack of bulkheads in the back glass panel. 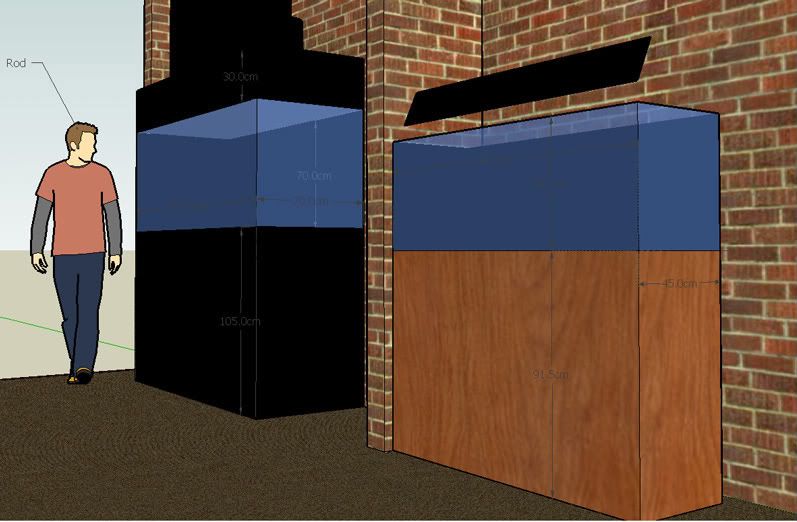 I wanted the tank more at eye level than the old tank. If you have another look at Josh's pictures I incorporated a hood of sorts, so yes I will be losing the top down perspective. The "hood" is simply black acrylic on a light weight frame that has sides and a front, no top. It sits on top of the tank, covering a bit of the glass including the braces and will be removable. More to come..... Rod.
__________________
Acromaniac |
|
|
|
|
01/28/2009, 08:15 PM
|
#10 |
|
Registered Member
Join Date: Jan 2009
Location: Adelaide, South Australia
Posts: 153
|
OK, some sneak peeks of the sump being built!
The acrylic arrives.  Start of assembly. 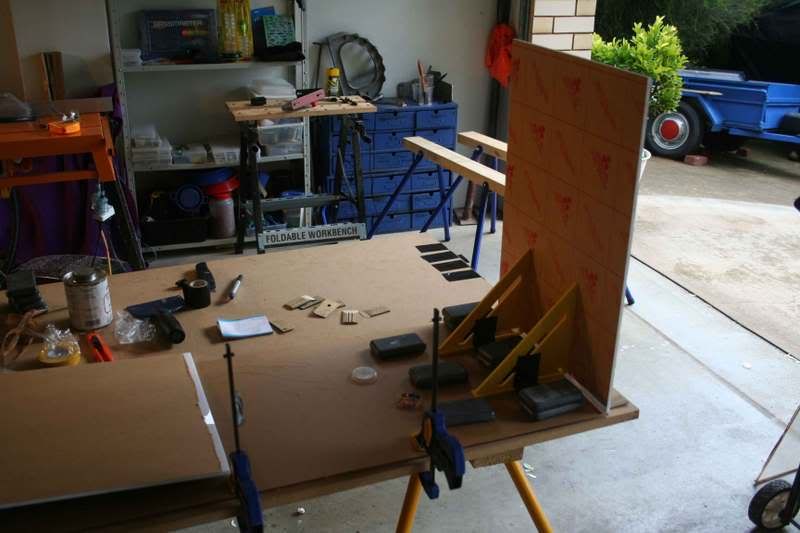 Baffles.  Taking shape. 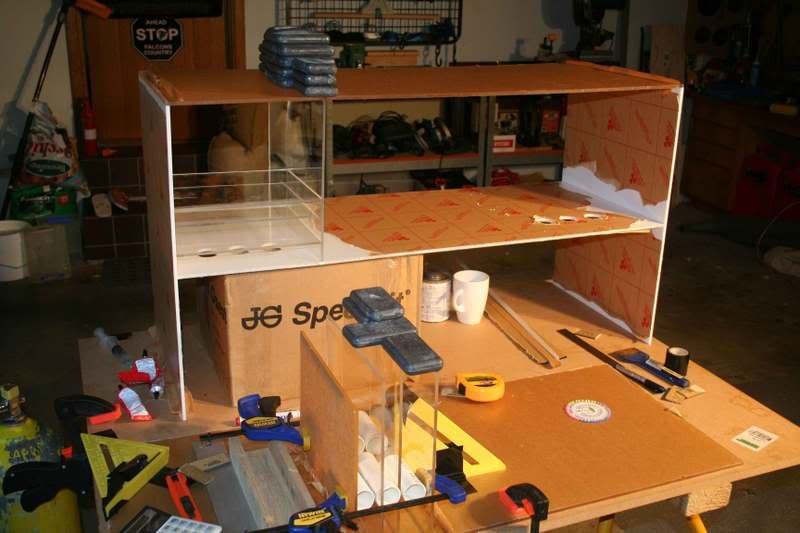 The dynamic duo. 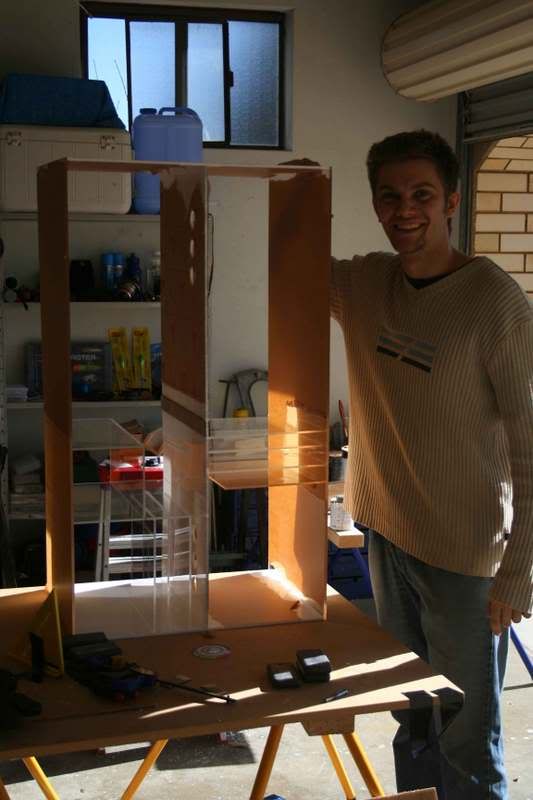 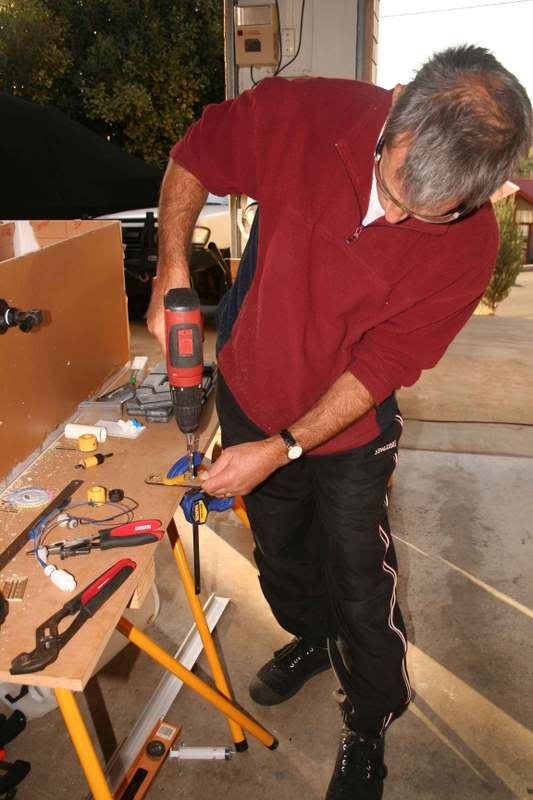 The patented Josh Accessory Rack. 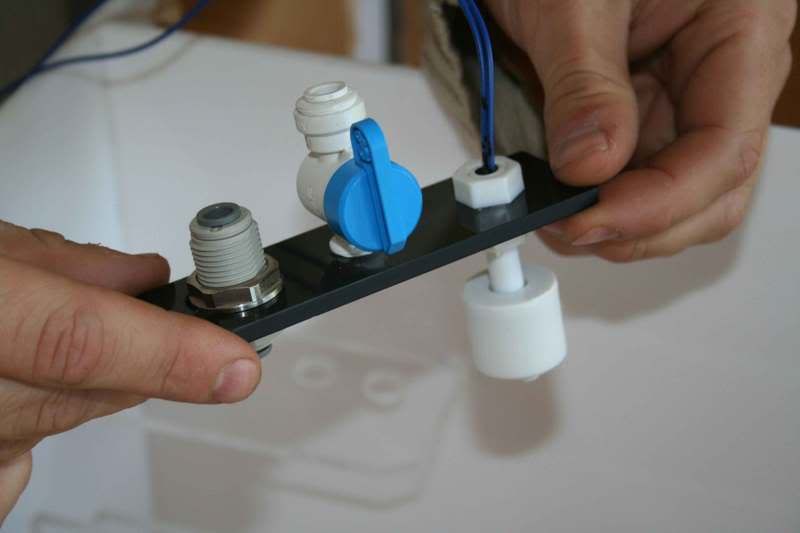 In situ. 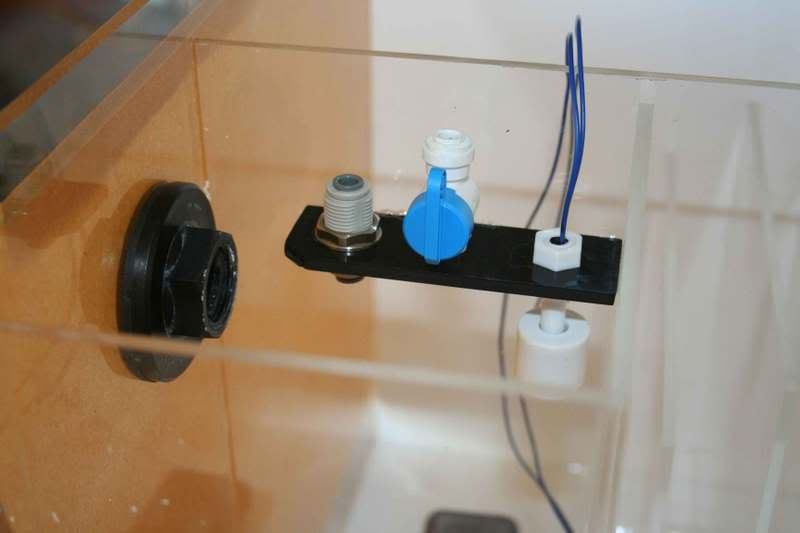 Almost there. 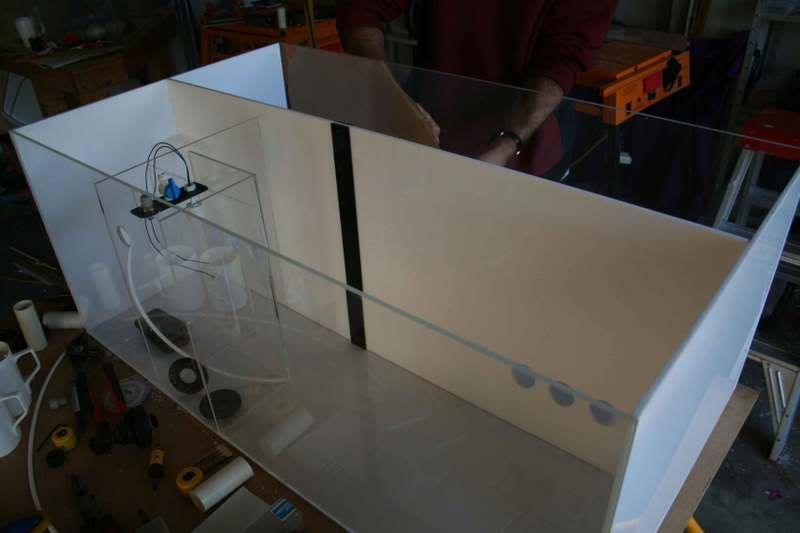 Almost finished! Many thanks to Josh aka Majesticangelfish, couldn't have done it wihout you mate!! Rod.
__________________
Acromaniac |
|
|
|
|
01/28/2009, 08:18 PM
|
#11 |
|
Registered Member
Join Date: Jan 2009
Location: Adelaide, South Australia
Posts: 153
|
Fresh water test, front.
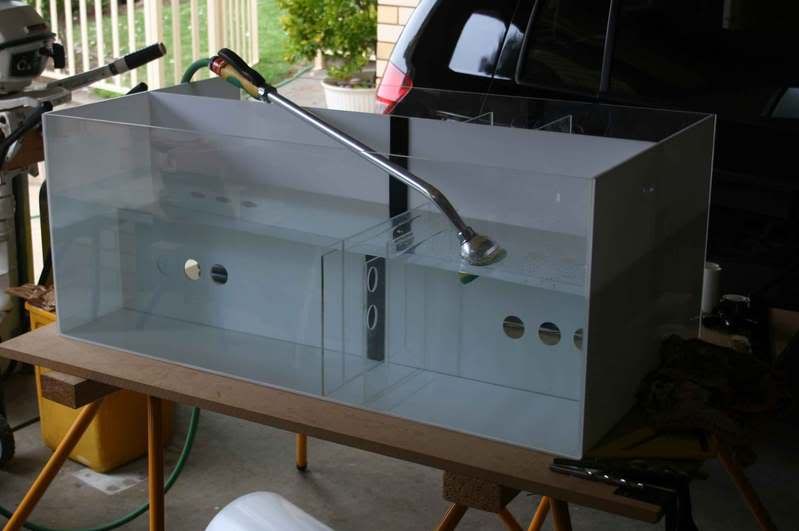 Back.  Josh's accessory rack, extended to include Ca effluent in and aeration chamber. 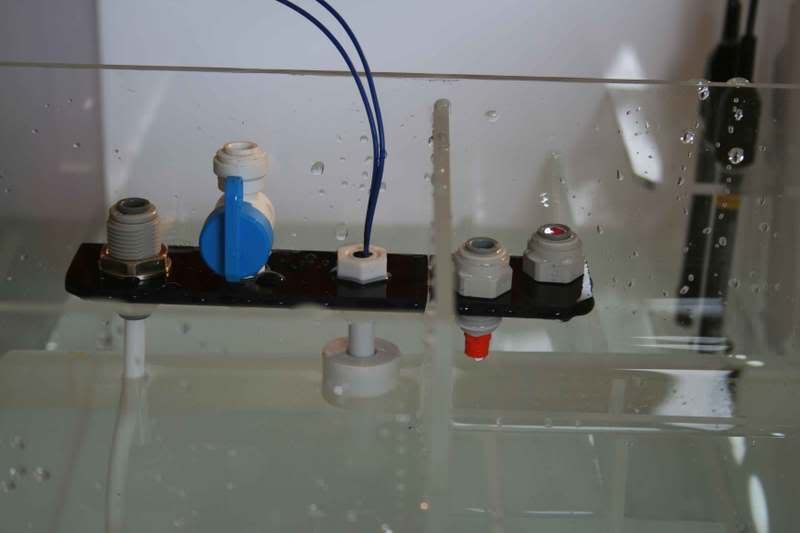 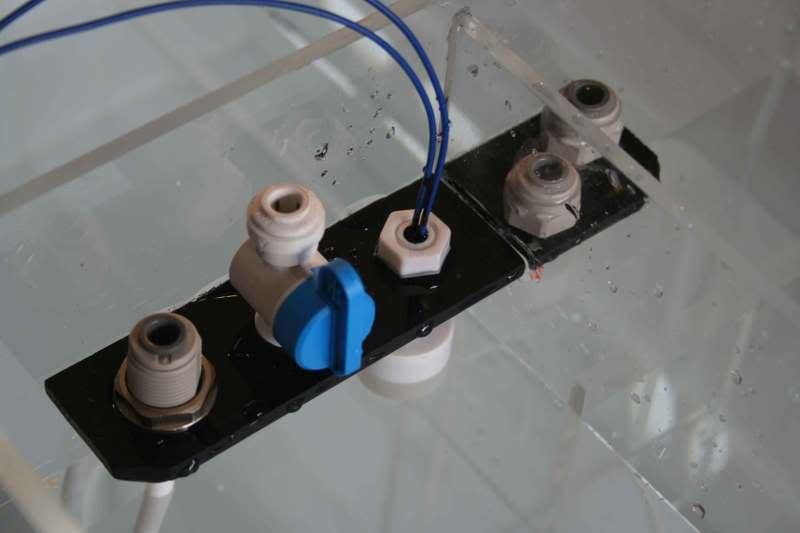 Spray nozzle for aeration chamber. 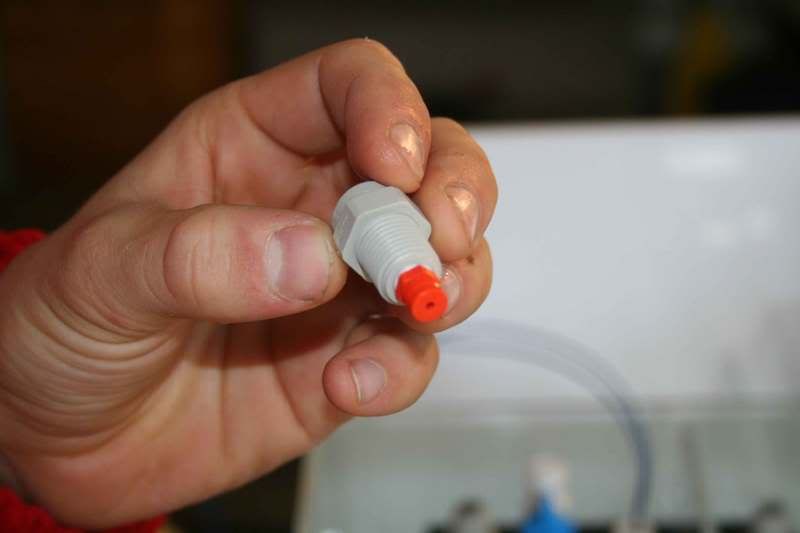
__________________
Acromaniac |
|
|
|
|
01/28/2009, 08:20 PM
|
#12 |
|
Registered Member
Join Date: Jan 2009
Location: Adelaide, South Australia
Posts: 153
|
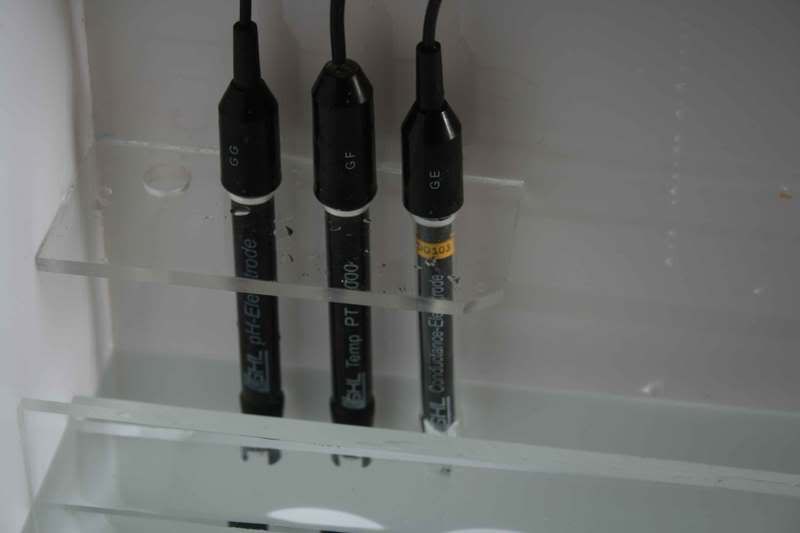
Probe holder.
 Complete! Front.  Back. 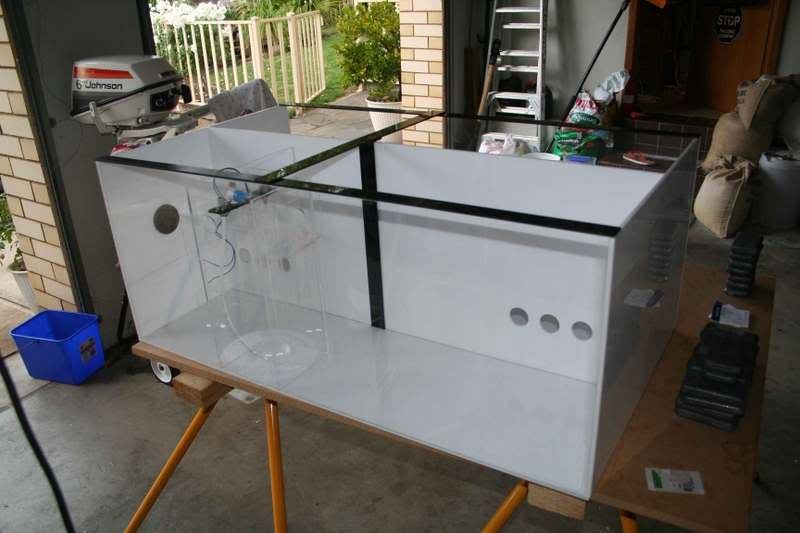 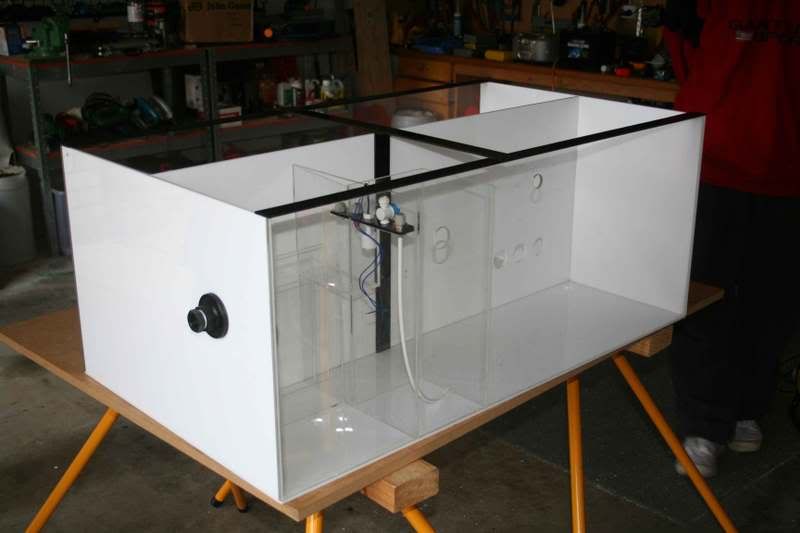 Inside. 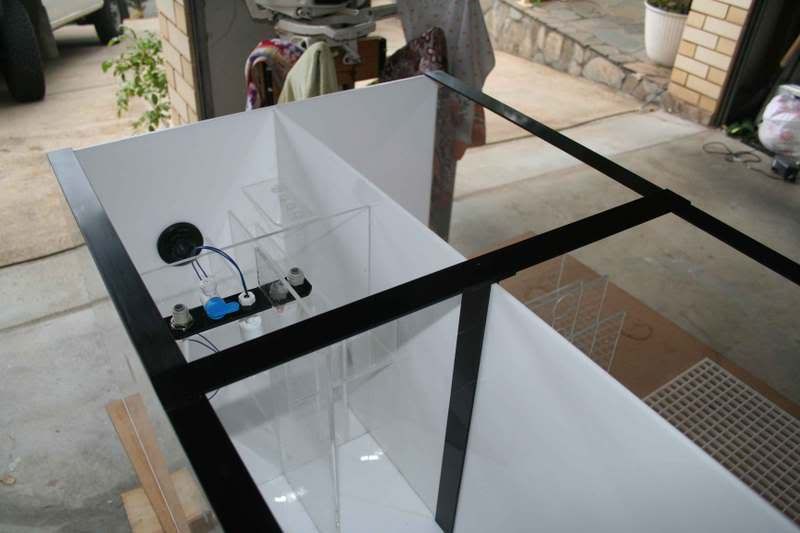 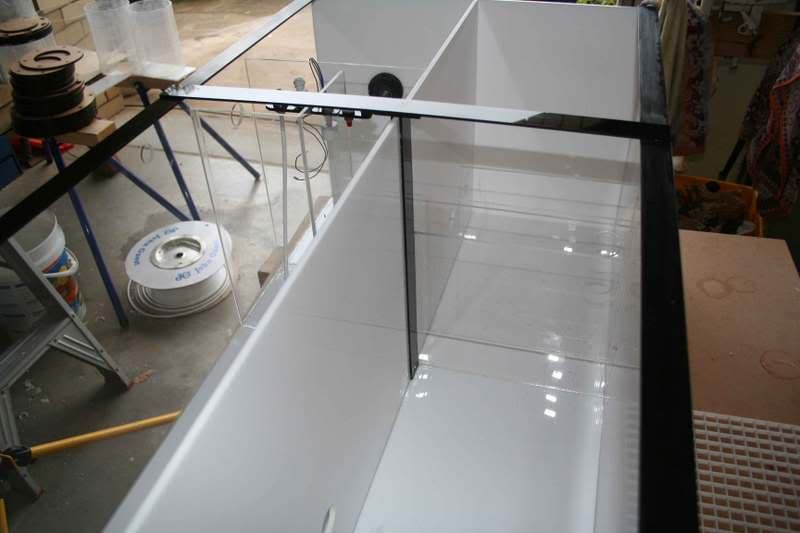 The master sump maker! He's happy with it! 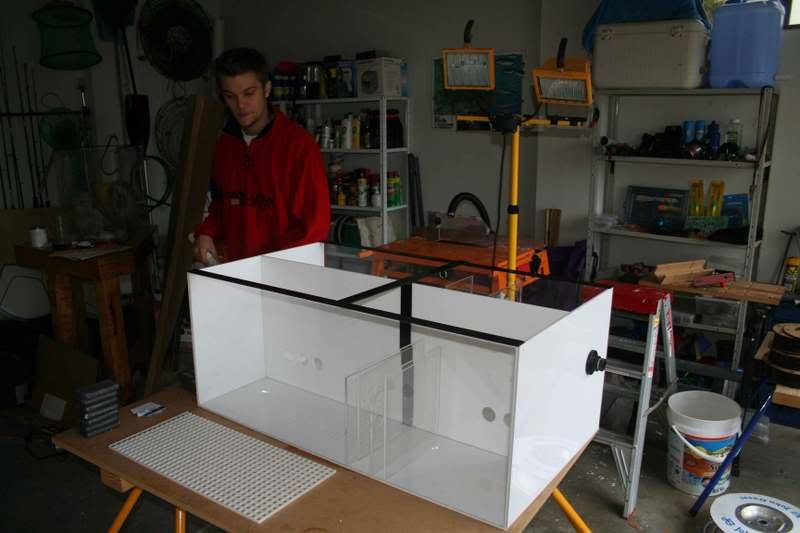 Ready to ship. (Actually it had cardboard around it too) 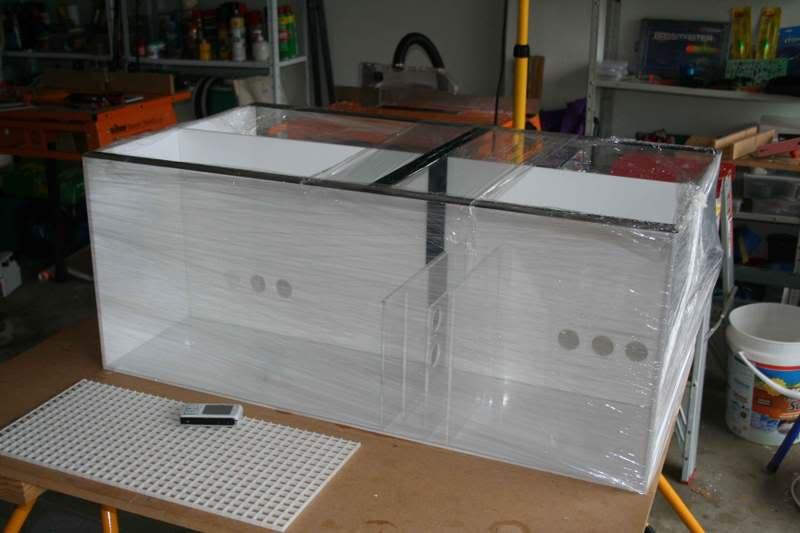 Thanks again Josh!! It's awesome!! Rod.
__________________
Acromaniac |
|
|
|
|
01/28/2009, 08:24 PM
|
#13 |
|
Registered Member
Join Date: Jan 2009
Location: Adelaide, South Australia
Posts: 153
|
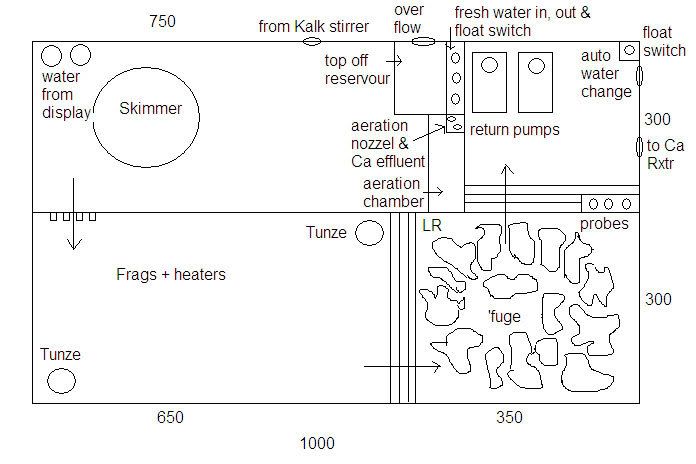
Here's a simple diagram of the sump and how it works,
 Rod.
__________________
Acromaniac |
|
|
|
|
01/28/2009, 08:30 PM
|
#14 |
|
Registered Member
Join Date: Jan 2009
Location: Adelaide, South Australia
Posts: 153
|
My understanding is that it is actually better to have holes in the bottom of the tank than the side, from a strength point of view. The tech at a glass manufacturer has said that if you drill the bottom of an aquarium it is completely supported, whereas on the side it isn't.
I planned to not have any leaks!! I used silicone to seal the bulkheads. As far as maintenance all the bulkheads are easily accessible from under the stand, unlike my old setup which had holes through the back which were completely inaccessible. Every bulkhead has a valve of course.The bulkheads; 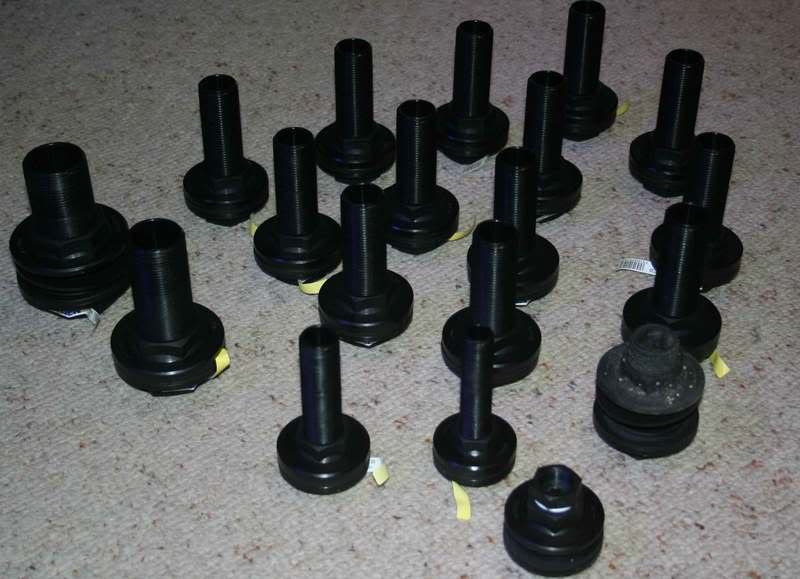 Rod.
__________________
Acromaniac |
|
|
|
|
01/28/2009, 08:35 PM
|
#15 |
|
Registered Member
Join Date: Jan 2009
Location: Adelaide, South Australia
Posts: 153
|
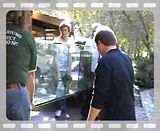
The tank arriving!!
Thanks Ben (Mr Miagi) & Josh (Majesticangelfish) for your help. Although Ben ended up as the "official observer". Thanks also to Ken at Aquariums Direct. Nothing was too hard or a problem and the finished product is a credit to his tank building expertise!! (Even if it is full of holes!) Anyway, on with the pics.................. The tank arrives. 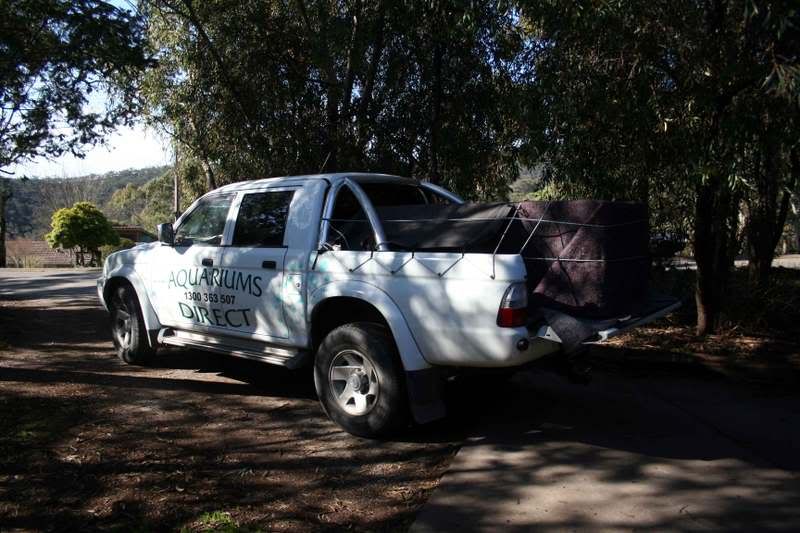 Starting to unload. 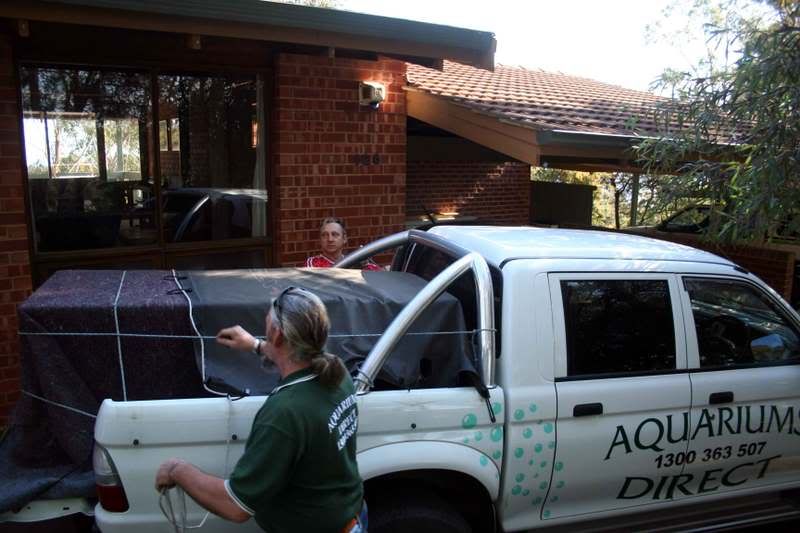 The proud Dad. 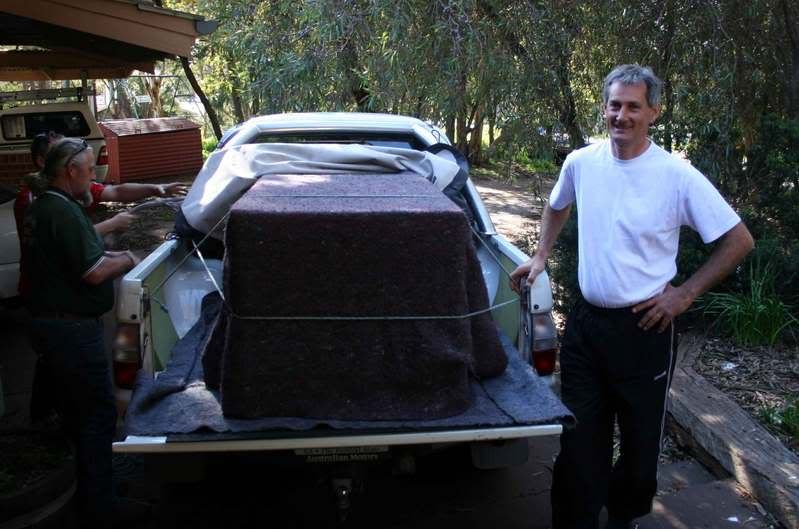 Ben looks on with great anticipation. (LHS) 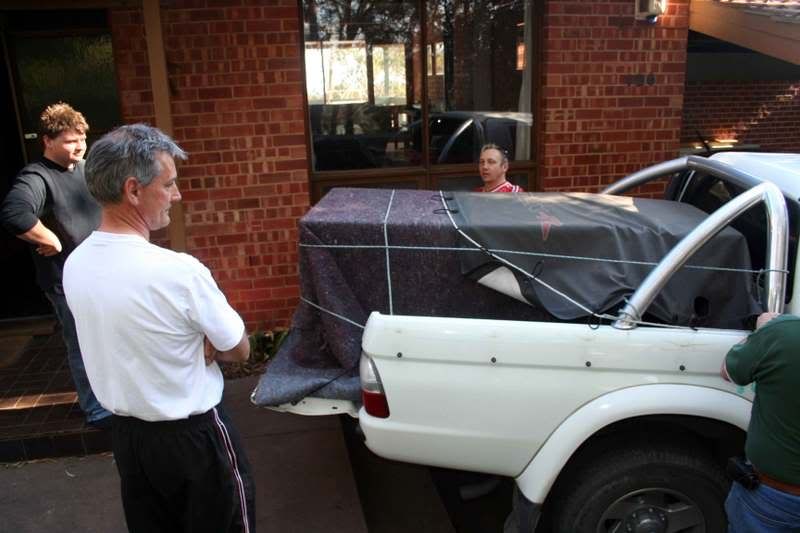 OK guys take it in there. 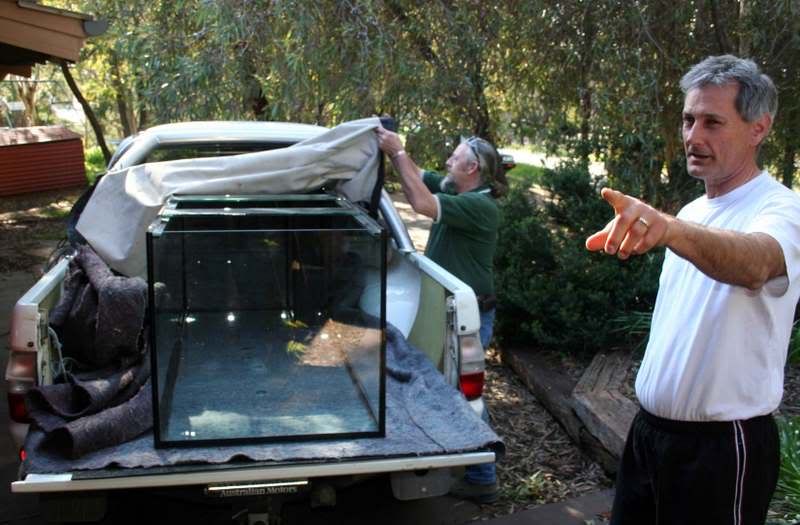 Here it is!  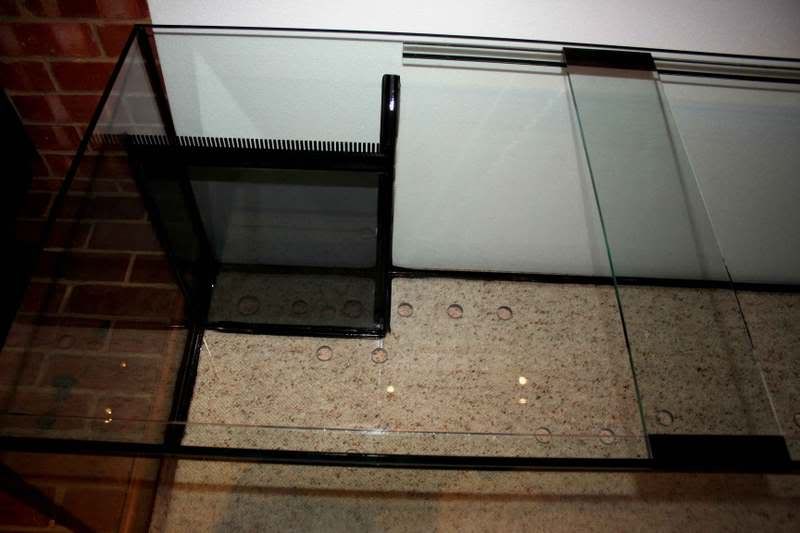 With a ruler to show size. 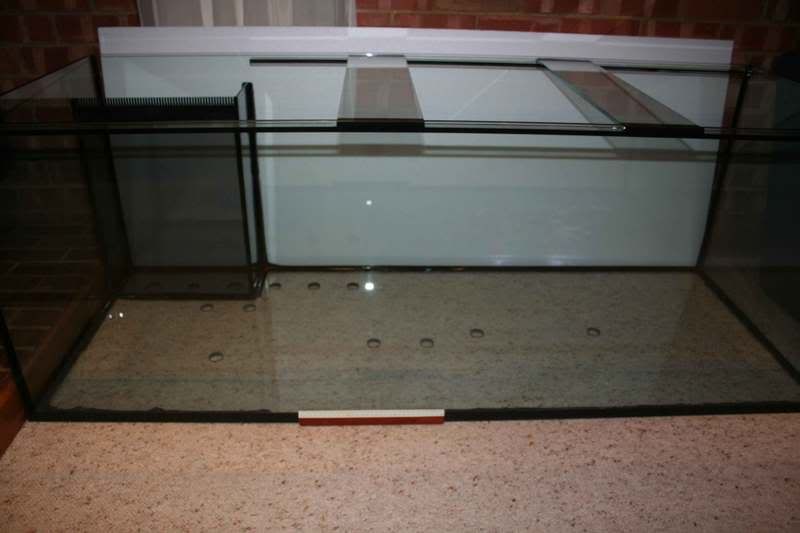
__________________
Acromaniac |
|
|
|
|
01/28/2009, 08:35 PM
|
#16 |
|
Registered Member
Join Date: Jan 2009
Location: Adelaide, South Australia
Posts: 153
|
And a video of the whole thing (Courtesy of my lovely wife)
 More to come.... Rod.
__________________
Acromaniac |
|
|
|
|
01/28/2009, 09:38 PM
|
#17 |
|
Premium Member
 Join Date: Jan 2004
Location: New Jersey
Posts: 5,619
|
Very nice set up, it'll be a great improvement over your already sweet system!
Your drawings are really nice too!
__________________
150 gallon Perfecto with 1500 gph GH overflow / DIY stand-wine bar / Dart Return / SRO XP3000 Ext skimmer / 75 g frag / 40 g fuge / 40 g DIY sump / Orphek P156 & Kessil 150A Current Tank Info: 150 DT/ 40B fuge/ 75g frag/ 40 g sump/ SRO XP 3000 Ext/ TUNZEs & VorTechs circulation/Dart return/ MTC Pro Cal/ UV & Oz |
|
|
|
|
01/28/2009, 09:54 PM
|
#18 |
|
Premium Member
Join Date: May 2005
Location: calgary, alberta
Posts: 422
|
That sump is incredibly well done! Following along...
__________________
Brett |
|
|
|
|
01/29/2009, 12:18 AM
|
#19 |
|
Registered Member.
Join Date: Aug 2006
Location: NYC
Posts: 2,009
|
wow looks insane
|
|
|
|
|
01/29/2009, 03:27 AM
|
#20 |
|
Registered Member
Join Date: Apr 2004
Location: Australia
Posts: 1,920
|
Hey mate,
Brilliant. Glad to see this up here! Needs some more photos!! Maybe I should start a couple threads myself! Havnt been on RC in so long... BTW, how are you coping with this heat wave??! The upstairs tank (with the 400w MH) is at 29.5 with the aircon on full, the tank in my room (with no aircon) is at 29.9 with extra fans on for evap. (used ~50liters since saturday!) Cant wait until this week ends!! Also hope the power doesnt go out, Norwood when out for 3hours today, and 4hours yesterday!
__________________
"Natural does not imply ideal; only acceptable or tolerable." Current Tank Info: Bonsai ZEOvit 115g BK200 Profilux, Balling method (TEC NGIII) T5: D&D 2xActinic+ Pure Ac.; Korallen Zucht: 2x FP 2xCL(dimmbar), Iwaki+Penductors. Rimless ZEO 100g, two 500g inwall dual sided starfire |
|
|
|
|
01/29/2009, 05:02 AM
|
#21 |
|
Registered Member
Join Date: Jan 2009
Location: Adelaide, South Australia
Posts: 153
|
Thanks guys.
 Yep, more photos to come. So far so good with the heat. Have had the A/C cranking for days. Tank is stable at 27-29. We had a power out today, got the generator going only to run for about 3 minutes and then run out of fuel. By the time I went and got some the power was back on.Rod.
__________________
Acromaniac |
|
|
|
|
01/29/2009, 09:14 AM
|
#22 |
|
Registered Member

Join Date: Jul 2006
Location: Bolivia, South America
Posts: 278
|
 Brilliant! Thanx for going the extra mile posting links, drawings and models!! |
|
|
|
|
01/29/2009, 11:58 AM
|
#23 |
|
Plumbing Engineer
Join Date: Feb 2004
Location: Atlanta GA
Posts: 3,260
|
two things.
1. out of curiosity why didnt you just get a marineland 300g(72x36x27)? I would think even with the custom overflow and holes it would have been cheaper then a custom made tank. 2. dont powdercoat the stand. it will still chip and then patching it is a PINA. Just get some rustolium paint, and paint it. that way if it chips or scratches, you can just sand a bit down and respray it...(experiance from when I worked at a LFS) |
|
|
|
|
01/29/2009, 12:37 PM
|
#24 | |
|
Reef Hugger
Join Date: Jul 2007
Location: Submerged
Posts: 3,253
|
Looks fantastic, congrats!
Love the drawings and the "move" video too. Quote:
BTW, Rod I have a powder coated stand and love it
__________________
-Austin Make your animals Thrive, not just Survive. |
|
|
|
|
|
01/29/2009, 01:09 PM
|
#25 |
|
Registered Member
Join Date: Nov 2001
Location: Austin, TX
Posts: 2,754
|
He's in Australia. Marineland may not sell tanks down there. Plus, he may not want or need the 36" depth.
__________________
Thanks, Chris Current Tank Info: 2015 Reef Savvy Dream Tank Winner |
|
|
|
|
|
|


