
|
|
 08/02/2010, 11:11 AM
|
#1 |
|
Registered Member
Join Date: Oct 2004
Location: connecticut
Posts: 1,699
|
156 Gallon Foam Rock Wall and In-Wall Build
I would like to document the progress of the this project. I really got the idea and motivation from Speckled Grouper. Her thread and help is really what I am going by. It will be slow moving to get the tank up and running in-wall, but I plan on constructing the foam rock wall in the coming weeks. This will be an upgrade from my current 90 gallon in-wall. Here are some preliminary photos:
156 Gallon 60 x 24 x 25 Oceanic. It is used with a nice dark blue background. I plan on using 2-3 Vortechs so I will leave the cutouts for those. Even if I don't use three, I think it will be pretty cool to see the dark background. 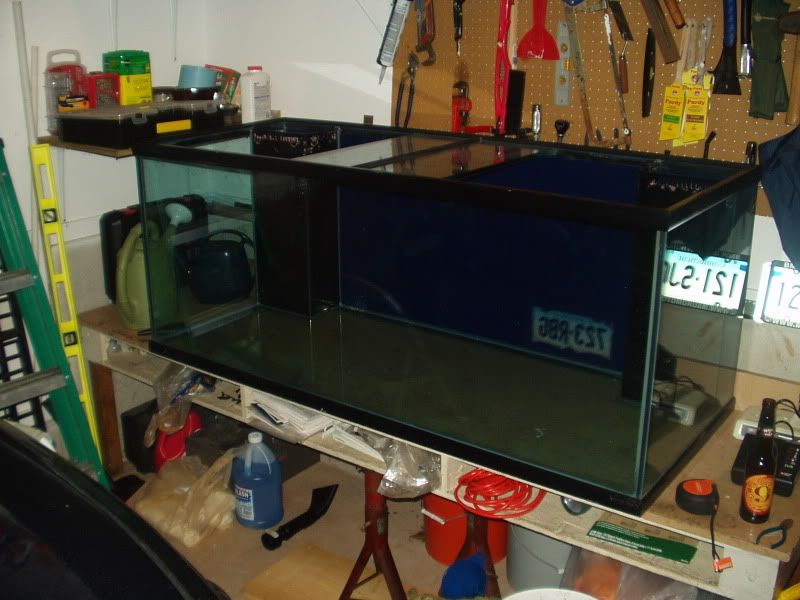 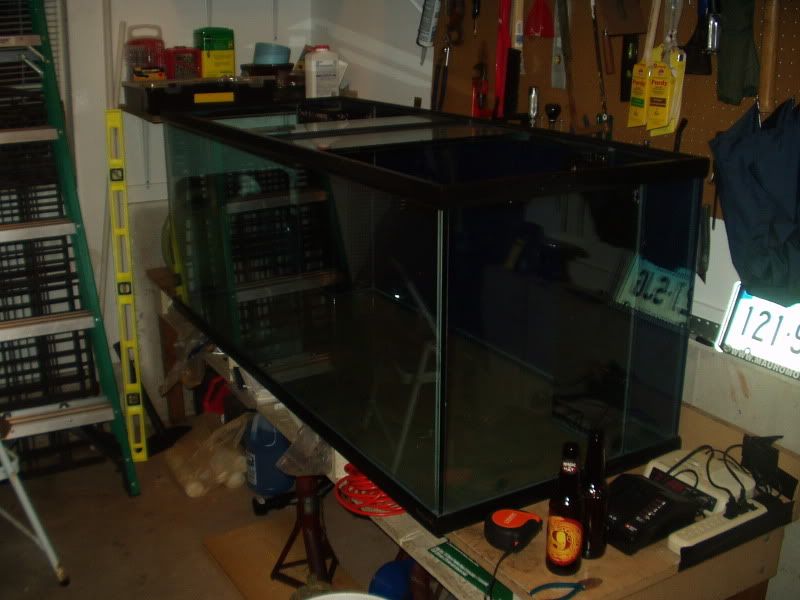 I have all the material on order. I will first begin by framing out the eggcrate. My intention is to use two pieces for the back and two pieces each for each overflow. |

|

|
|
08/02/2010, 09:06 PM
|
#2 |
|
Registered Member
Join Date: Oct 2004
Location: connecticut
Posts: 1,699
|
Started making the rock part of the wall this evening. I have some rock on order so I don't want to do too much until I see what I have to work with. The basic shape of it with eggcrate is done as well as some of the rock mounting.
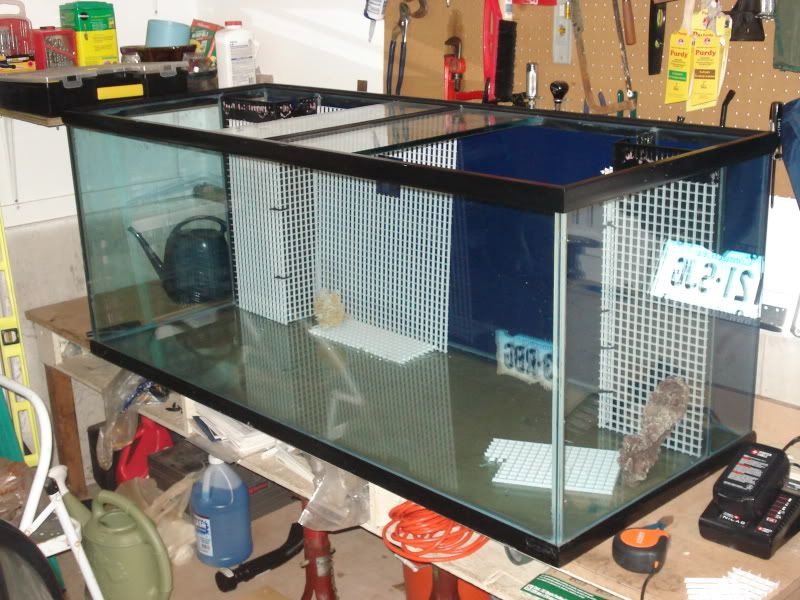  Obviously there is still a great deal of rock to add before foaming. |
|
|
|
|
08/05/2010, 07:27 PM
|
#3 |
|
Registered Member
Join Date: Oct 2004
Location: connecticut
Posts: 1,699
|
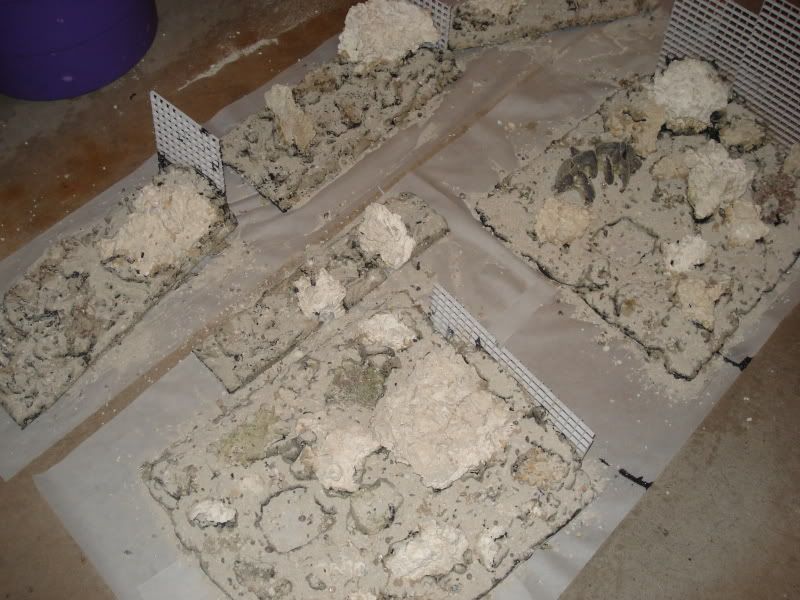
I got 40 lbs of Marco rock in today. So, the zip tie part of the project is nearly complete. I still have more rubble that I plan to just lay down when I am ready to foam. Here are some shots of how the rock looks tied to the eggcrate.
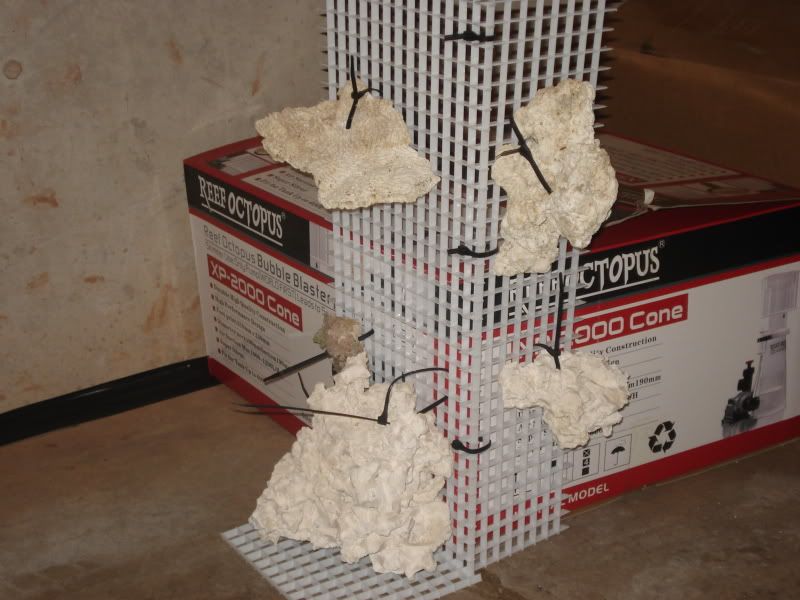 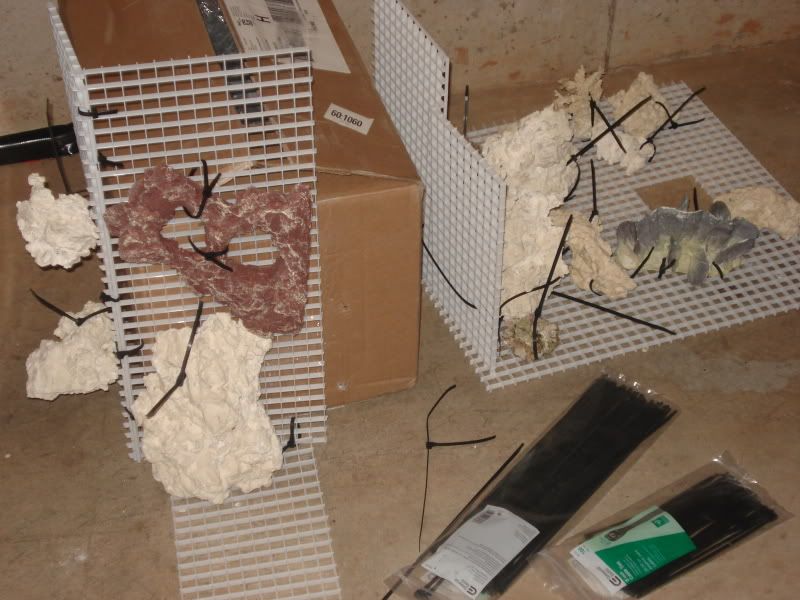 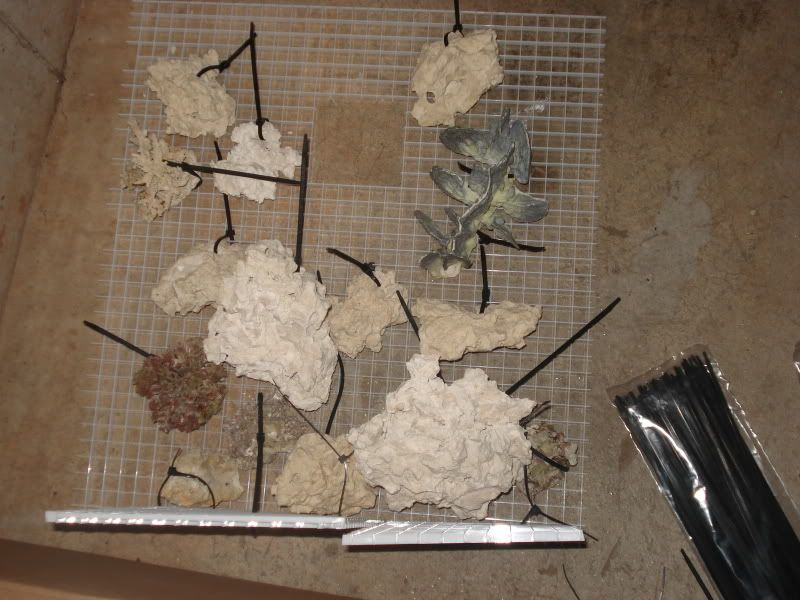 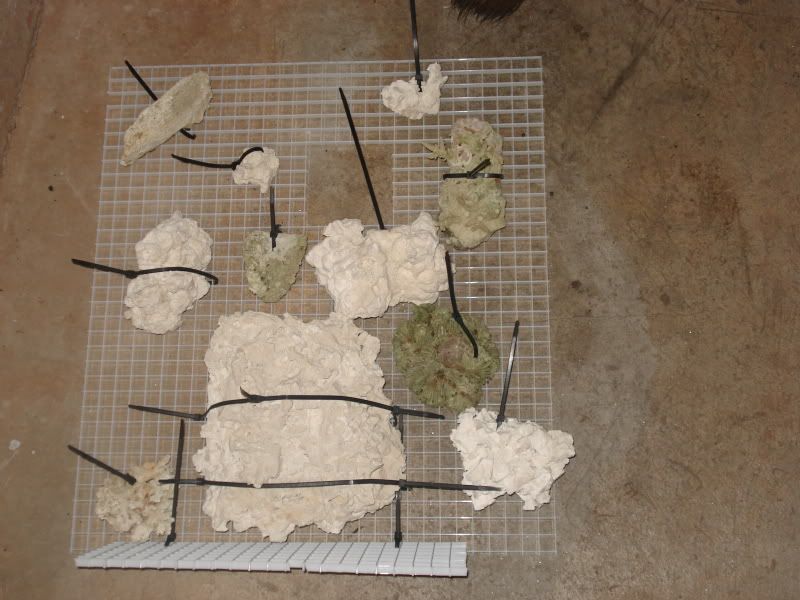 I should be getting the foam tomorrow. Next step is to lay the structures down and start foaming. This will secure the crate and give it that stability. I can then mold the foam to my liking. |
|
|
|
|
08/05/2010, 10:59 PM
|
#4 |
|
Registered Member
Join Date: Nov 2009
Location: Bergen Country, NJ
Posts: 55
|
You should see how much water the foam wall displaces, just because I'm curious.
|
|
|
|
|
08/06/2010, 05:03 AM
|
#5 |
|
Registered Member
Join Date: May 2010
Location: Maryland
Posts: 74
|
Nice tank, I'll be following along.
__________________
40 breeder mixed reef, home made LED lighting. NEW! 180 Current Tank Info: 55G reef |
|
|
|
|
08/06/2010, 06:15 AM
|
#6 | |
|
Registered Member
Join Date: Oct 2004
Location: connecticut
Posts: 1,699
|
Quote:
|
|
|
|
|
|
08/06/2010, 06:33 AM
|
#7 |
|
Plumbing Engineer
Join Date: Feb 2004
Location: Atlanta GA
Posts: 3,260
|
PUT MORE ROCKS ON! it will float like it is now trust me!
|
|
|
|
|
08/06/2010, 12:13 PM
|
#8 | |
|
Registered Member
Join Date: Oct 2004
Location: connecticut
Posts: 1,699
|
Quote:
|
|
|
|
|
|
08/07/2010, 05:21 PM
|
#9 |
|
Registered Member
Join Date: Oct 2004
Location: connecticut
Posts: 1,699
|
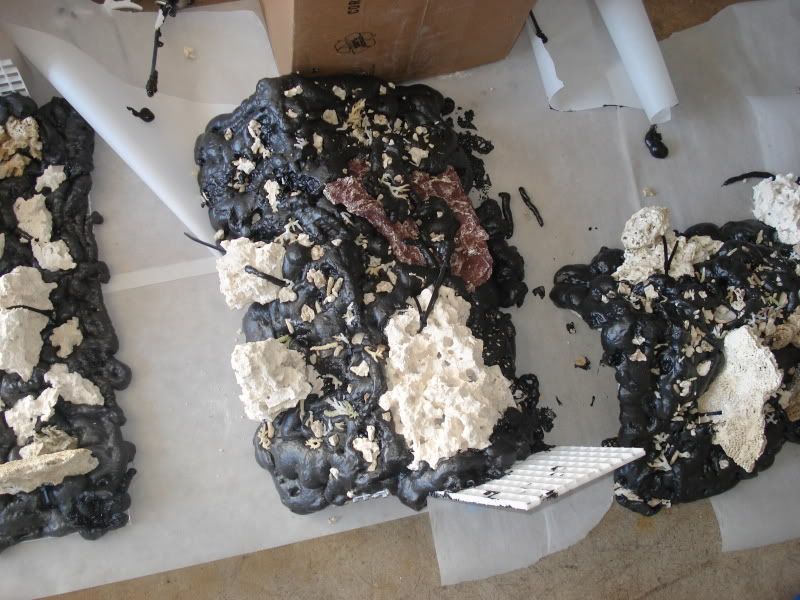
I started foaming today. I used four cans - one for each piece. Since I ordered five, I should be good once they are fitted into place. The last can can be used to close the seams and touch up any area I missed. You definitely need to wait a good 30 minutes for the foam to become tacky - otherwise, it just creates a mess. I will wait a good 24 hours now, fit them into place in the tank, cut the excess, wait another day or two, then start the epoxy step.
 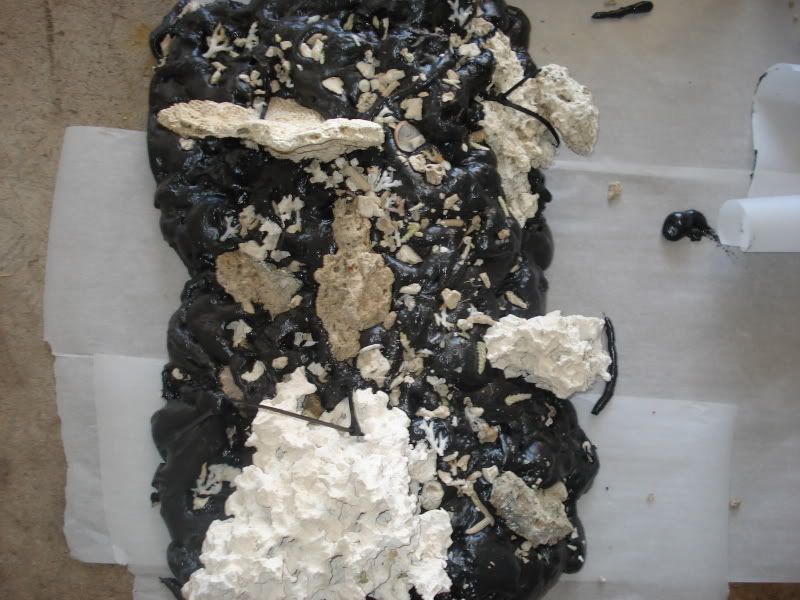  
|
|
|
|
|
08/09/2010, 08:04 PM
|
#10 |
|
Registered Member
Join Date: Oct 2004
Location: connecticut
Posts: 1,699
|
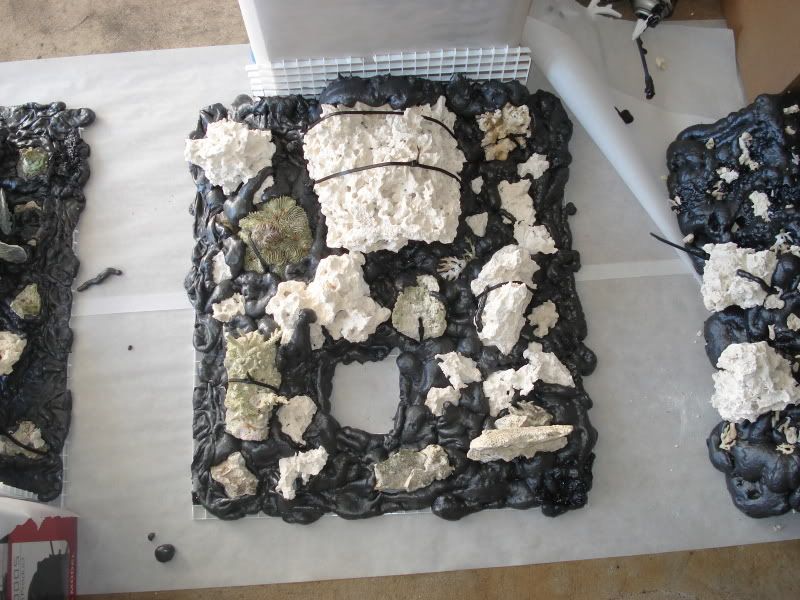
Structures cut to tank layout. Overflow structures had to be cut in half. I really want to silicone all pieces to the back, so that is why I am doing this now. Next, epoxy and apply substrate to remove the eye sore that is the stark black of the foam. I am liking it very much so far - pictures don't do it justice.
    Once it has all been siliconed, I will touch up the foam with the corners and so on... |
|
|
|
|
08/10/2010, 01:12 AM
|
#11 |
|
Registered Member
Join Date: Dec 2006
Location: kaukauna, wi.
Posts: 3,879
|
the white rocks will get darker and the pond foam will get grayer...all in all...in 6-9 months you wont be able to sell the difference by color alone
__________________
PLEASE DONT USE GREAT STUFF (THE YELLOW STUFF) IN YOUR TANK........USE POND FOAM (THE BLACK STUFF).. I BEG YOU! Great stuff====$5 a can 24-48 hour cure Epoxy to cover it====little as $5 for small projects or up to $100+ for larger projects and another 24-48 hour cure I hope you covered it well cuz if you didnt it will start to break down in a few months sand is another added cost to cover up the yellow. Pond foams====$9-$15 a can 24-48 hour cure DONE! You can cover it with sand if you want to (YOU DONT HAVE TO) though but thats added cost again Current Tank Info: 75 gal under way |
|
|
|
|
08/11/2010, 08:39 PM
|
#12 |
|
Registered Member
Join Date: Oct 2004
Location: connecticut
Posts: 1,699
|
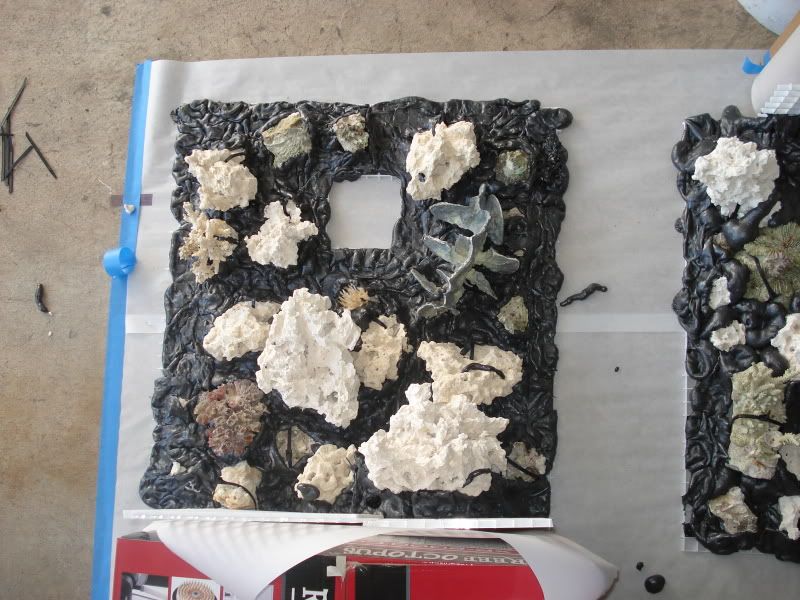
Epoxied and added the substrate earlier this evening. Here are some pics:
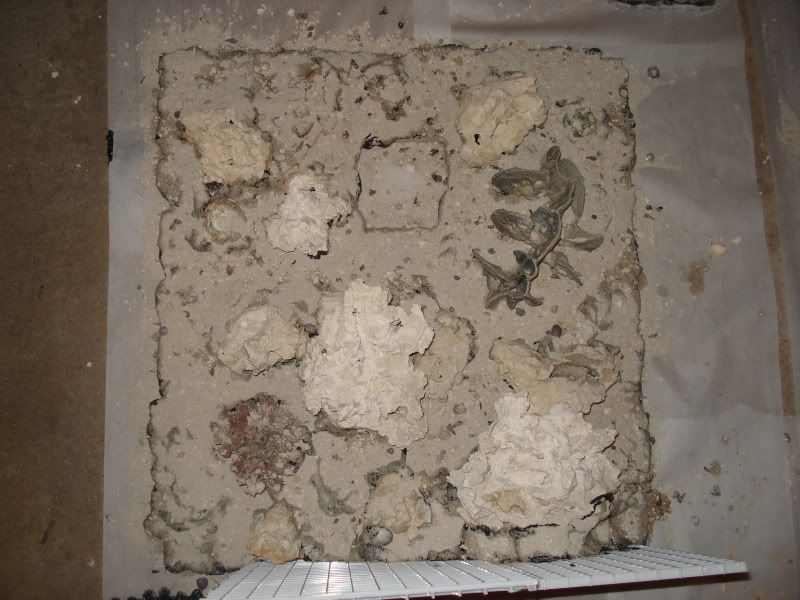 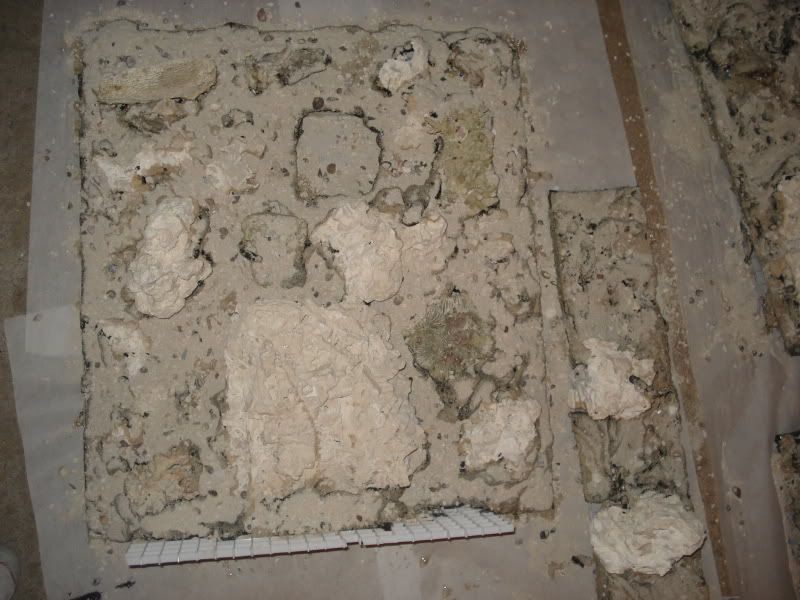  Now I need to let them dry. I didn't go through nearly as much substrate as I thought. This is fine though - I will keep it for the bottom once I get the tank up and running. Next, after they dry is to epoxy the backside just to be sure. Then, fit them into the tank, silicone them in place, foam the crevices and joints, epoxy any foam, and apply the rest of the substrate. It is a fun project that is looking very good. |
|
|
|
|
08/12/2010, 10:07 PM
|
#13 |
|
Registered Member
Join Date: Mar 2009
Location: Clinton
Posts: 1,025
|
NICE WORK! I'm just curious, did you make any caves through the foam? I always wondered about doing a foam wall build and thought it would be cool to put in some rubber hose or pvc and zip tie that in then foam around it to make caves and stuff. With a rubber hose you could make it turn a corner and use a Y in there to branch off or something. I'm not sure how well it would work but always wanted to try it out.
Great Job, I can't wait to see the end results! Makes me want to try it.
__________________
RG 120 display -40 sump - ATB 840 skimmer - 2x250 MH, 2x54 Actinics, Ice Cap LED moon - Vortecs and Koralias for flow. SPS dominant. Current Tank Info: 120g tank 40g sump 2x250 watt MHs 2x54 watt actinics ATB 840 skimmer Vortecs and Koralias for flow |
|
|
|
|
08/15/2010, 08:25 PM
|
#14 | |
|
Registered Member
Join Date: Oct 2004
Location: connecticut
Posts: 1,699
|
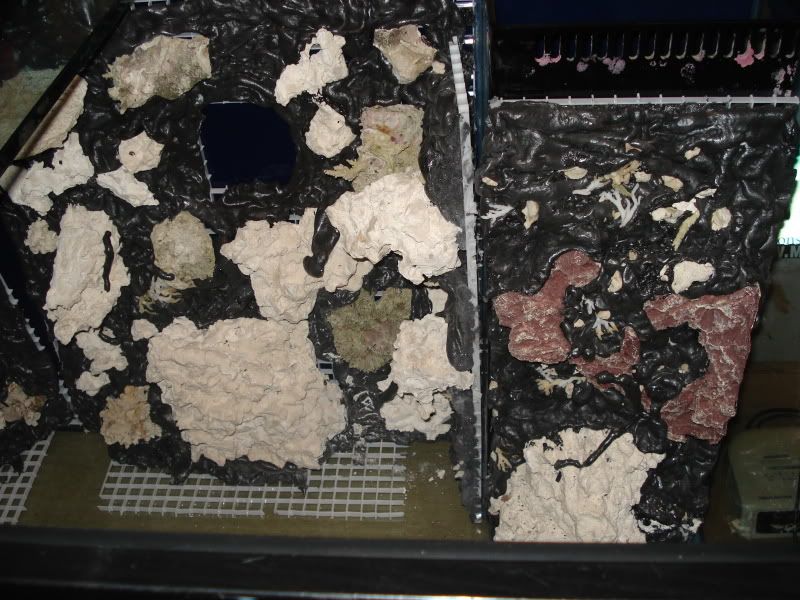
Quote:
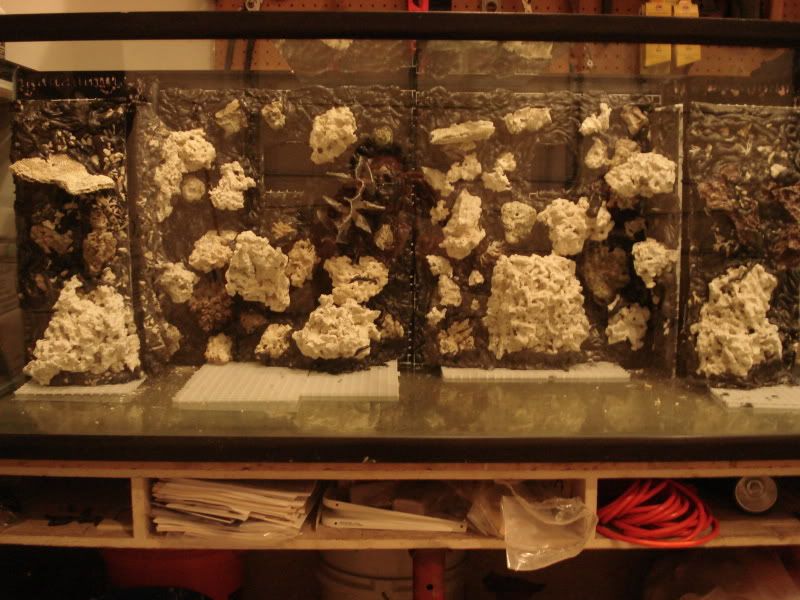
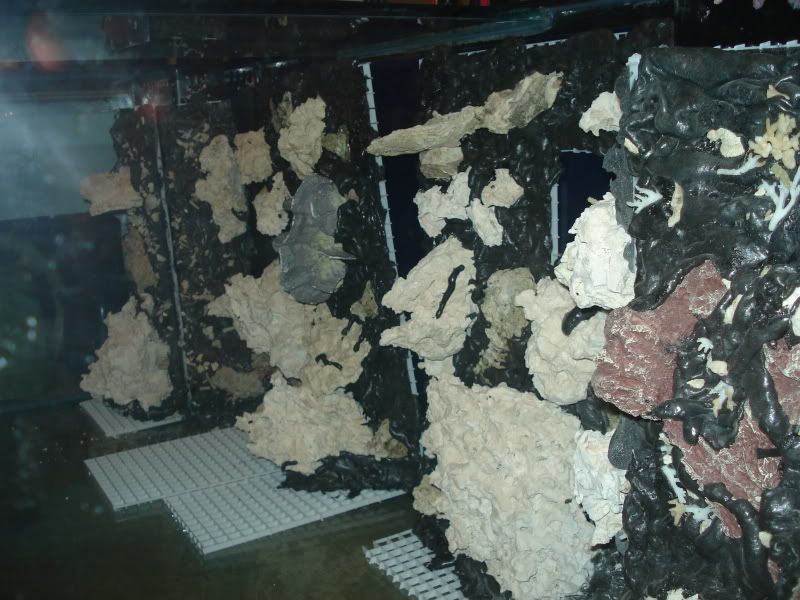
Left side: 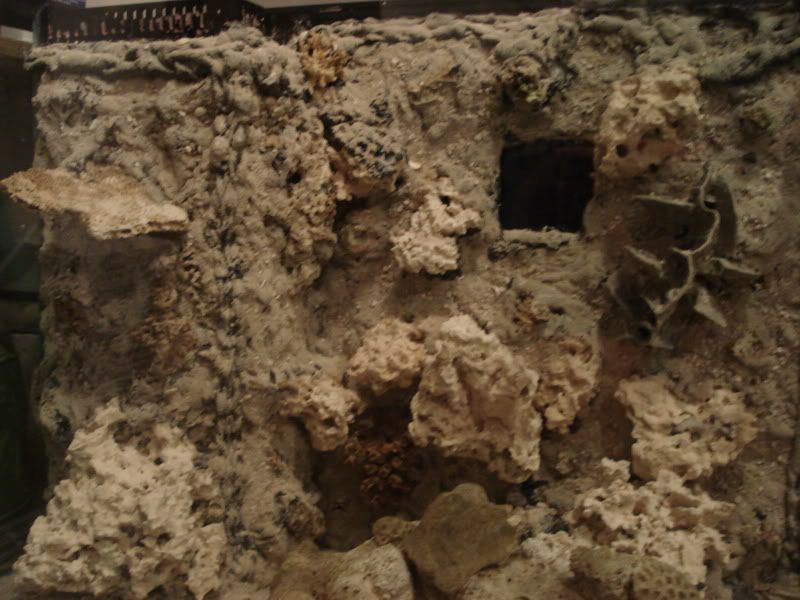 Right side:  Center: 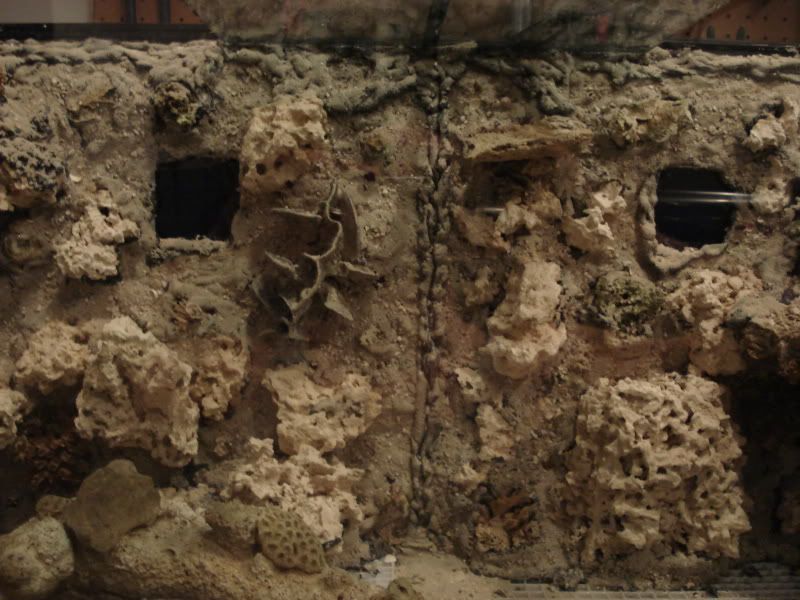 front view : Angled front shot -disregard the two stand alone pieces in front: 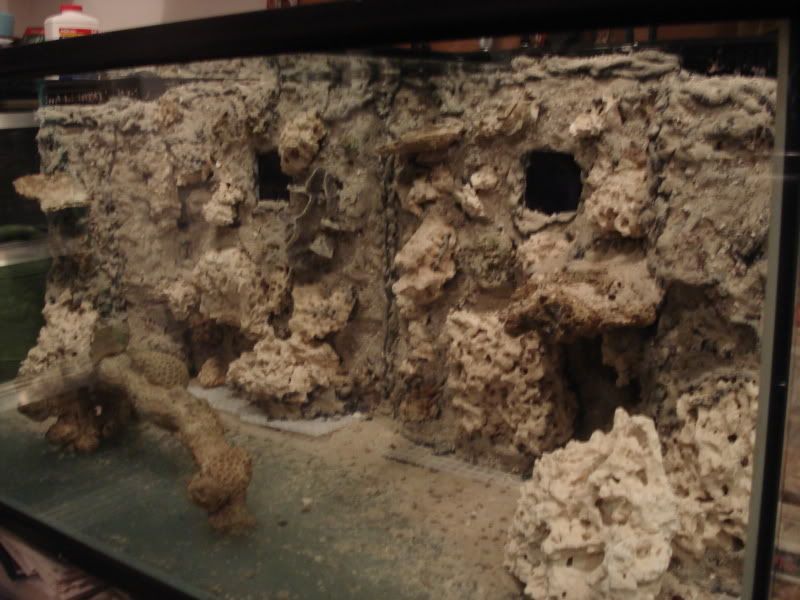 As I mentioned in the first post, this will be an eventual in-wall build, but that is on hold for quite some time. I will take a long time to slowly cure this. |
|
|
|
|
|
08/15/2010, 09:31 PM
|
#15 |
|
Registered Member
Join Date: Oct 2006
Location: Barrie, Ontario, Canada
Posts: 6,639
|
foam wall and dry rock need no "curing" so to speak...only cycling..
|
|
|
|
|
08/16/2010, 10:49 AM
|
#16 |
|
Registered Member
Join Date: Oct 2004
Location: connecticut
Posts: 1,699
|
Yah, I just figured in the months that I am waiting for the house to be built, I might as well get some used saltwater in there from water changes and get some water flow. It can't hurt.
|
|
|
|
|
08/16/2010, 11:04 AM
|
#17 |
|
Registered Member

Join Date: Jul 2009
Posts: 174
|
I'm tagging along. I love watching DIY projects like this. The rock wall came out looking pretty good. Can't wait for you to get water in there with some fish and corals.
|
|
|
|
|
08/23/2010, 12:08 PM
|
#18 |
|
Registered Member
Join Date: Jun 2005
Location: Ocoee, Fl
Posts: 1,580
|
Im tagging along for the build. I just started the foam wall for my 120 yesterday.
|
|
|
|
|
08/23/2010, 12:13 PM
|
#19 |
|
Registered Member
Join Date: Jun 2005
Location: Ocoee, Fl
Posts: 1,580
|
What Exopy did you use?
|
|
|
|
|
08/23/2010, 07:42 PM
|
#20 |
|
Registered Member
Join Date: Aug 2009
Posts: 198
|
I would like to offer one suggestion; Try to break up the rectangular outlines a bit. Nature rarely has straight lines. A few rocks poking out and around vertical corners along with foam contours that round the corners can do wonders for making things look more natural.
Mark |
|
|
|
|
09/13/2010, 10:04 AM
|
#21 |
|
Registered Member
Join Date: Jun 2005
Location: Ocoee, Fl
Posts: 1,580
|
Any updates yet?
|
|
|
|
|
09/13/2010, 04:00 PM
|
#22 | |
|
Slayer of Mice
 Join Date: Jul 2010
Location: Augusta, Ga
Posts: 1,338
|
Quote:
__________________
America's best are not in America. Current Tank Info: 140 Gallon DSA in-wall, foam/rock wall, DIY LED, 40g sump, Precision Marine Skimmer, 100 gallon refugium, NO3, PO4,NH3/4 undetectable, Mg, Ca, KH...eeehhhhhh? |
|
|
|
|
|
09/23/2010, 08:04 PM
|
#23 |
|
Registered Member
Join Date: Oct 2004
Location: connecticut
Posts: 1,699
|
I will post a pic soon. It's done and sitting in a basement ready to be put to good use.
|
|
|
|
|
09/24/2010, 01:39 AM
|
#24 |
|
Registered Member
Join Date: Apr 2007
Location: Las Vegas
Posts: 503
|
nice work..im doing my wall now....
[IMG]http://i52.*******.com/fdav5w.jpg[/IMG] [IMG]http://i52.*******.com/10qwh8i.jpg[/IMG] [IMG]http://i54.*******.com/250nfns.jpg[/IMG] [IMG]http://i53.*******.com/2zxxe9d.jpg[/IMG] sry just wanted to show you 
__________________
The great question... which I have not been able to answer... is, "What does a woman want? Current Tank Info: in the works |
|
|
|
|
02/23/2011, 12:24 PM
|
#25 |
|
Registered Member
Join Date: Jun 2005
Location: Ocoee, Fl
Posts: 1,580
|
How is the tank doing?
|
|
|
|
 |
|
|
 Similar Threads
|
||||
| Thread | Thread Starter | Forum | Replies | Last Post |
| 180 Gallon Foam Rock Wall Penisula in 2 weeks | Mav2 | Large Reef Tanks | 40 | 11/27/2011 03:28 AM |
| 29g build with foam/rock wall | OodleyBoodely | Do It Yourself |
20 | 02/14/2011 10:03 PM |
| Live rock walls/sides in a fish tank. | crazinezz978 | Lighting, Filtration & Other Equipment | 3 | 12/14/2009 04:33 PM |
| 10 gallon foam rock wall build | marve467 | Nano Reefs | 13 | 12/13/2009 05:26 PM |
| FS 29 gallon Foam rock set up | markviiisvt4 | Northern Ohio Reef Keepers | 0 | 12/08/2009 02:00 PM |


