


|
 |
|
|
#1 |
|
Registered Member
Join Date: Jul 2011
Location: Illinois
Posts: 83
|
180 inwall tank/man cave build
Well all, I after years of just reading posts and just recently signing up on rc, I figured I would document my new little project here on the boards. Having read a few other build threads on here I noticed that there were not to many that were starting where I was at, and the ones that did I didn't have answers to the questions I posed. So, I figured I'd document my journey and hopefully someday it can help someone else out. I expect this to be a very long one so enjoy the ride!
To start, I'm at the very very beginning. Nearly all the projects needed to be done I will be doing myself with a few things contracted out. As you'll see in the picture below I have just finished putting I'm my subfloor. I also have the 180 gallon tank along with a 50 gallon sump system. After 3 days I have squared where I will be placing the footers for my framing. If you look to the left this is where I will have the inwall tank. There are 2 poles that the tank will need to go between. There's 8 feet between each pole.  basement with finished subfloor. 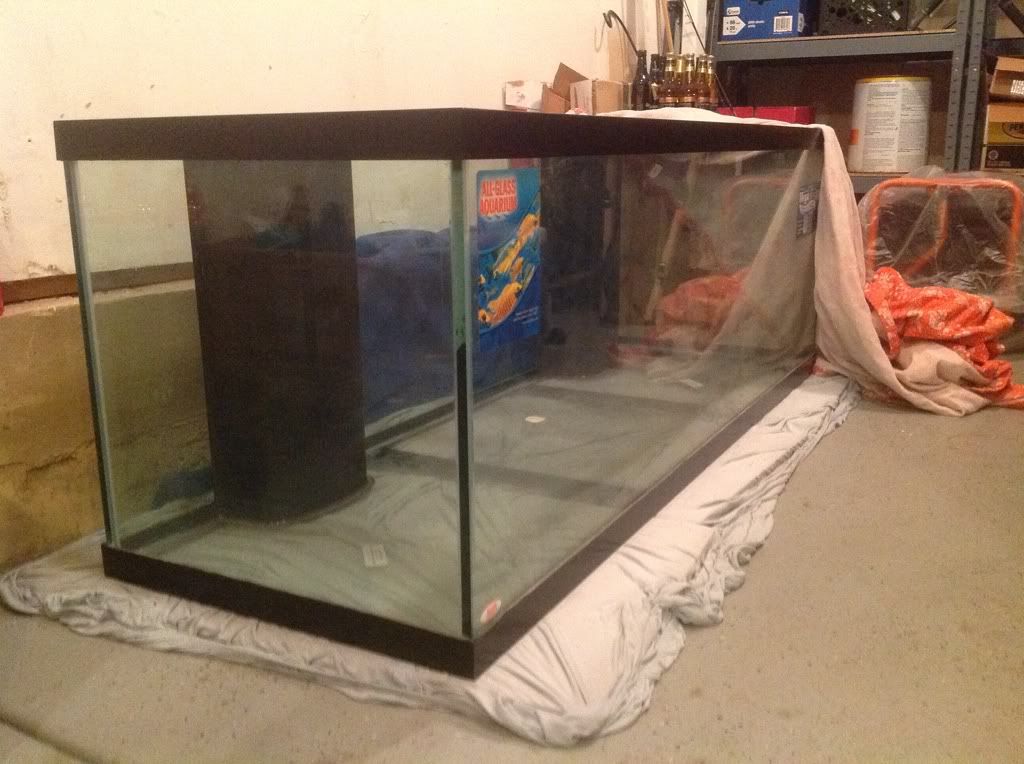 180 gallon tank sitting in the garage.
__________________
In progress: 180 in wall. |
|
|

|
|
|
#2 |
|
Registered Member
Join Date: May 2012
Location: Huffman/Houston, TX
Posts: 120
|
Nice...AND a mancave. Double score!! Will this be viewable from both sides? You should make a stand to put 2 40g tanks(QT and extra)
__________________
One mind, any weapon. Current Tank Info: 60x36x18(170g) reef w/65g sump APEX 2 MP-40Wes Dart/Snapper hybrid |
|
|

|
|
|
#3 |
|
Registered Member
Join Date: Mar 2003
Location: Odessa, Tx
Posts: 63
|
+1 for the QT tank
What type of reef are you planning on running? Have you decided on equipment yet?
__________________
"One man's vulgarity is another man's lyric" --J. Harlan-- Rory |
|
|

|
|
|
#4 |
|
The DQ King
Join Date: Apr 2010
Location: Chicago (McHenry)
Posts: 2,414
|
Damn dude I wish I had that space, I just got done with my 180 g build, well it's almost done.
I suggest painting it or getting window tint so u can't see throuh prior to setup. Qt tank is a plus, man u have endless things with that room. Have u thought out equipment yet? Skimmer, lights, controller, flow, return..ect ect?
__________________
-Dave Current Tank Info: 40g RIP. 300g system, 180g display. |
|
|

|
|
|
#5 |
|
Registered Member
Join Date: Jul 2011
Location: Illinois
Posts: 83
|
@below... Just the front will be viewable. I do have a 55 gallon tank up and running, and a 10 gallon qt tank. In terms of in wall, I'm just going to put the 180 in wall, and keep the qt in the back part of the basement.
@therory.. I'm love the fish more than the corals, so right now I'm leaning toward a FOWLR tank. @granny... I may change my mind when I get to it, but I was going to use bulletin board paper to cover the tank.(thanks to my wife I have seeming endless rolls of the stuff) In terms of equipment I got a buch of stuff for free (some of which I don't need and will be giving away later on). I have two iwaki external return pumps. A moded asm skimmer that I have no clue what one of the mods is for, and I don't have the pump for it. Lighting wise I have not thought about types of light, but I have been thinking about outlet placements after the tank goes in. I may put in some "special" lighting but that remains to be seen. Right now I'm more worried about placement of the tank in the wall in comparison to the rest of room. I'm hoping to build a bar that curves around to the side wall and have the tank at bar stool height, basically giving the bar an extra seat. After screw my footers in Im going to start drawing out different basement setups.
__________________
In progress: 180 in wall. |
|
|

|
|
|
#6 |
|
Registered Member
Join Date: Jul 2011
Location: Illinois
Posts: 83
|
UPDATE:
This week I was able to put my "footers" down. While I had everything already chaulked out, I ran into a little problem in one corner as I noticed that the new wall would need to come out a few more inches. Now that this stage is done I can start building the frames. The past week was spent drawing up plans for where to put the tank. Here is a picture of with the footers nailed in.  Here are the demensions of the room: 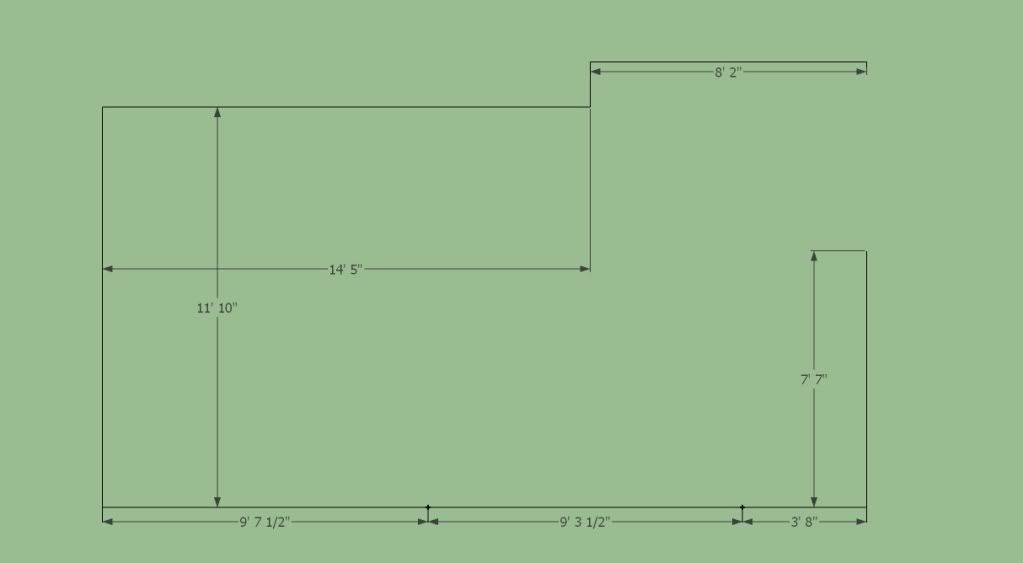 Here is a 3D view of what the room will look like:  With the inwall tank my main concern is: how high should it be? On the 3D image I have it set for 3'6" off the ground. This puts it right at the top of most couches. Should it go a little higher? The location of the tank cannot change to much, I could move it at most a foot left or right. I have also decided to utilize my 55 Gallon tank as well. I should have plenty of space for a bar, back bar, sink(maybe), fridge, and storage space, so I think I'll also build an in-bar tank.(this is one of the last pieces of the build though) Any thoughts, ideas, suggestions when building the frame for the tank?
__________________
In progress: 180 in wall. |
|
|

|
|
|
#7 |
|
Shogun
Join Date: Apr 2009
Location: Illinois, Montgomery
Posts: 2,048
|
I would just run the 180 unless the share a common sump. I never have good luck when i add new set ups that run seperate from my main tank.
__________________
250 DD, Nanoseascreations custom sump and reactor with Seaslug bio pellets , (2) 400w MH Lumen max2 (20k Radium) and (2) 80w ATI aqua blue plus t-5's ,(2) Tunze 6105's w Tunze 7095, (2) Vortech mp40w es,ReefKeeper Elite, JBJ ATO, Reef octopus extreme 200, and Arctica 1/5 chiller. RR 20l frag tank, Nova Extreme light with ATI bulbs, (12) bulb d.i.y. reefledlights.com , (1)Vortech MP10es. " My girlfriend hates when I use the F word in any of it's various forms, fish, fish tank, fish store...." " Ninja fish trips weekly" |
|
|

|
|
|
#8 |
|
Registered Member
Join Date: Jul 2011
Location: Illinois
Posts: 83
|
I was thinking of having the bar tank be a freshwater/cichilid tank.
__________________
In progress: 180 in wall. |
|
|

|
|
|
#9 |
|
Registered Member
Join Date: Jul 2011
Location: Illinois
Posts: 83
|
Seems like most posts I'm reading here are selling posts, so I thought I'd give a quick update on my build.
Havn't updated a lot because most of the build has revolved around the room itself: framed, hung drywall, mudded and sanded, ran electrical. Of course work, having another kid, and all the wife's "projects" get in the way of getting this done in a more timely manor. Just got to the point of cutting out the hole for tank in the wall, and the tank has been moved(finally) from the garage to the basement. Take a look.  Currently working on 3 things: Tank stand to be placed behind the wall. Bar. Priming the walls.
__________________
In progress: 180 in wall. |
|
|

|
|
|
#10 |
|
Registered Member
Join Date: Jan 2009
Posts: 69
|
Looking good! You went higher than 36" right? I like it
|
|
|

|
|
|
#11 |
|
Registered Member
Join Date: Jul 2011
Location: Illinois
Posts: 83
|
44". Didn't know what I was going to do with the bar when I was framing and thought no matter what I went with higher would be better.
__________________
In progress: 180 in wall. |
|
|

|
|
|
#12 |
|
Registered Member
Join Date: Jul 2011
Location: Illinois
Posts: 83
|
Need some suggestions... Below is opening from the back side. Any suggestions on the best way to build the stand?(or more importantly, what NOT to do).
I was thinking of using the wall studs for front support(they're ever 8"), then building off of that with 4x4s in the corners with the 2x4s on top. 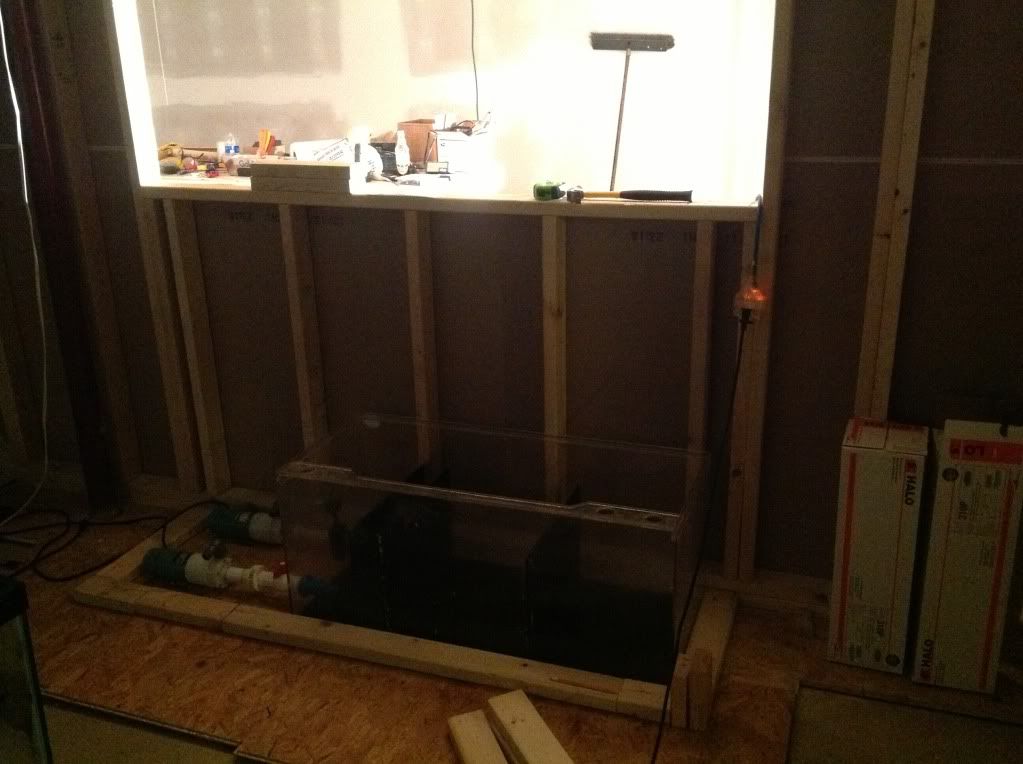
__________________
In progress: 180 in wall. |
|
|

|
|
|
#13 |
|
Registered Member
Join Date: Jul 2011
Location: Illinois
Posts: 83
|
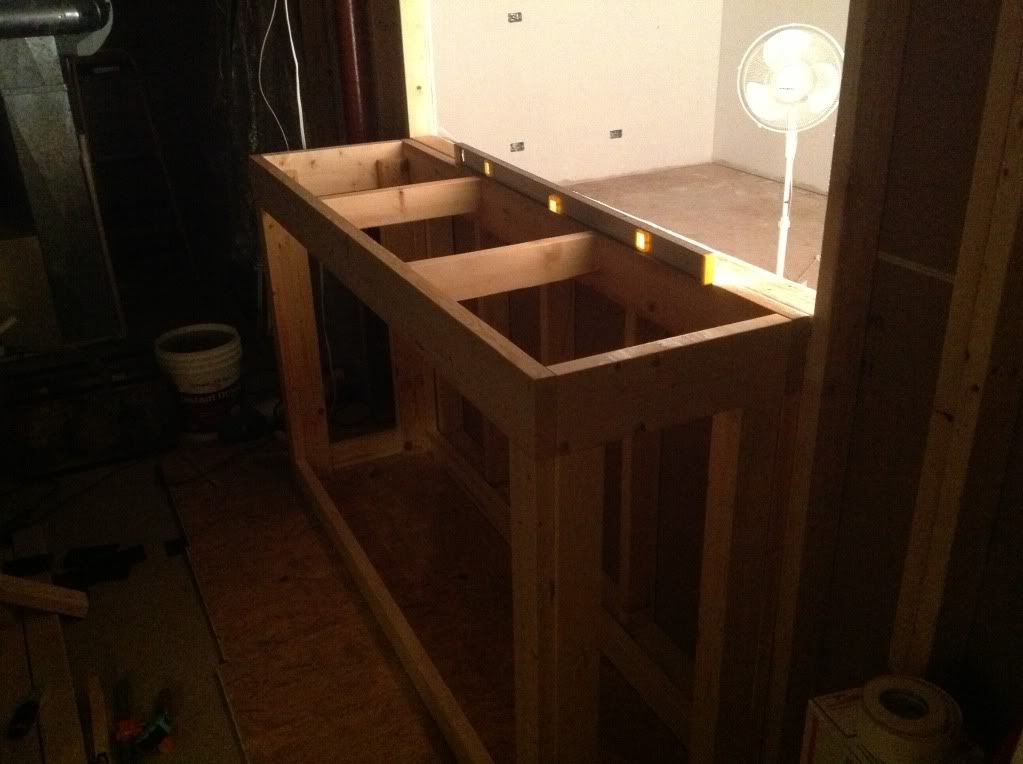
Got the stand built, still need to put plywood on the top, and build a little stand on the bottom for the sump.
__________________
In progress: 180 in wall. |
|
|

|
|
|
#14 |
|
Registered Member
Join Date: Feb 2010
Location: Pleasant Prairie
Posts: 478
|
Looks good man
|
|
|

|
|
|
#15 |
|
Registered Member
Join Date: Sep 2006
Location: a fine sturdy box by the airport
Posts: 3,430
|
check your pm

|
|
|

|
|
|
#16 |
|
Registered Member
Join Date: Jul 2011
Location: Illinois
Posts: 83
|
__________________
In progress: 180 in wall. |
|
|

|
|
|
#17 |
|
Registered Member
Join Date: Jul 2011
Location: Illinois
Posts: 83
|
__________________
In progress: 180 in wall. |
|
|

|
|
|
#18 |
|
Registered Member
Join Date: Jan 2009
Posts: 69
|
Dam, looking good
|
|
|

|
|
|
#19 |
|
Registered Member
Join Date: Aug 2005
Location: Lemont
Posts: 293
|
I would think about some kind of exhaust fan for your equipment room. The salt creep will go every where!!!!
|
|
|

|
|
|
#20 |
|
Registered Member
Join Date: Jul 2011
Location: Illinois
Posts: 83
|
__________________
In progress: 180 in wall. |
|
|

|
|
|
#21 |
|
Registered Member
Join Date: Jul 2013
Location: Hickory Hills, Illinois
Posts: 65
|
Sweet build. I wish that I was in the hobby when I did my mancave. The bar tank is always a great idea. Good Luck with the Build.
|
|
|

|
|
|
#22 |
|
Registered Member
Join Date: Jan 2012
Location: Bolingbrook,IL
Posts: 172
|
I'm going to tag along your build looks great so far. Where in IL. are you?
|
|
|

|
|
|
#23 |
|
Registered Member
Join Date: Aug 2008
Location: Wichita KS
Posts: 58
|
i am going to be following this one.
|
|
|

|
|
|
#24 |
|
Registered Member
Join Date: Jul 2011
Location: Illinois
Posts: 83
|
Just finished dry fitting everything. The picture below is of the return. I could get a good picture of the drains due to the lighting.
I have two pumps but only one will be running at a time. The other is a back up(I just happen to have two so I figured why not it set it up with a backup!).that is why both pumps come to a T, so I can switch off the pumps, change the valves and they are traveling the same path. At the top you can see a ball valve, which is where I can add a manifold, or a recirc line. The rest of the line goes up to the tank. Any recommend changes? 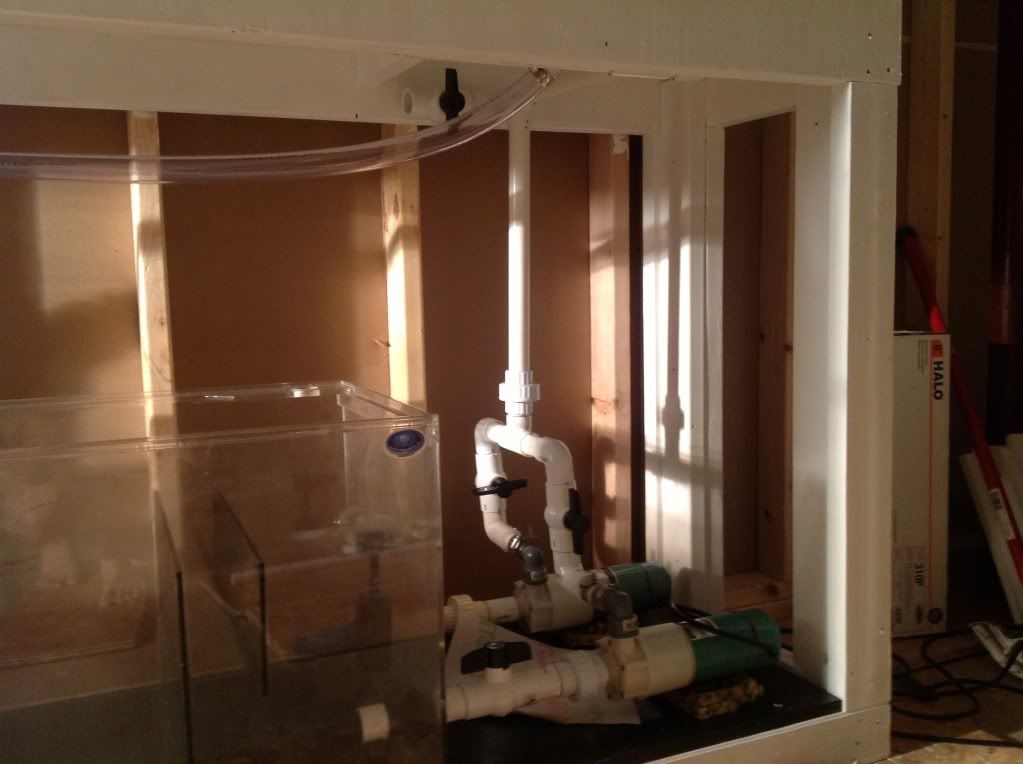
__________________
In progress: 180 in wall. |
|
|

|
|
|
#25 |
|
Registered Member
Join Date: Jul 2011
Location: Illinois
Posts: 83
|
Also after getting everything up I noticed this little guy
 n looking scratch) n looking scratch)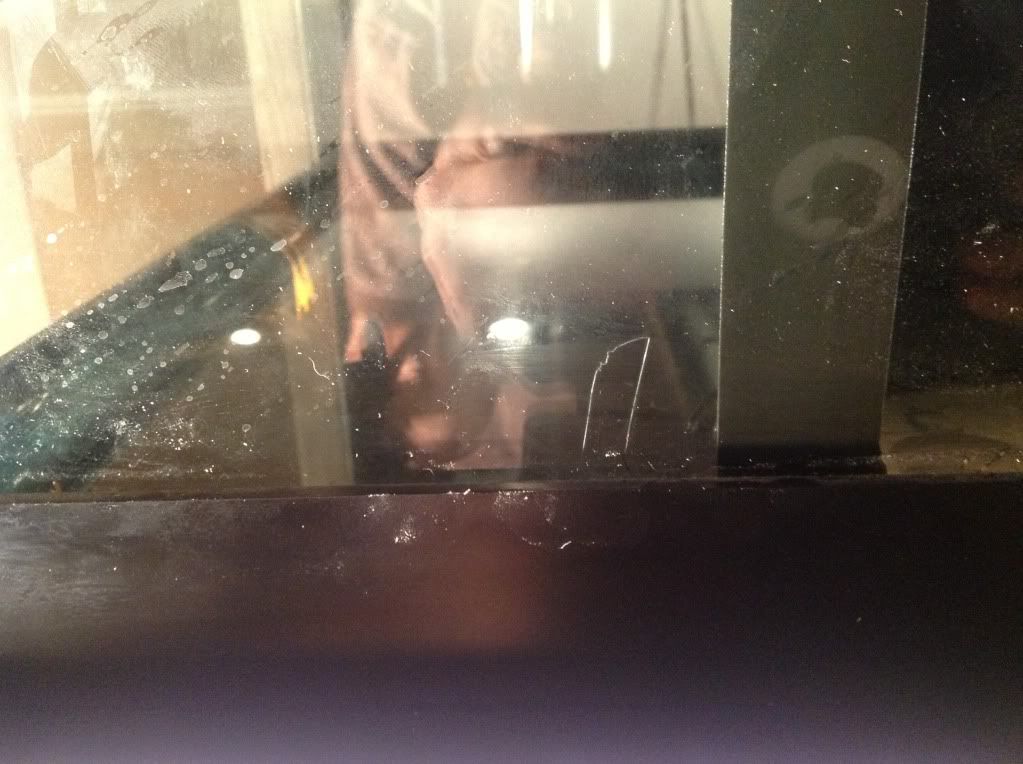 When I did a water test there is no leaking. Since it is on the glass only, should I use aquarium silicone and cover it just to be safe? The silicone would then be covered mostly by substrate.
__________________
In progress: 180 in wall. |
|
|

|
 |
| Tags |
| 180 gallon, build, inwall |
|
|