


|
 |
|
|
#1 |
|
Registered Member
Join Date: Jul 2002
Location: Wylie, TX
Posts: 473
|
My dear daughter mentioned wanting me to get another fish tank about a month ago. I mentioned it to the dear wife, but also stated that I wanted a reef again and not just another FW tank. We don't have the money to set one up properly, so we passed on the idea.
Fast forward a month and I'm taking an afternoon walk with a coworker. We're talking about our garages and how we have our storage built-in and he mentions that he'd have a lot more room if this 'fish tank' was sitting in the middle of it. One thing leads to another and we decide I would come get it. He also mentioned he had some equipment for it. I tell the wife and she says OK. The tank is a 120 Gallon Cube (30" on each side), with two 3" holes drilled in the back. One dead center and the other in the top corner. I get to his house and he has the tank sitting at the front of the garage with about 7 large containers of parts. We load everything he has up into my little SUV and I head home not really knowing everything in my car. I've since gone through everything and here's a full list of equipment. Tank: 120Gallon Cube Sump: Pro-clear 150 Pro (wet/dry) Protein Skimmer: AquaC Remora 2x Phos Reactor 150 Random Calcium Reactor (can't find make or model on it) OceansMotion 3 2x Won ProHeat 350W Current Chiller 2646 HB Water Systems RO/DI (4 stage 75GPD)(needs new filters) Lighting: IceCap 660-009 (ballast + end caps) Pumps: Various MaxiJet pumps 2x Mag 9.5B 1x Mag 3 Two large pumps from MDM Incorporated (80880 and 80250) Iwaki MD-20RLT Mak4 A40LX PinPoint PH monitor (needs new probe but has AC adapter) There's some other equipment that I haven't tested, but all the above appear to be working. Here's where I need your help. 1) Does anyone know what the 'two large pumps' actually are? There's nothing on MDM's site. I'll probably email them on Monday One says 'sequence' on the motor, but the other is a generic Baldor motor. 2) How would you use the above equipment? 3) Which pumps would you use? I was thinking one of the smaller 'big' pumps on a closed loop with the OM3 and the largest pump for my main return 4) The tank came with a bunch of test chemicals, treatment, and dosing chemicals. I'm assuming after 2 years this is all bad and should be thrown away? 5) I have the option of either using the above wet/dry as my sump or I also have another coworker willing to sell me a 40B. My thought was to buy the 40B and just put the above wet/dry in it to give me a 3-chamber sump. 6) I've never used these large external pumps before. Do they self prime, or do I need a bulkhead in the sump so the water just flows into the inlet? 7) The company that made the RO/DI is out of business. The replacement filter set is 'UDIFK'. Is this a generic designator? 8) The tank has been dry for over a year and a half. Some of the silicone looks 'dry' for lack of a better term. How much of a concern is this? Should I just fill it up and let it sit for a week to see how it does? I can take better pictures if needed. The chiller comes on when you plug it in (the fan kicks on), but the controller is shot. It looks like I can buy a replacement controller, however I was thinking about controlling both heaters and the chiller with an Arduino. Mainly because I've heard horror stories about the above heater's failing 'on' instead of 'off'. Any thoughts? The pinpoint PH monitor doesn't have a probe, but after a very short research, it looks like it's well worth the cost for me to replace it. Sorry for all the questions. I've been out of reefs for nearly 10 years now. A lot of the knowledge is coming back to me, but I'm also finding that some of the recommendations have changed since back then. Pictures: Everything in the little SUV: 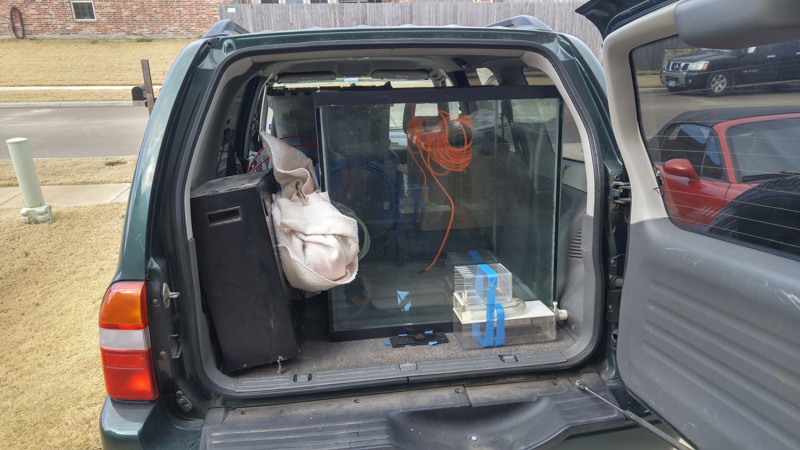 Wet/Dry with the two PHOS150's and RemorC hanging on the edge. I removed the media trays and the built-in protein skimmer, but they're off to the side: 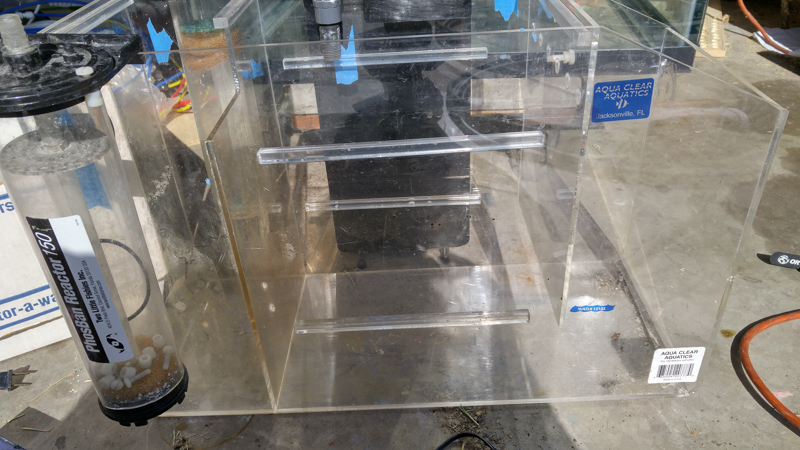 Tank:  Model on the pump side of the 'big' pump: 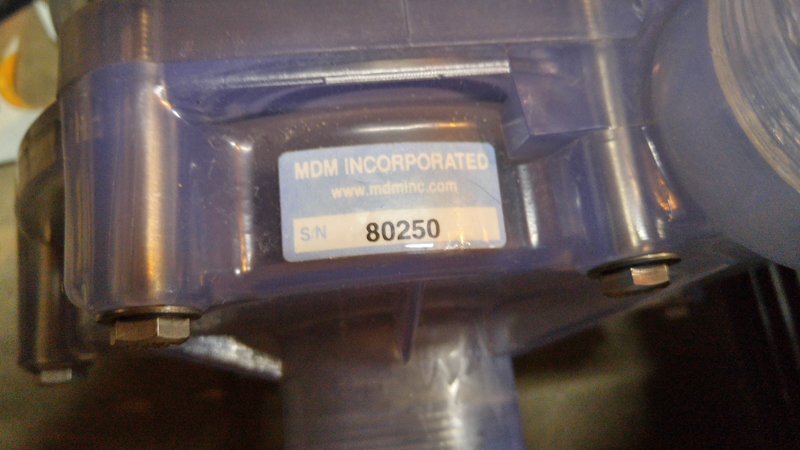 Unknown Calcium Reactor: 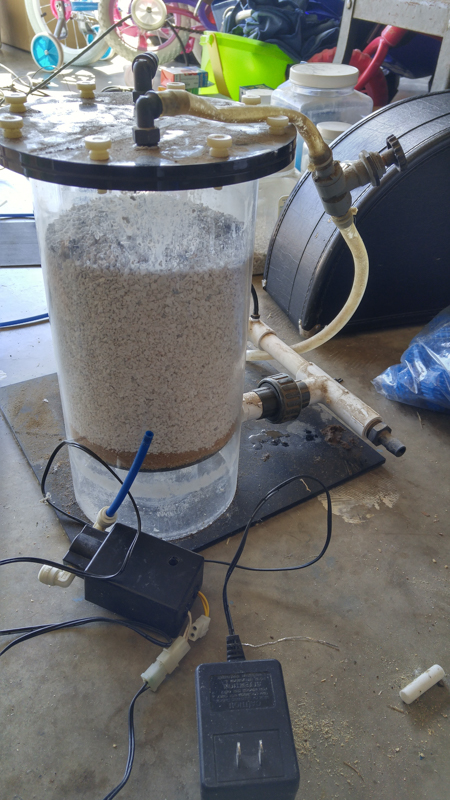 I can take pictures of anything else if someone wants to see it. I have yet a third coworker that is going to help me build a steel stand for this thing. Then I'll use wood panels to hide all the gear. I'm going to try to use magnets to hold the panels on. I'm extremely excited to get started on all of this, but a bit scared at the same time  Just realized one question ya'll will probably ask... I have no idea what I'll be putting in it. Right now the only two guarantees is a bi-color blennie and a flame angel  (Edit to resize images) Last edited by BigDave; 02/06/2016 at 04:11 PM. |
|
|

|
|
|
#2 |
|
Registered Member
Join Date: Apr 2008
Location: Indianapolis
Posts: 2,447
|
Whats your thought on overflow? Any idea where you are going to place it in your house?
Looks like a good find. Its a TALL tank.... I would be looking at Radion, Hydra52, etc for lighting (if you are going to have corals).
__________________
120g DT 100lbs LR / 200 lbs LS, 45g fuge, VectraM1 Return, Herbie drain, 4x RW-8, 2x AI Hydra 26 w AWM, ASM G2, Apex controller, Apex BoB w floats ATO |
|
|

|
|
|
#3 |
|
Registered Member
Join Date: Oct 2015
Location: Chillicothe Ohio
Posts: 468
|
The pumps have the maker on them.
Visit MDM and check them out lol ! As for the reactors i would replace the media for sure, and rubber hoses...rubber seals....urchin skimmer as well....I would replace all rubber o rings and hoses. Soak the pumps a while in straight vinegar, as well as anything that looks crusty. Che,k your probes carefully. If they weren't stored wet they are probably bad. Don't know what you paid but it looks as if you got a lot for the money lol ! Good find !
__________________
"But did you die !" Current Tank Info: 75g nondrilled reef. |
|
|

|
|
|
#4 |
|
Registered Member
Join Date: Jul 2002
Location: Wylie, TX
Posts: 473
|
The price was the most amazing part... $0. Although after seeing everything he was giving me, I told him I'd give him some money. My ethics got in the way.
Regarding the overflow... I'm not really sure what to do about that. Part of me is thinking of building an acrylic over flow box both on the inside and the outside. I'd leave the 3" hole through the glass without a bulk head. Then I could setup a BeanAnimal's style overflow in the outside box. |
|
|

|
|
|
#5 |
|
Registered Member
Join Date: Aug 2015
Posts: 960
|
That is a nice set up and you can't beat the price. I hope you can get it up and running soon. You will sure enjoy that size tank...
|
|
|

|
|
|
#6 |
|
Registered Member
Join Date: Jan 2004
Location: Orlando, FL
Posts: 3,082
|
That's a really cool sized tank. I think you'd be better off with the 40b for the sump than using that wet dry. You'd have to have a stand that could fit a 36" tank though.
__________________
Current tank: Red Sea Reefer 350 Deluxe, Avast Marine Pegleg 180 skimmer, Gyre 150, Eheim 1262 return |
|
|

|
|
|
#7 |
|
Registered Member
Join Date: Jul 2002
Location: Wylie, TX
Posts: 473
|
We thought about that on the 40b for the stand. Since the overflows are in the back of the tank, we'll probably have the extra 6" to run pipes up and down already, so squeezing the 40b in should be OK.
|
|
|

|
|
|
#8 |
|
Registered Member
Join Date: Jul 2002
Location: Wylie, TX
Posts: 473
|
I started designing the stand last night in Autocad. It looks like we'll be using 2x2 square steel tubing with 3/4" Plywood across the bottom and two layers of 3/4" for the tank to sit on.
It also looks like I'll be using both the 40b and the wet/dry. My plan is to put the wet/dry inside the 40b. I also emailed mdm incorporated about my pumps and they sent me the following reply: <<<< Thanks for providing the serial numbers from the pumps. The number 80880 is part of the Sequence 750 series and is equivalent to the 3600SEQ12 which will provide a max flow of 3600 GPM at zero feet of head and tops out at 12' of head pressure at zero flow. The number 80250 is part of the Sequence 1000 series and will provide a max flow of 5400 GPH at zero feet of head and tops out at 19 feet of head pressure at zero flow. Hope this helps. Let us know if you need anything else. >>>>> Doing some quick algebra, that should be about 2100GPH and 3979GPH at 5' for the two pumps, or roughly 6,000GPH ~ 50x turnover between the two. Would you put the oceans motions on the larger pump and have less turnover through the sump, or would you do it the other way? |
|
|

|
|
|
#9 |
|
Registered Member
Join Date: Jul 2002
Location: Wylie, TX
Posts: 473
|
Progress!
It has been way too long since I've updated this page. Let's just say life doesn't always go as planned. I bought all the steel and my coworker and I cut all the pieces for the stand back in March. In early April we had two hail storms hit our house 2 weeks a part causing over $60,000 in damage. We ended up living in a hotel for 2.5 months and just got back into our house early June. After taking care of more house stuff, I was finally able to start back in on the reef tank a week or so ago. We're almost through welding the stand and I'll have some pictures of that tomorrow. I'm hoping to have the thank sitting on the stand in the garage by the end of this weekend ready for me to start doing the roughing in of the plumbing. Then I'll fill it with tap water for a week or so leak test. Progress has been extremely slow as of late, but will hopefully quicken up in the coming weeks. I also bought my 4 55 gallon water storage containers. 1 for fresh, 1 for salt, and 2 for waste water for watering plants/toping off swimming pool. I need to build a stand for those. And I bought a pressure pump to feed the RO/DI with. Here's my welder standing on the stand 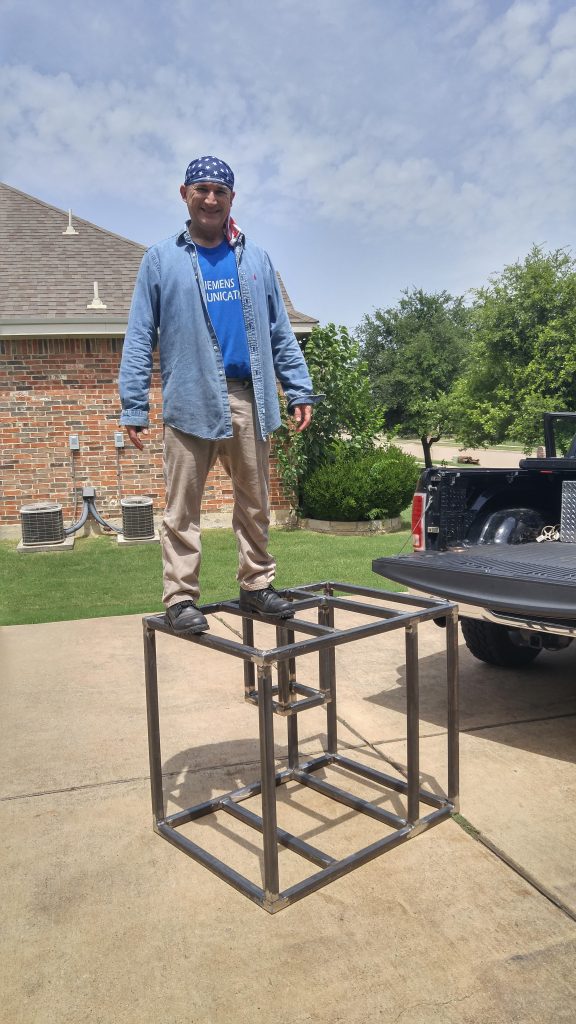
|
|
|

|
|
|
#10 |
|
Registered Member
Join Date: Jul 2002
Location: Wylie, TX
Posts: 473
|
We finished the welding on the stand and I got the plywood installed. If you take a look at the sump picture, you can see my time spent in CAD paid off. The sump slides into it's spot Perfect. The two pumps are sitting pretty close to where they will be installed. Next up is lifting the tank up onto the stand. I have two guys from work coming over one evening this week to help with that task. 2 people can lift it, but it's not fun. 3 should make the job easier.
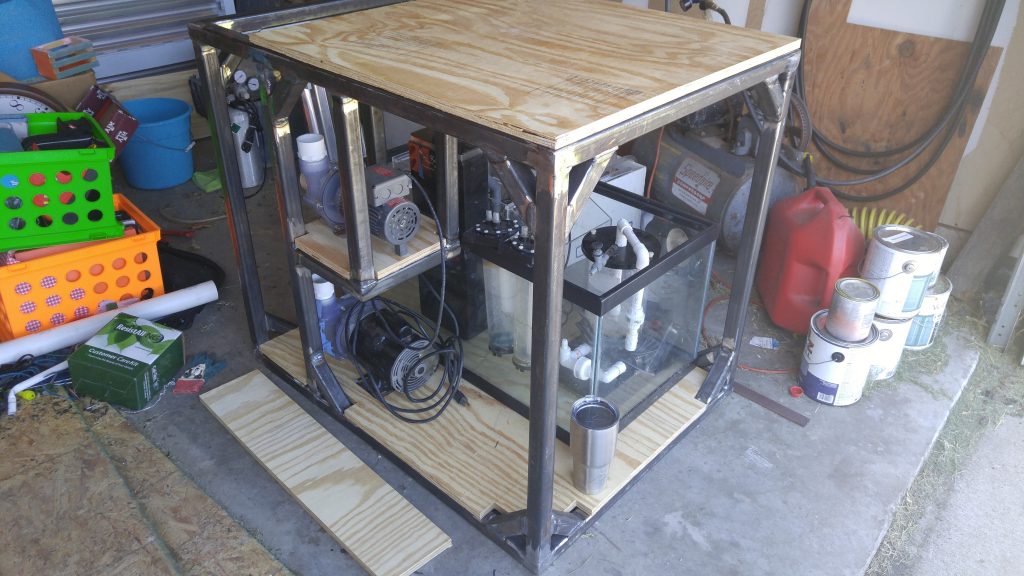 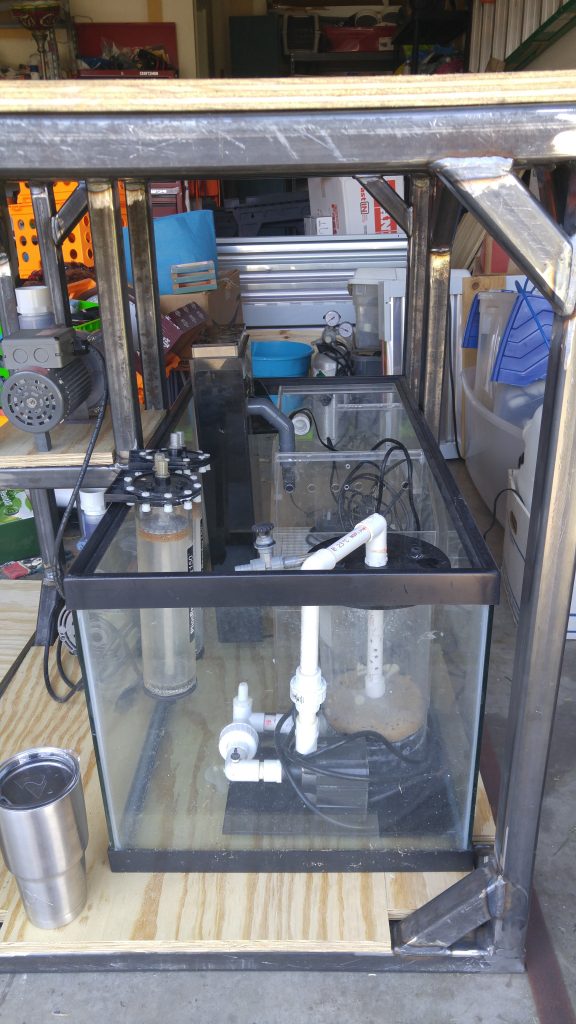
|
|
|

|
|
|
#11 |
|
Registered Member
Join Date: Aug 2008
Location: Mount Juliet, TN
Posts: 4,528
|
Great start! That is an unreal amount of flow for that size aquarium, I would definitely get some valves for the pumps, I think you'll have to dial back the return for sure.
|
|
|

|
|
|
#12 |
|
Registered Member
Join Date: Jul 2002
Location: Wylie, TX
Posts: 473
|
I have a Mak4 sitting in the garage too.
I'm considering using the smaller 'big' pump for the main pump and the Mak4 for the closed loop. I hate the idea of putting ball valves on pumps to restrict flow. It always makes me feel wasteful. I'll install everything as it sits and we'll see how bad it really is. Then I can tear the big pump out if it's too ridiculous. |
|
|

|
|
|
#13 |
|
Registered Member
Join Date: Aug 2008
Location: Mount Juliet, TN
Posts: 4,528
|
The restriction does usually come with a drop in electricity usage, although I don't think it's proportional.
|
|
|

|
|
|
#14 |
|
Registered Member
Join Date: Sep 2013
Location: Wylie (Dallas) Tx
Posts: 231
|
Frame looks great! I live in Wylie as well and we got hit with those same 2 storms also. No idea how my 225g survived the softball sized hail coming through the front windows but it never even got touched thankfully. None the less, we had to vacate the house in April as well during the repairs and the tank had to be broken down and moved to storage until we get back in late august/ early september. Keep us posted on the progress!
__________________
Todd 225g mixed reef, T5s, RO skimmer, Vortech and Tunze, Trigger System sump 40b QT / observation tank, 2-10gs for TTM |
|
|

|
|
|
#15 |
|
Registered Member
Join Date: Jul 2002
Location: Wylie, TX
Posts: 473
|
And now we have a tank on the stand. I will hopefully start plumbing this thing tonight.
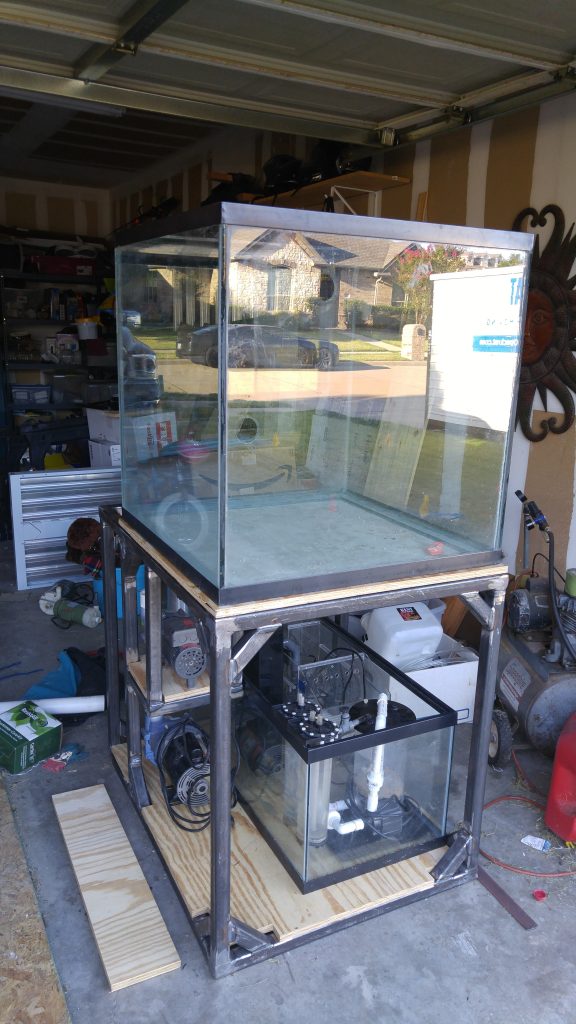
|
|
|

|
|
|
#16 |
|
Registered Member
Join Date: Jul 2002
Location: Wylie, TX
Posts: 473
|
Plumbing
I got quite a bit of the plumbing done this weekend. I started on Saturday and quickly started running out of materials. Then I hit a snag. I found out the bulkhead I got for the closed loop was not quite big enough for 2″ PVC to go in to.
I ended up pulling out the lathe, making a plug for the 2″ PVC to go on, and then taking just enough off so that it would slide into the drain. Once all done, I put it back on the tank. Once I had that fixed, it was time to continue plumbing the rest of the pumps. By the end of the day Sunday, I had all of the drains for the over flow done and both inlets into the two pumps plumbed. Left to do is plumb the return from the main pump, the manifold for the equipment on the main pump, and the return through the Oceanís Motions for the closed loop. All the pipes are currently dry fit. I still need to go back and glue everything in place. Making the pipe fit 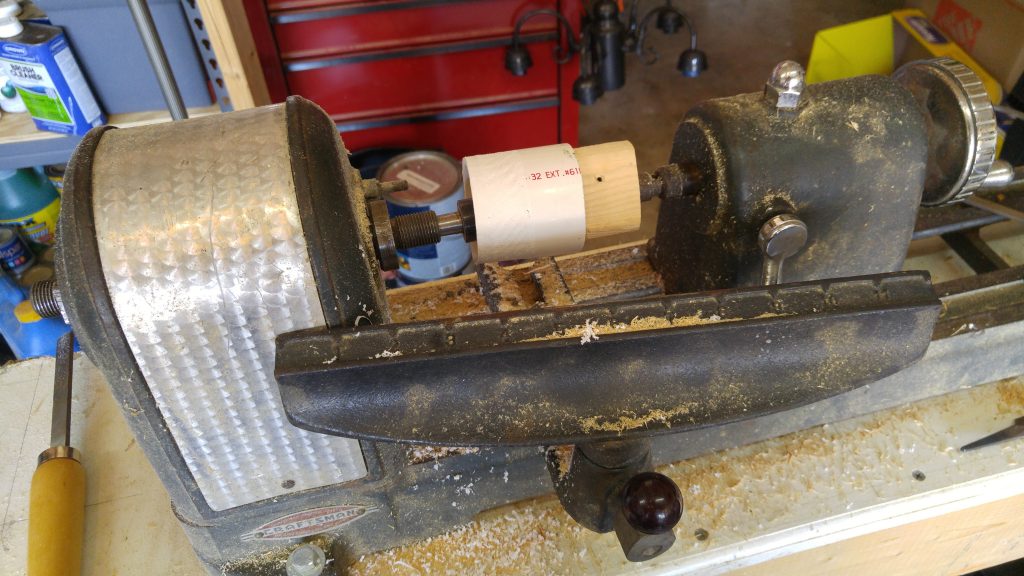 Much better 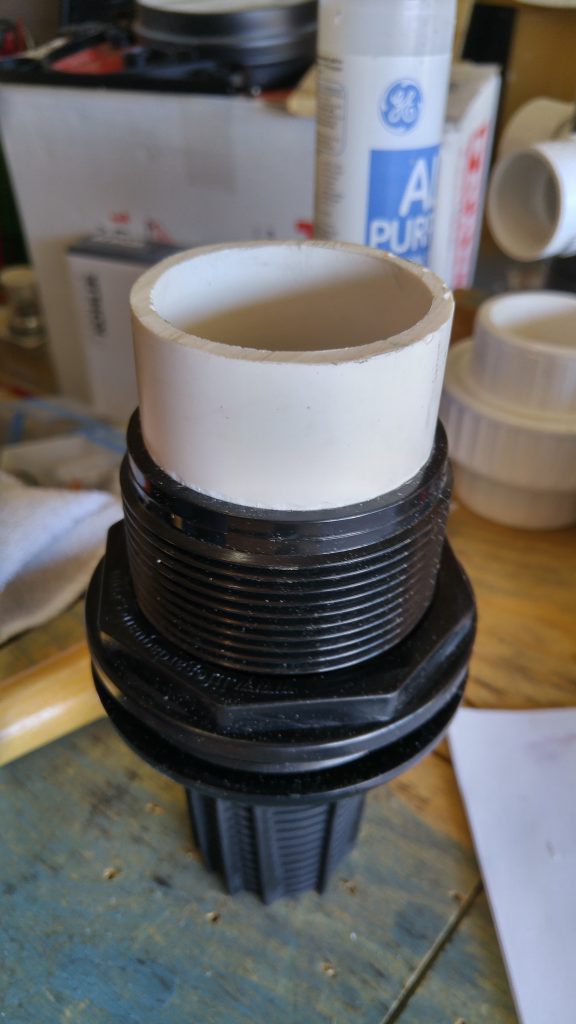 As it currently sits 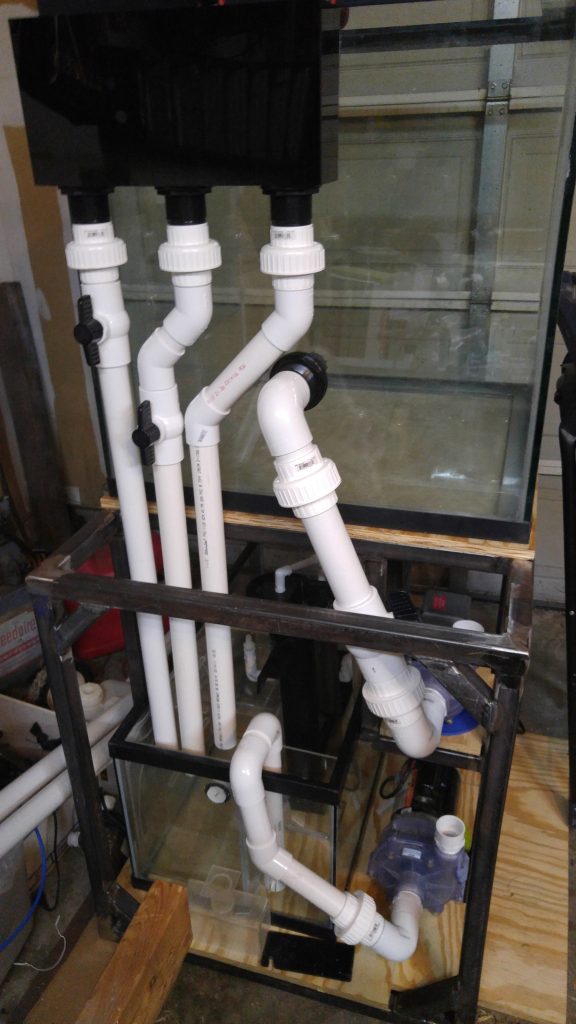 All the parts left to make fit 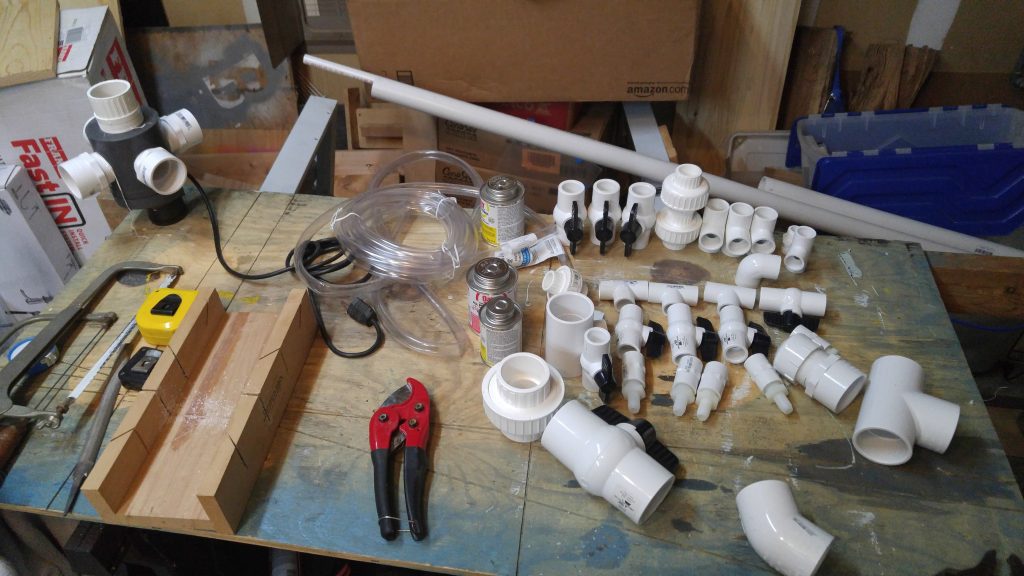
|
|
|

|
|
|
#17 |
|
Registered Member
Join Date: Jul 2002
Location: Wylie, TX
Posts: 473
|
One of the things I'm doing with this build is I'm writing my own aquarium controller. I'm using an Arduino/Pi combo. The Pi is used for user IO and for timing and the Arduino is running all the Aquarium IO.
Last night I pulled the box off of the workbench to test it and found out the touchscreen has gone out. My guess is there was something sitting on it for the last few months and it looks like the corner of the screen is cracked. Luckily these little screens are relatively cheap. I'll just order another one. |
|
|

|
|
|
#18 |
|
Registered Member
Join Date: Jul 2002
Location: Wylie, TX
Posts: 473
|
Also, I think I should have put this post in the Tank Build section... anyone know how to get it moved there?
|
|
|

|
|
|
#19 |
|
Registered Member
Join Date: Sep 2013
Location: Grand Rapids MI area
Posts: 737
|
Nice job so far, can't wait to see it full!
|
|
|

|
|
|
#20 |
|
Registered Member
Join Date: Jul 2002
Location: Wylie, TX
Posts: 473
|
More Plumbing Spaghetti.
More Plumbing Spaghetti.
I got the chance to work on the plumbing some last night. I don't always get time to work on the tank during the week, mostly due to the Texas heat and the fact my garage faces South. I was able to finish off the main pump return and start in on plumbing the ocean's motions wave maker. I used J hooks to hang the wave maker horizontally and also used some zip ties to help support the motor side of the wave maker. Finally I got one of the 4 wave maker returns ran to the top of the tank. It's supposed to rain all weekend, so I should be able to finish the dry fitting of all the plumbing and get it all glued up as well. Here's the updated photo from the back of the tank You can see the top of the wave maker in the middle bottom of the pic. 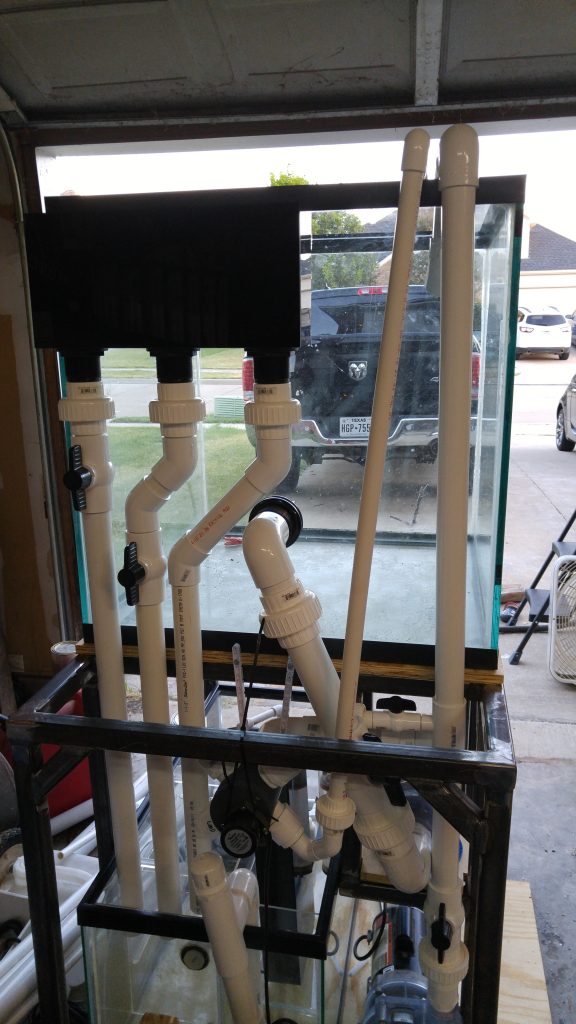 Here's a quick photo looking down into where all the plumbing is being ran. You can see that things are starting to get tight in there. 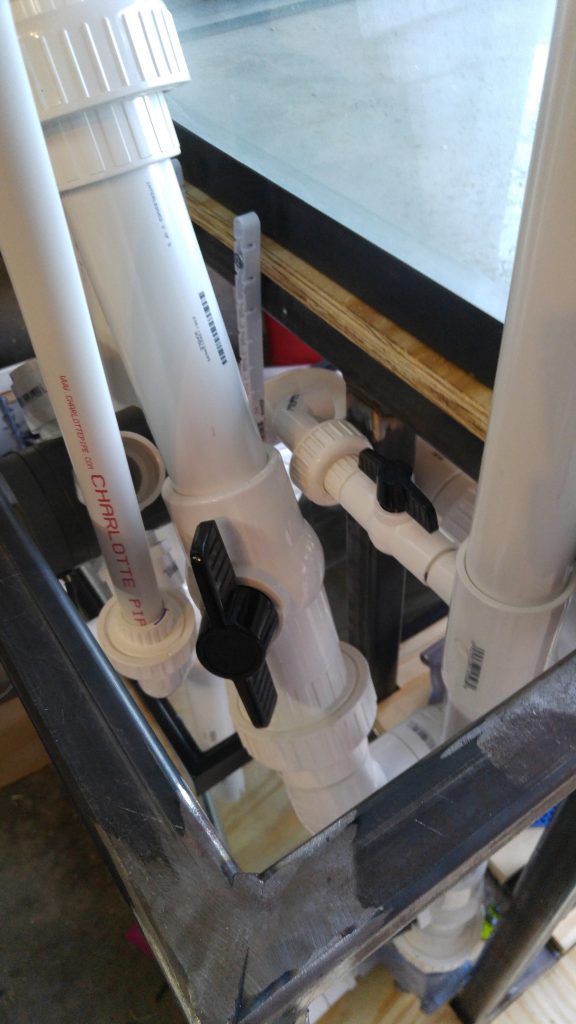 This last image shows the plumbing from the front right of the stand back towards the plumbing showing how the water is getting from the closed loop pump to the wave maker 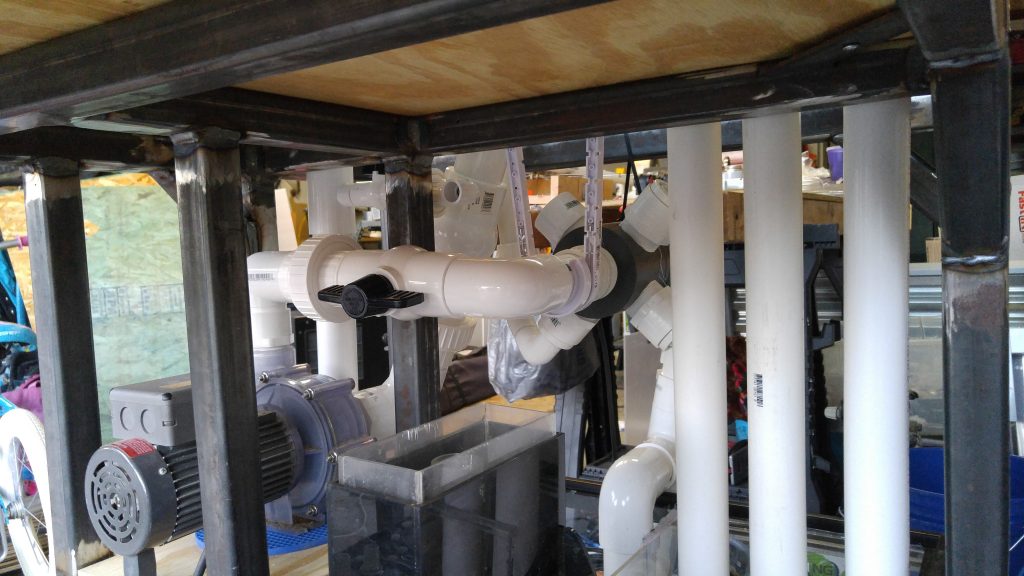
|
|
|

|
|
|
#21 |
|
Registered Member
Join Date: Aug 2001
Location: California
Posts: 2,259
|
Looks good. Question - what about water or salt creep on that stand?
__________________
-saf1 Current Tank Info: 210 gallon mixed reef |
|
|

|
|
|
#22 |
|
Registered Member
Join Date: Jul 2002
Location: Wylie, TX
Posts: 473
|
I'm just setting everything up in the garage to test. Once finished I plan on tearing everything down and sealing/painting everything... Pipes, stand, plywood and back of tank.
Sent from my VS986 using Tapatalk |
|
|

|
|
|
#23 | |
|
Registered Member
Join Date: Aug 2001
Location: California
Posts: 2,259
|
Quote:
Thanks.
__________________
-saf1 Current Tank Info: 210 gallon mixed reef |
|
|
|

|
|
|
#24 |
|
Registered Member
Join Date: Jul 2002
Location: Wylie, TX
Posts: 473
|
Ah. Nope. Nothing special. I'll give it a few coats of an etching primer, then a few coats of color. I'm thinking red for the steel, white for the wood, blue for the pipes and black for the back of the tank.
Sent from my VS986 using Tapatalk |
|
|

|
|
|
#25 |
|
Registered Member
Join Date: Jul 2002
Location: Wylie, TX
Posts: 473
|
Oops. Glued a union on without putting the collar on first. Will have to make a quick run to Lowe's to get replacement parts, but should be able to fill the tank up tonight.
Sent from my VS986 using Tapatalk |
|
|

|
 |
|
|